This product version has reached end of life and is no longer supported. Click here for the latest documentation.
Service Studio 8.0 Help
Advanced Logic Canvas
The Logic Canvas of the Advanced query editor is where you type the SQL query you want to execute. Advanced queries are written using standard SQL . Service Studio validates if your query matches the output structure that you have specified and presents warning messages when something is not correct.
Since the OutSystems Platform will translate the Entities and Attribute names into their physical table names, there are a few syntax rules you should follow to ensure your queries are built to change.
Using Entities
Use entities in your advanced query by typing {EntityName} .
As an example, a query to select all attributes from the Users entity would be expressed as Select {User}.* from {User};
Using Entity Attributes
To refer to a specific attribute you should use {EntityName}.[AttributeName] . As an example, a query to only select the Id attribute from the Users entity would be expressed as Select {User}.[Id] from {User} ;
You can use auto-complete ( ctrl+space ) to make Service Studio create this notation for you. This way you can write your SQL statements and let Service Studio worry about the brackets.
Selecting all Attributes
To select all attributes you should use the notation {Entity1}.*,{Entity2}.* .
Specifying the entities' names in the select statement, instead of just using Select * has two benefits:
Service Studio automatically checks if the query's result matches the Output Structure specified, preventing runtime errors;
You are assured that the query will not misbehave even when you change the Entity definition.
Since the OutSystems Platform expands the syntax Select {Entity}.* into Select PhysicalTable.Attribute1, PhysicalTable.Attribute2 ... this ensures that even when you change the order of the attributes, delete, or add an attribute in the entity definition, the select statement will return the expected result.
On the other hand, if you only use Select *, the OutSystems Platform executes the statement without expanding it, meaning that you might get errors if you change the Entity definition after it has been created. To learn more about this issue, check this forum post .
Using Input Parameters
To refer to input parameters declared on your queries, use @ParameterName . As an example, a query to select users based on their name would be expressed as Select {User}.* From {User} Where {User}.[Name] like @Username;
Writing Advanced Queries
Select
To query an entity, simply write your SQL query following the notation explained above. As an example:
Select {User}.[Id] from {User} where {User}.[Name] like '%@SearchKeyWord%' order by {User}.[Name] Asc
Insert, Update, Delete
Advanced queries also support inserting, updating and deleting records from the database. However if you only intend to insert, update or delete a single record, you should use the available Entity Actions instead .
Since the Output Structure is mandatory, you need to specify one, even if your SQL query does not return any result.
Advanced Scenarios
Querying Entities from Other eSpaces
To design queries that contain entities from other eSpaces, simply import the entities using the References window . After importing the entities, you can use them in your queries just like if they were defined in your own eSpace.
To insert, delete or update records from a referenced entity, in the producer eSpace you need to set the entity 'Public' property to 'Yes' and 'Expose Read Only' to 'No', otherwise a runtime error is thrown.
Querying Tables from Other Databases
There are two ways of querying tables from other databases: using extensions, or linked server.
Using an Extension
Integration Studio, which allows you to import Entities from an external database . Integration Studio automatically creates an Entity and Entity actions for each table imported.
After publishing the extension, you can reuse the entity inside the Service Studio through the References window and execute queries just like the entity was created using Service Studio.
Using a Linked Server/Database Link
If your OutSystems Platform database is already configured to use a linked server/database link, you can simply query the tables in the external database using standard SQL.
This technique adds a performance penalty to your applications, since the queries are sent to the OutSystems Platform database server that then sends them to the linked server to be executed.
Using Stored Procedures
Advanced queries allow you to run stored procedures defined either on the OutSystems Platform or external databases. To execute a stored procedure, you need to ensure the OutSystems Platform runtime user has permissions to do so.
Since the Output Structure is mandatory, you need to specify one, even if the stored procedure does not return any results.
Limitations
The OutSystems Platform does not read the stored procedure output parameters: you will be able to execute a stored procedure but if it returns some result you will not be able to used it in your logic. If you need to read the output parameters of stored procedures, create an extension using Integration Studio that encapsulates this logic.
Changing the Default Connection
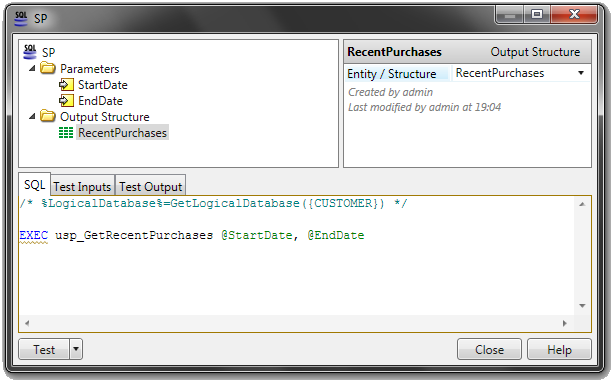
By default, Service Studio analyses the entities used in the advanced query to use the appropriate database connection. However there are scenarios in which you don't specify any entity in your SQL query, for example when invoking stored procedures. In such scenarios you need to specify which connection to use, by using the syntax /* %LogicalDatabase%=GetLogicalDatabase({Entity Name}) */
To do so, you need to have at least one entity imported from the same database you want to invoke the procedure. After creating the extension to import the entity, use the references window in Service Studio to import the entity into your eSpace. In this example the CUSTOMER entity was imported so that we could connect to the correct database and run the usp_GetRecentPurchases stored procedure.
See Also