Developing with OutSystems
As your OutSystems application scales, performance challenges inevitably appear. What once was a simple search bar, powered by SQL LIKE '%...%' queries, turns into a major bottleneck. Search latency rises, users experience delays, and your database starts to struggle.
Relational databases are excellent at transactional consistency, but they are not built for high-speed, full-text search across millions of records.
That’s where Elasticsearch comes in. For blazing-fast search in ODC, Elasticsearch wins.

Why use Elasticsearch with OutSystems
Elasticsearch is designed from the ground up for search performance and scale. When integrated with OutSystems, it brings:
- Advanced search capabilities: Full-text, fuzzy, and relevance-based matching across massive datasets.
- Real-time indexing: Data becomes searchable almost immediately after changes in your OutSystems app.
- Massive scalability: Handles millions (or even billions) of records with horizontal scaling.
- Database offloading: Frees your main database to handle transactions while Elasticsearch manages heavy query workloads.
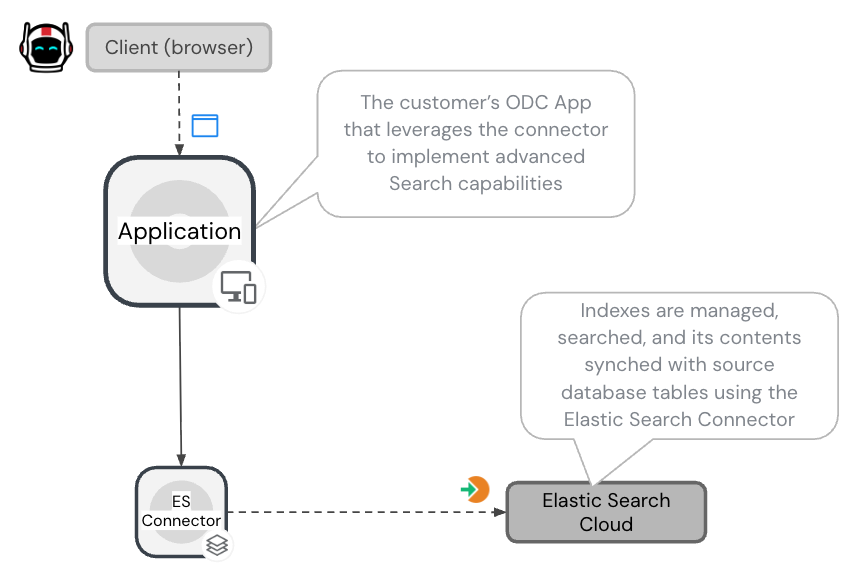
These benefits are easily unlocked with the OutSystems Elasticsearch Connector, enabling a smooth integration between your ODC app and Elastic Cloud.
Performance that speaks for itself
We compared performance of searches with optimized SQL queries in an ODC app against equivalent Elasticsearch queries using the same datasets:
- 1 million records (Persons table)
- 8 million records (Recordings table)
The difference was striking.
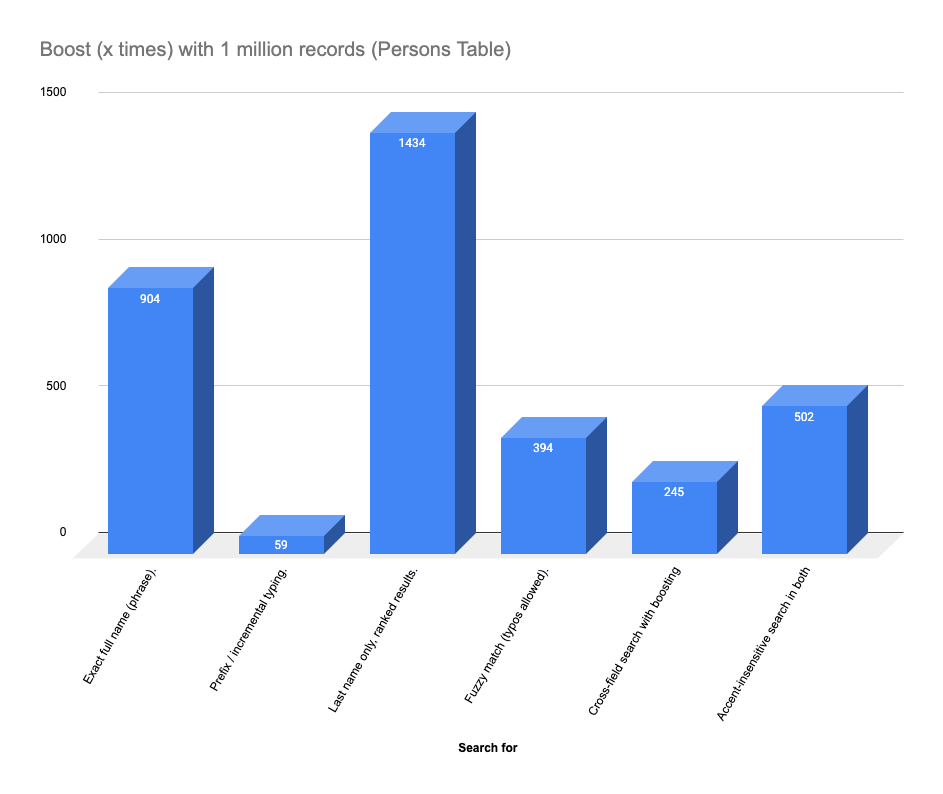
In the two graphs that follow, you can see the amount of boost you get when using ES to power/drive different types of searches on a 1-million-record table (Test 1) and then on 8 million records (Test 2).
Test 1: Performance comparison of searches with 1 million records (Persons table)
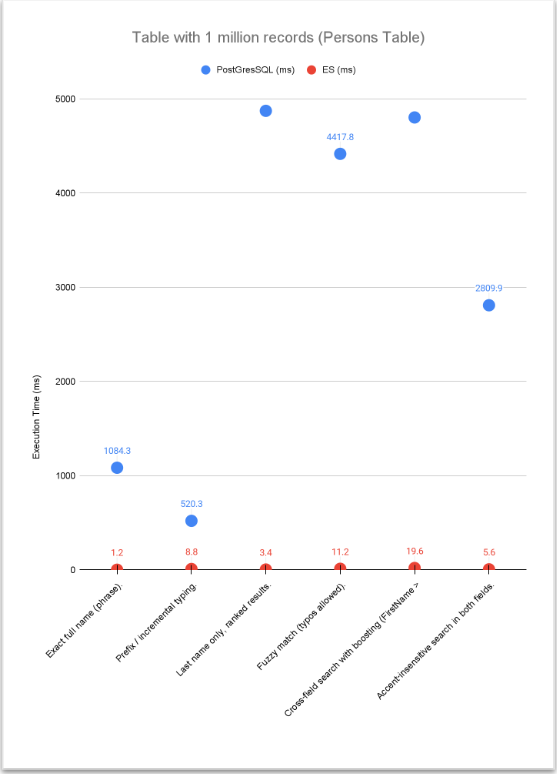
A “last name only” search took PostgreSQL nearly 5 seconds, while Elasticsearch completed it in just 3.4 milliseconds.
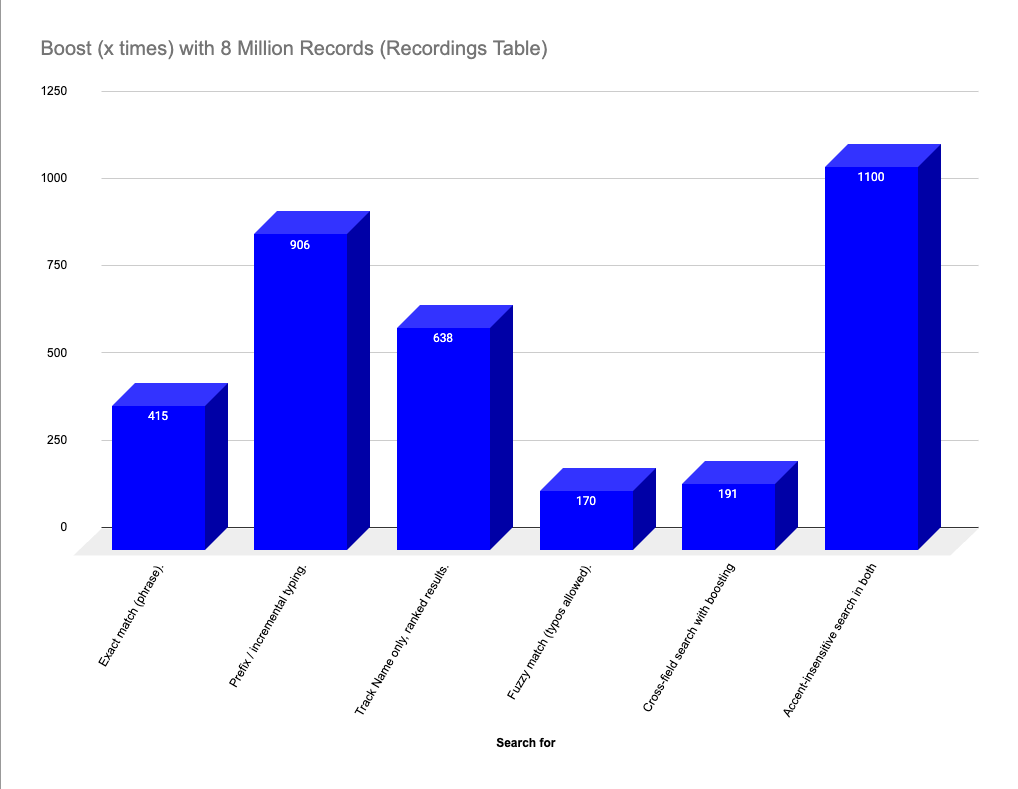
Test 2: Performance comparison of searches with 8 million records (Recordings table)
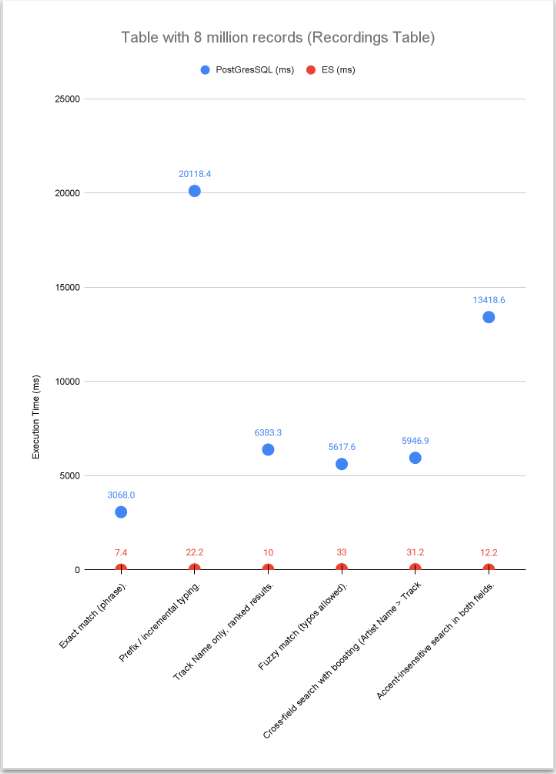
A prefix search like typing “Jo Do” (for “John Doe”) took the relational database over 20 seconds (20,118 ms)—completely unusable in production. Elasticsearch returned the same results in 22.2 milliseconds.
Notice how growing our test to deal with 8 million records (Graph for Test 2) makes this boost even more noticeable. So, as your data grows, SQL query times increase exponentially while Elasticsearch remains consistently fast, (often 900x to 1400x faster.).
This is how you deliver scalable, search-driven user experiences. OutSystems handles business logic and UI, while Elasticsearch powers search at the speed of thought.
Setting up Elasticsearch and the ODC connector
Ready to get started? It's time to walk you through the entire setup, from spinning up a free Elastic trial to installing and configuring the ODC connector.
Now let’s build your own instance and connect it to OutSystems.
This process takes about 15 minutes.
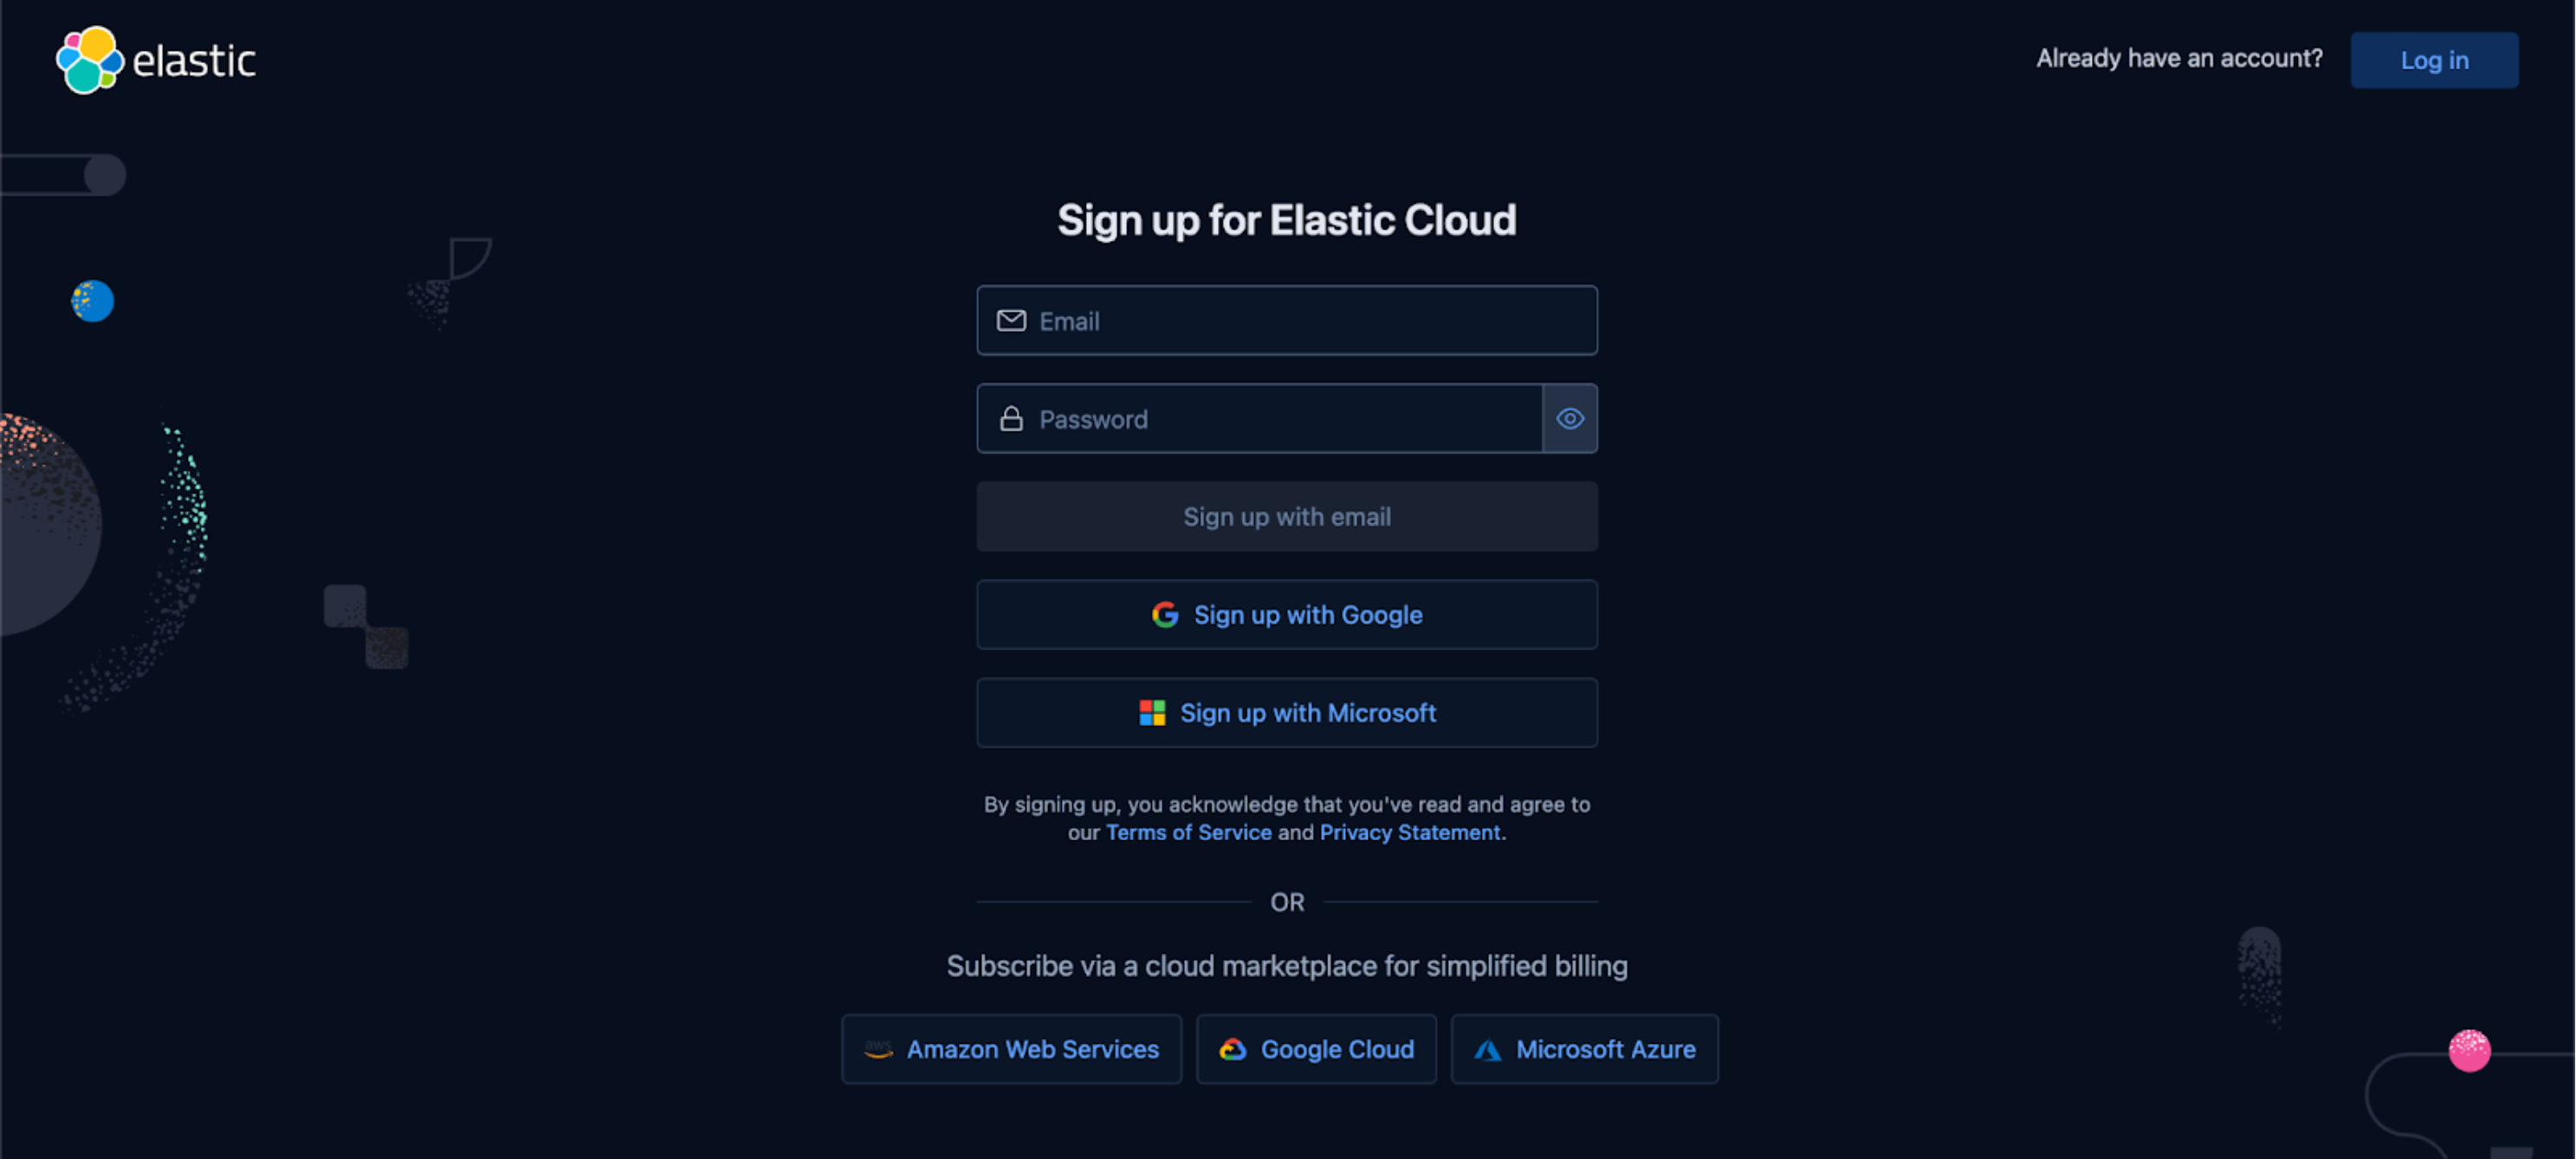
Step 1: Sign up for an Elastic Cloud trial
Visit elastic.co and start a 14-day free trial. No credit card is required.
You’ll get access to Elasticsearch, Kibana, and other Elastic Stack tools.
Step 2: Create your deployment
- Choose Elasticsearch as your solution.
- Give it a clear name (for example, odc-search-sandbox).
- Select your cloud provider (AWS, GCP, Azure) and region closest to your ODC tenant to minimize latency.
- Click Create Deployment.
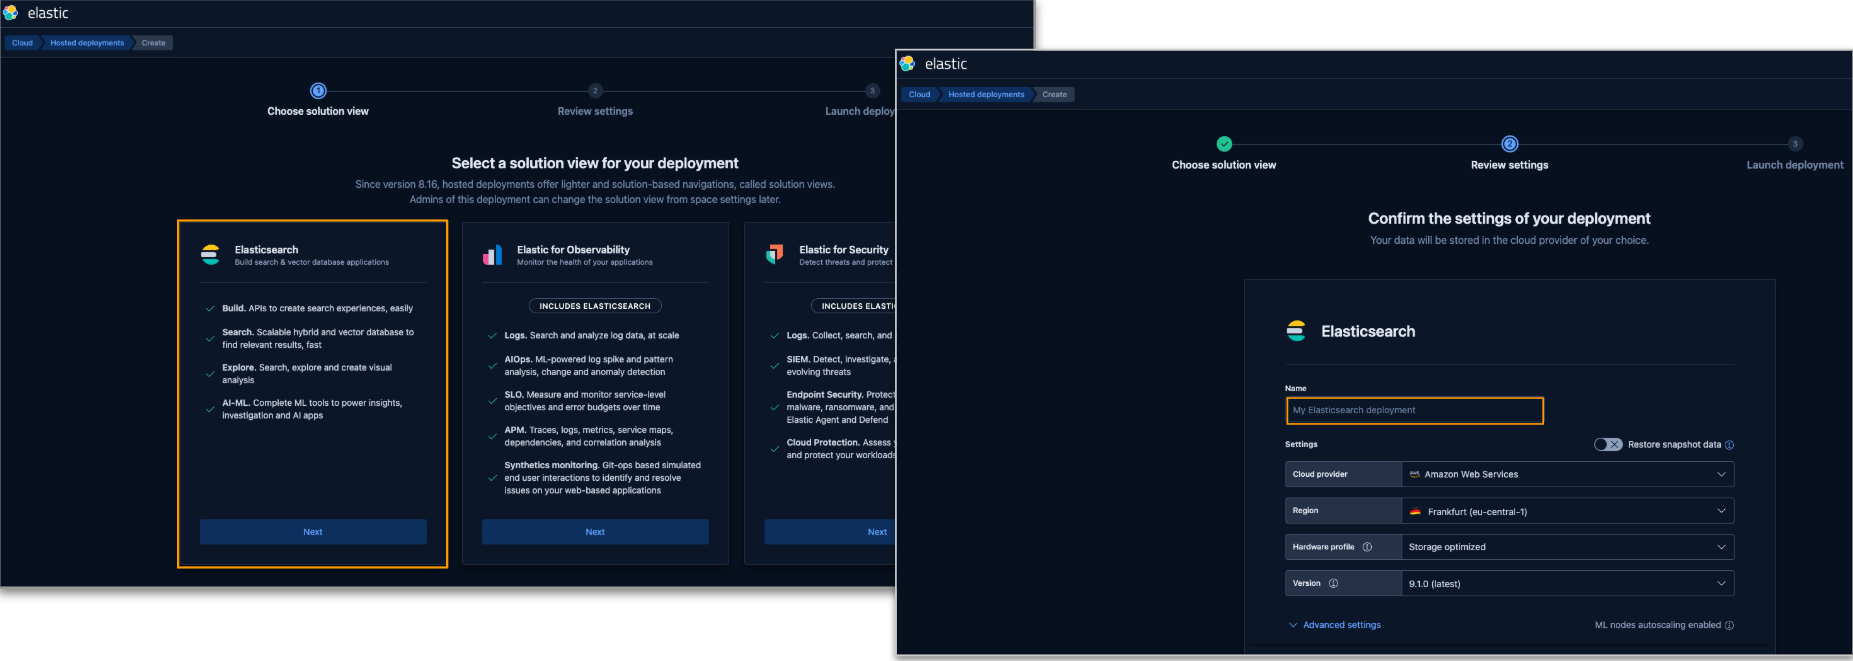
After a few minutes, your deployment will be ready.
Elastic will generate credentials. Save your admin password securely. It’s shown only once.
Step 3: Retrieve your endpoint and API key
Open Kibana from your deployment dashboard.
- Copy the Elasticsearch endpoint URL.
- Generate a new API key under Management → API Keys. Name it (for example, odc_connector) and save it safely.
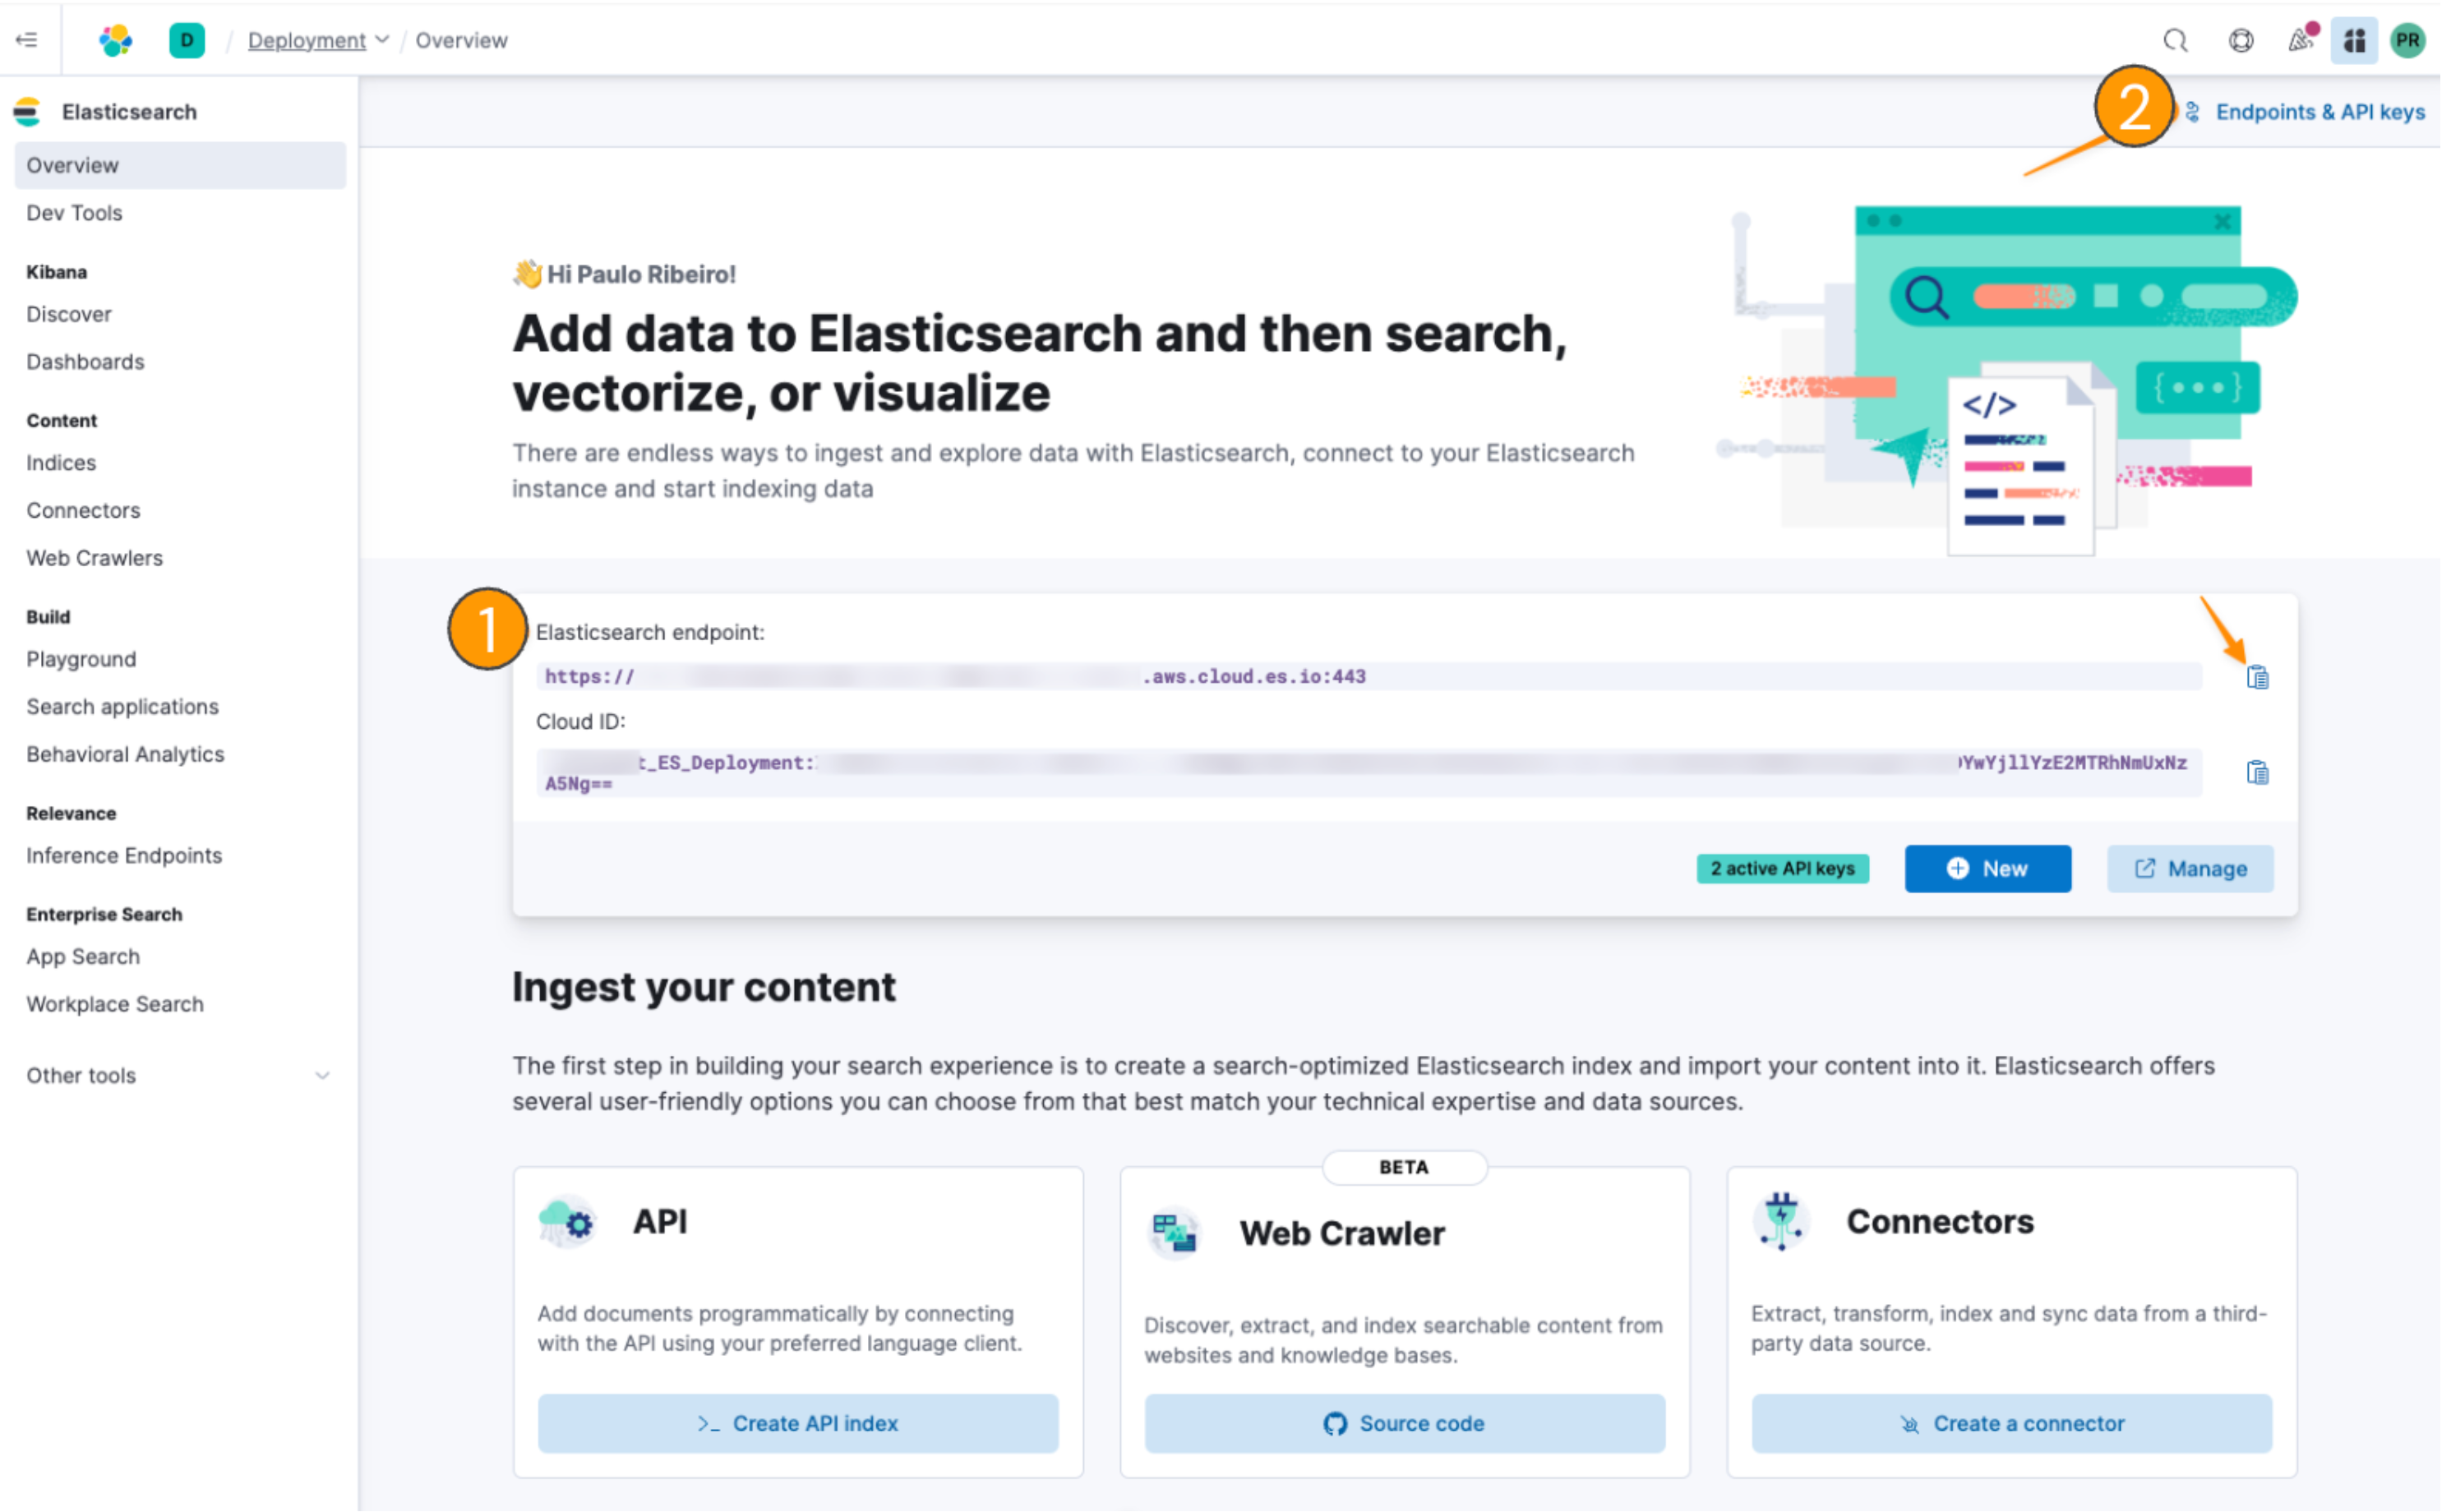
You can find both right inside the Kibana interface, which is the management tool for your deployment.
- On the main “Overview” page, you'll find your Elasticsearch endpoint. Copy this URL.
- In the top-right corner, click the "Endpoints & API keys" link. From here, you can create a new API Key. Give it a name (for example, “odc_connector”) and save the generated key.
Step 4: Install the OutSystems connector
With your keys in hand, head over to your ODC Portal.
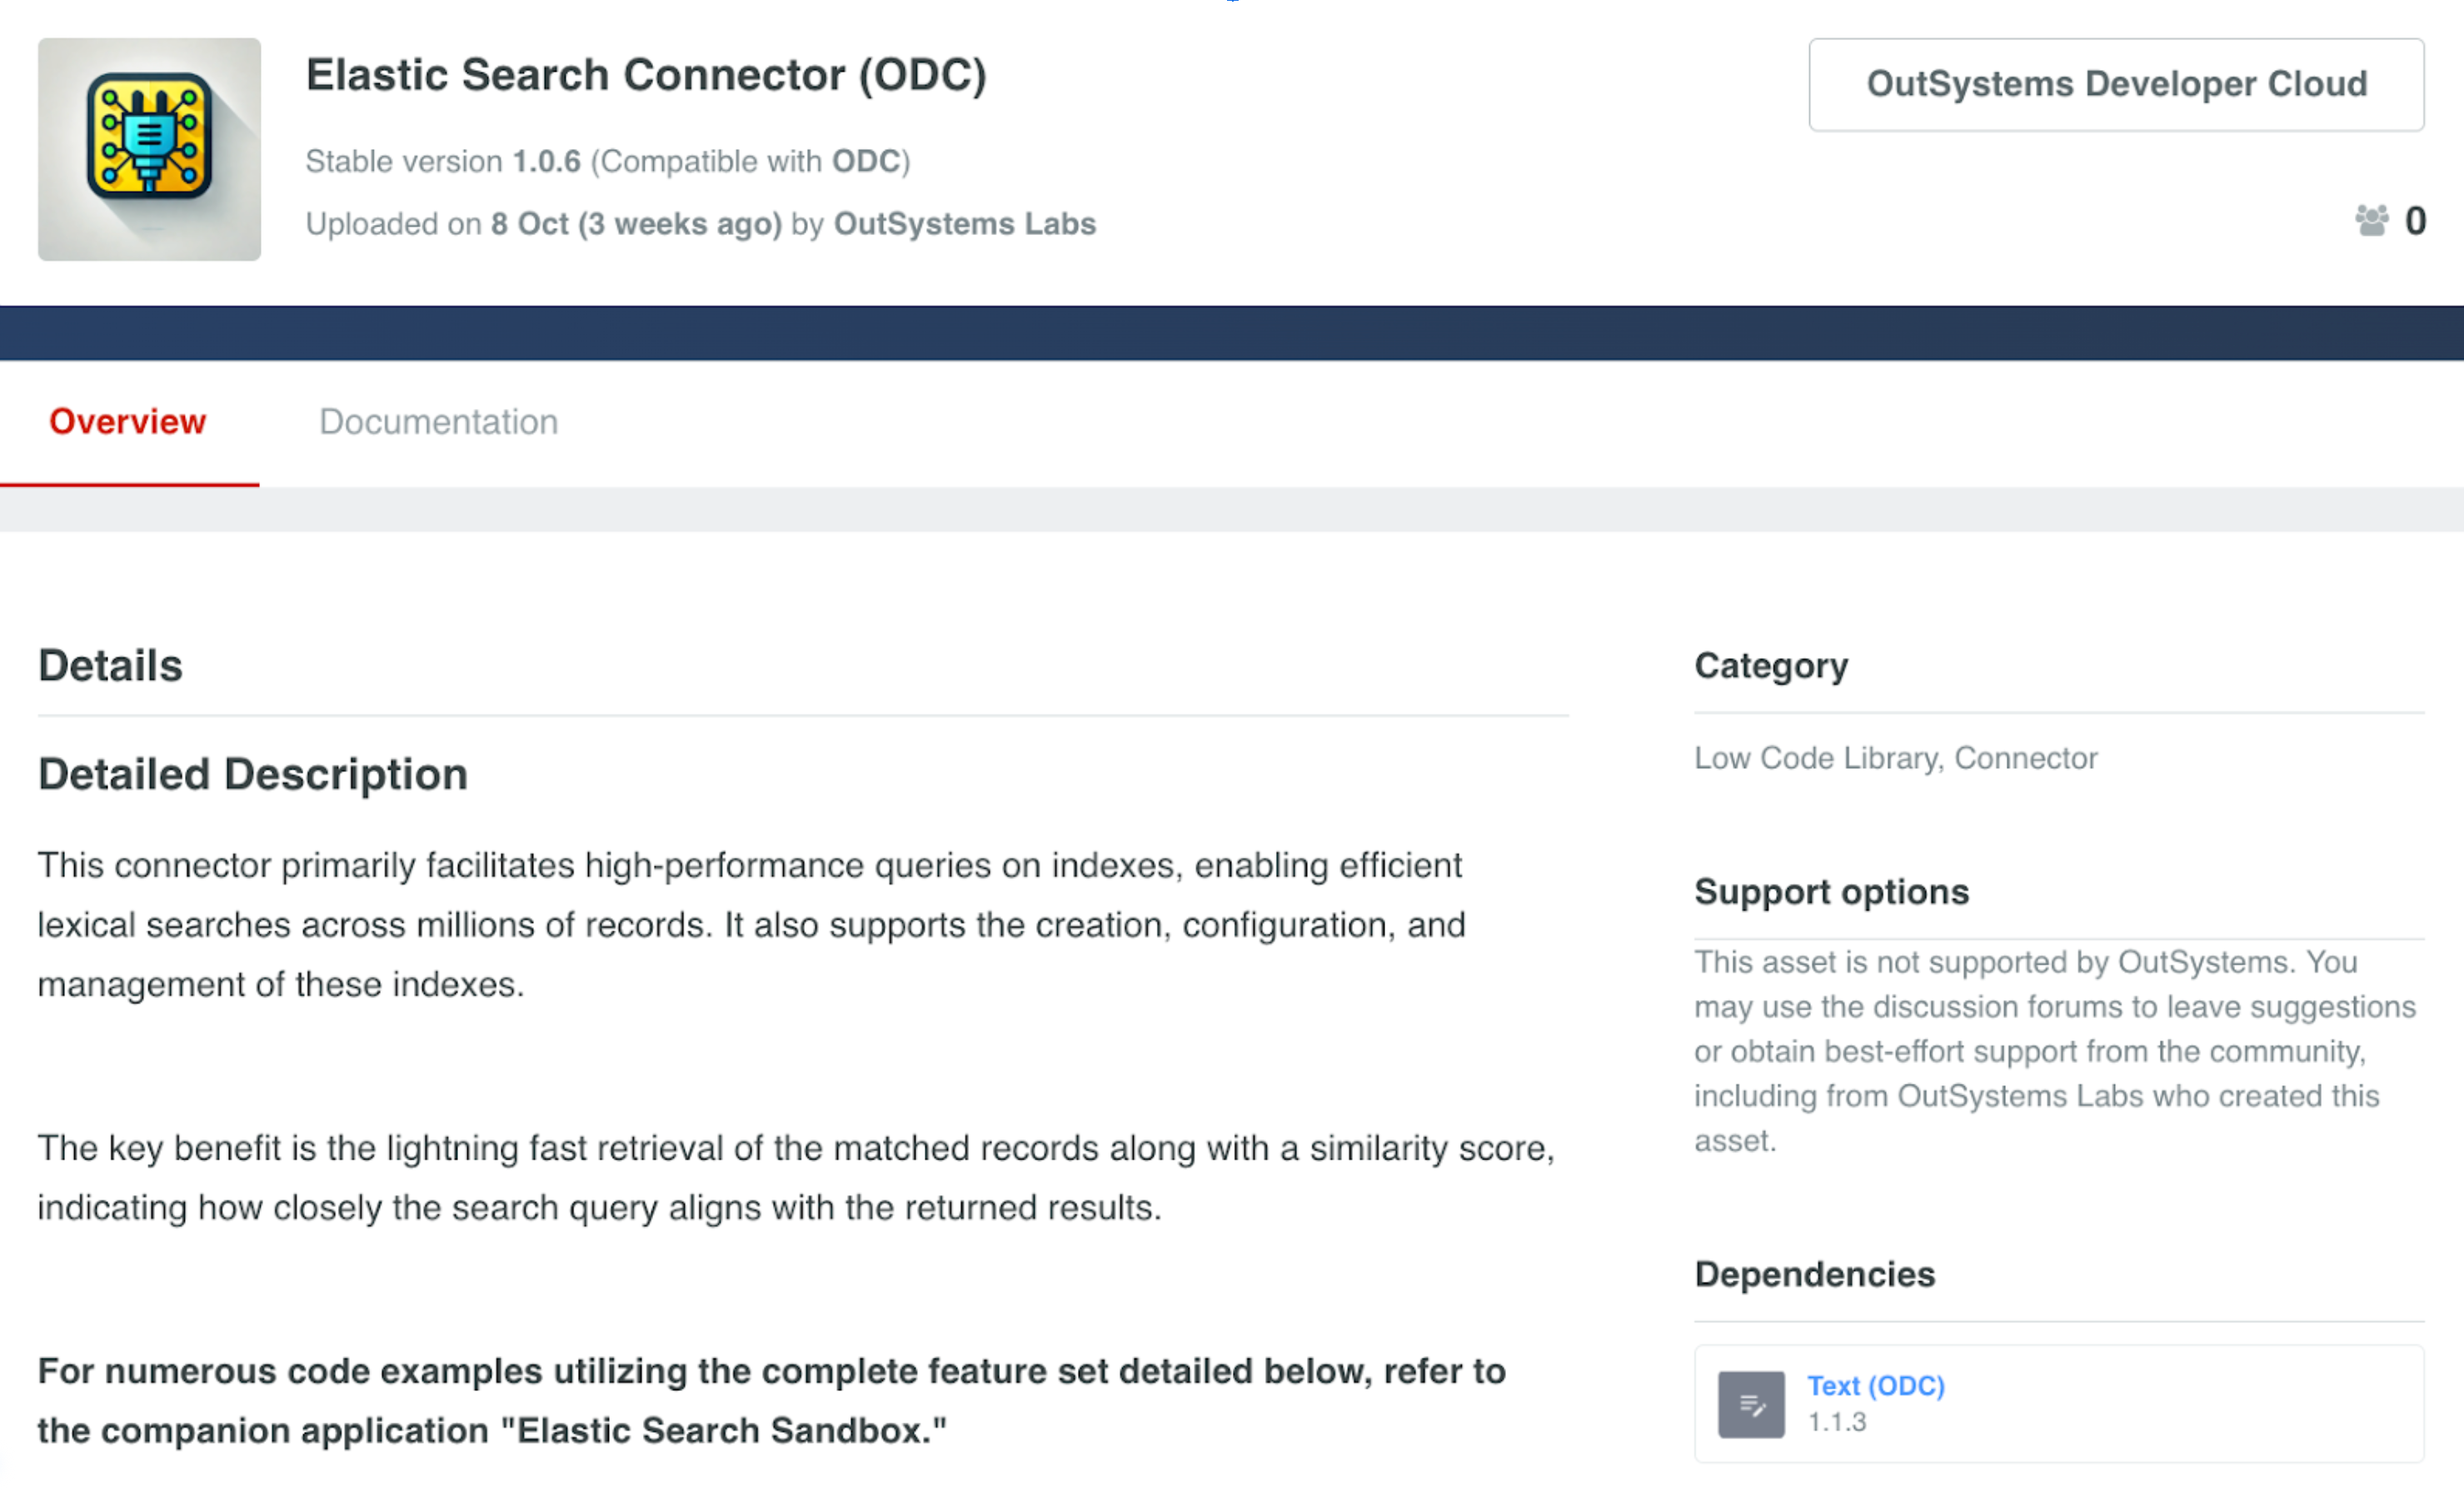
- Navigate to Forge -> All assets.
- Search for and install the “Elastic Search Connector.”
- Finally, open your ODC app and add a reference to the ElasticSearchConnector library.
Step 5: Configure your ODC app settings
The last step is to securely store the credentials your app needs to talk to Elasticsearch. We'll use ODC Settings for this.
- In the ODC Portal, go to your app and click on Configure -> Settings.
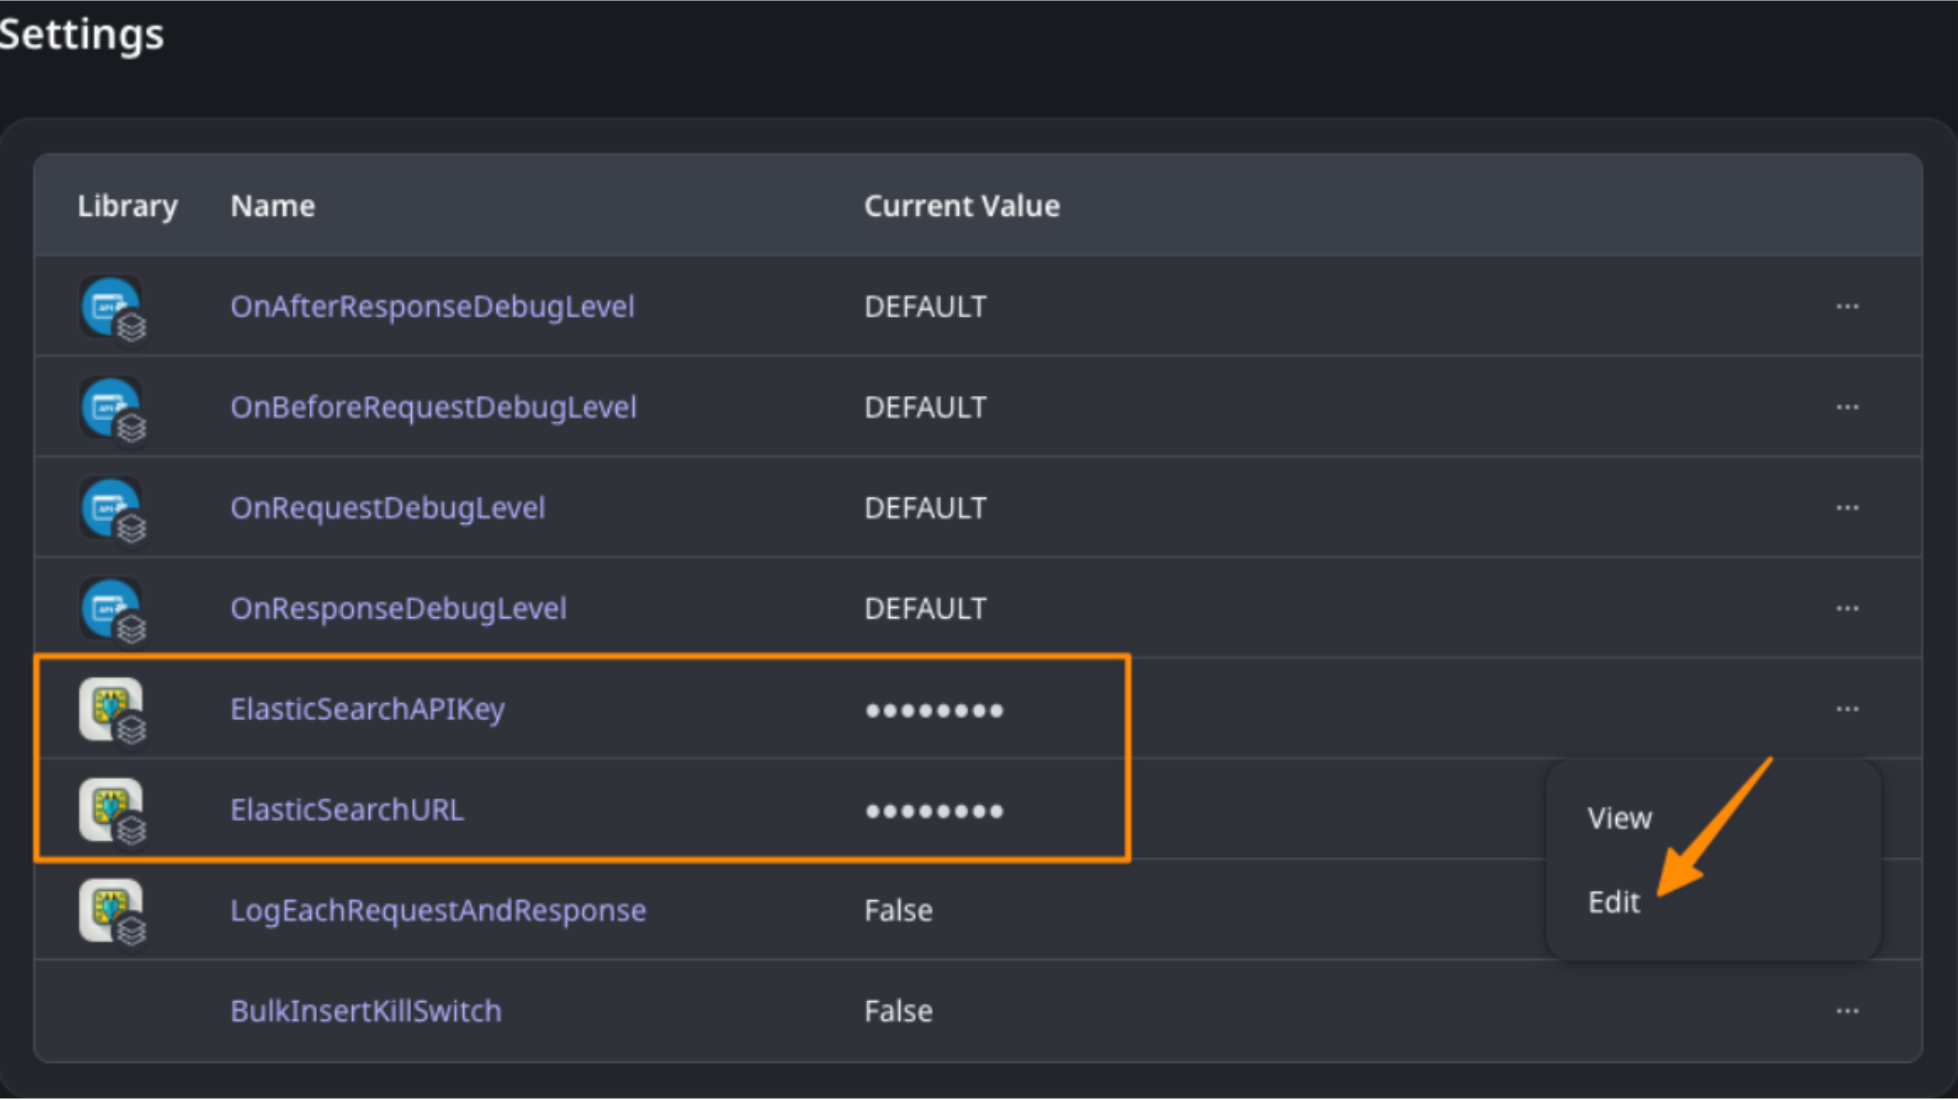
- Add two new settings:
- ElasticSearchAPIKey: Paste the API Key you generated in Step 3.
- ElasticSearchURL: Paste the Endpoint URL you copied in Step 3.
Bonus step: Explore the sandbox app!
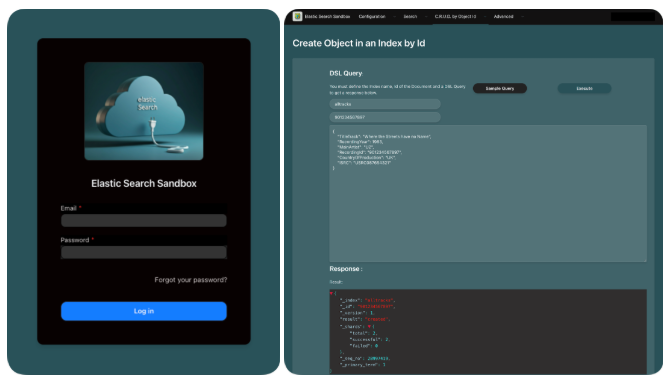
Want to see all the connector's features in action without writing any code? The team also published a companion app.
Go back to the Forge and install the “Elastic Search Sandbox.” This app is a massive accelerator, providing screens and sample queries for every feature, from index management to running complex DSL queries. It's the perfect way to test and learn.
And that's it! Your ODC application is now fully connected to a powerful Elasticsearch deployment.
Now, we get into the fun stuff: a deep-dive developer's guide to designing your indexes, keeping your data in sync, and running your first lightning-fast queries — all using the connector you just set up.
Developer guide: Indexing, syncing, and querying
It’s time to write some code and to provide practical, best-practice advice on how to design indexes, load data, keep data in sync, and execute queries using the connector. Here’s your hands-on guide to designing, loading, and querying your data using the Elastic Search Connector.
1. Designing your index: Best practices
Before you load data, you need to think about how to store it. An Elasticsearch “index” is like a database table, but it's optimized for search.
Tip 1: Denormalize your data for speed
Elasticsearch stores data as documents, not tables. Think denormalized and search-optimized.
Elasticsearch is not a relational database, so stop thinking in terms of joins. For fast searching, your “document” (the equivalent of a row) should contain all the data you want to search on.
- Map your entity: Think of each OutSystems entity record (a given PERSON record) mapping to one ES document.
- Create composite fields: If your entity has FirstName and LastName, add a FullName field to your index. This makes searching for "John Smith" much easier and more powerful.
- Include ODC entity ID: Always store your OutSystems entity's ID (for ex Person.Id) as a field in the ES document. This is the key to keeping your data in sync.
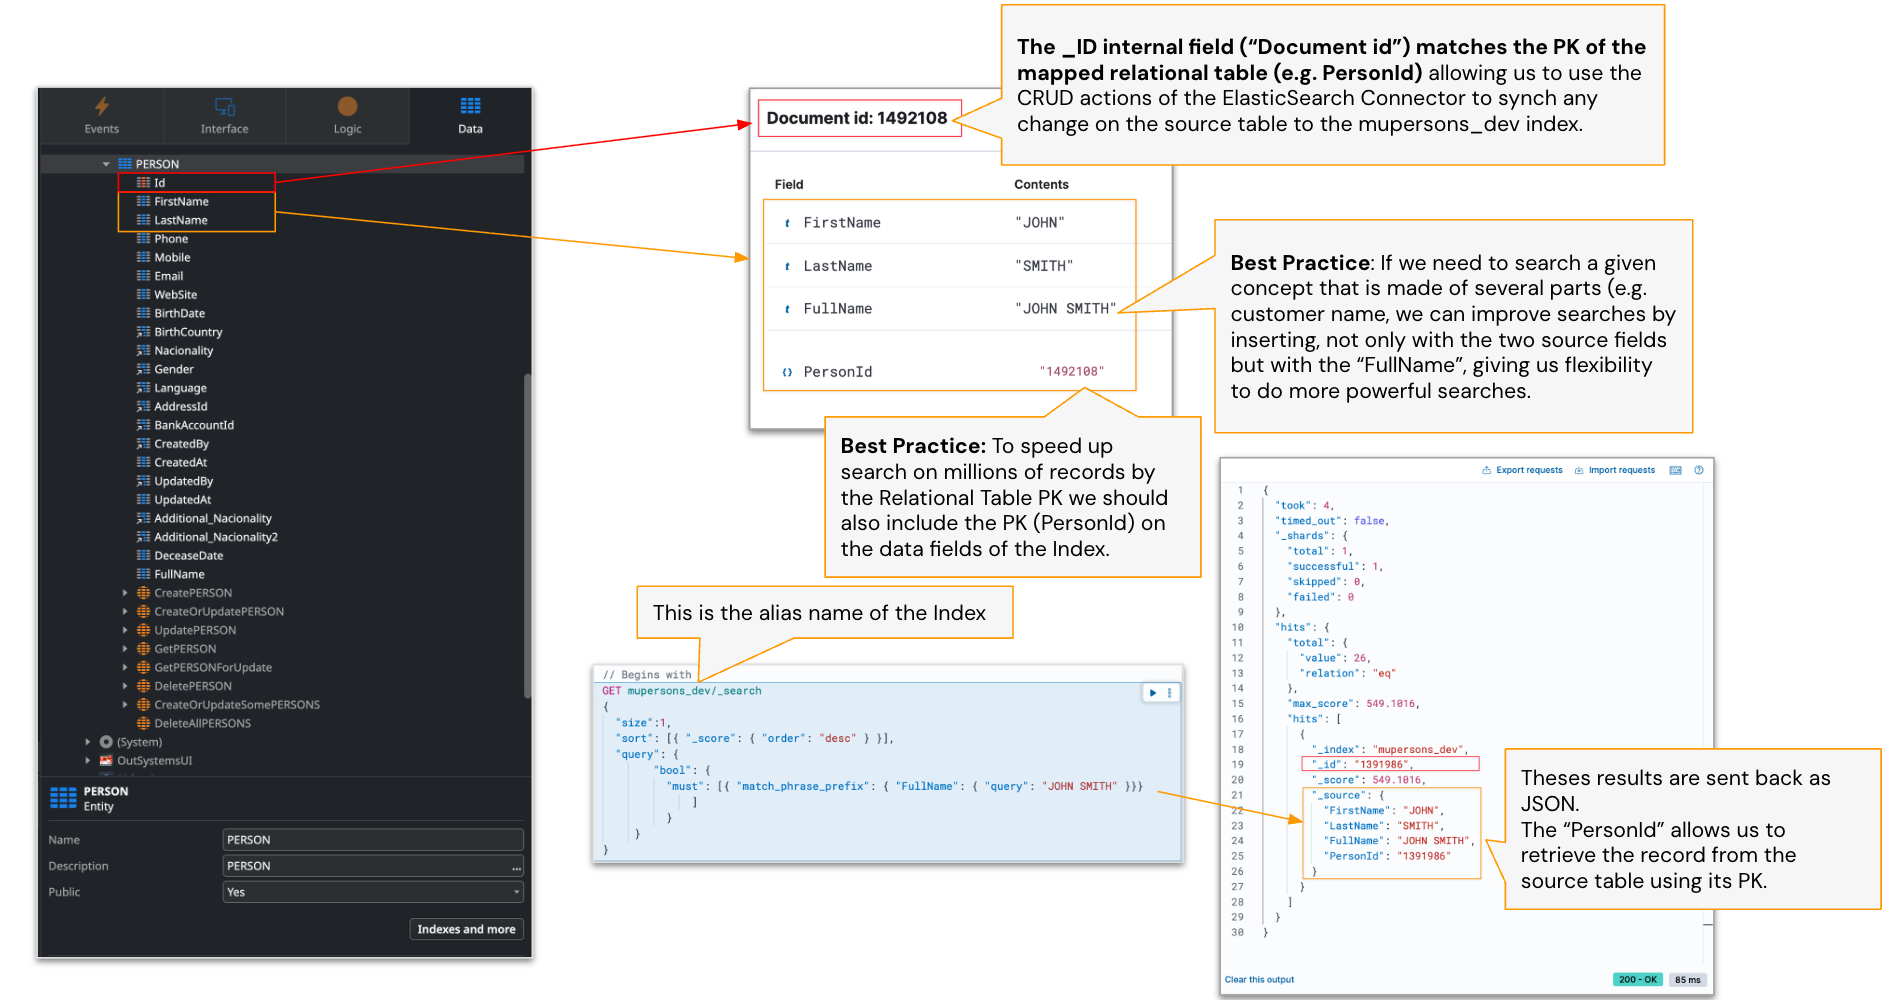
Tip 2: Always use an index alias
This is the most important best practice. Never point your app directly to an index name. Instead, point it to an alias (a nickname).
- Why? Because you'll eventually want to update your index—add new fields, change mappings, etc. With an alias, you can build a new index (myindex_v2), load all your data into it, and then instantly swap the alias from the old index to the new one, all with zero downtime.
- How? You can create an alias using Kibana's Dev Tools or the IndexAliasAdd action right in the connector.
Tip 3: Use ODC settings for your alias name
Don't hardcode the alias name (“murecordings_dev”) in your logic. You have different stages (Dev, Test, Prod) that might need to point to different indexes.
Store alias names in ODC Settings, not hard-coded constants (for example, Settings.IndexRecording_StageName). This way, your ODC code is the same in every environment, and you just change the setting's value in the ODC Portal.

2. Keeping data in sync: The CRUD wrapper
Your OutSystems database is still your source of truth. When data changes there, you need to tell Elasticsearch.
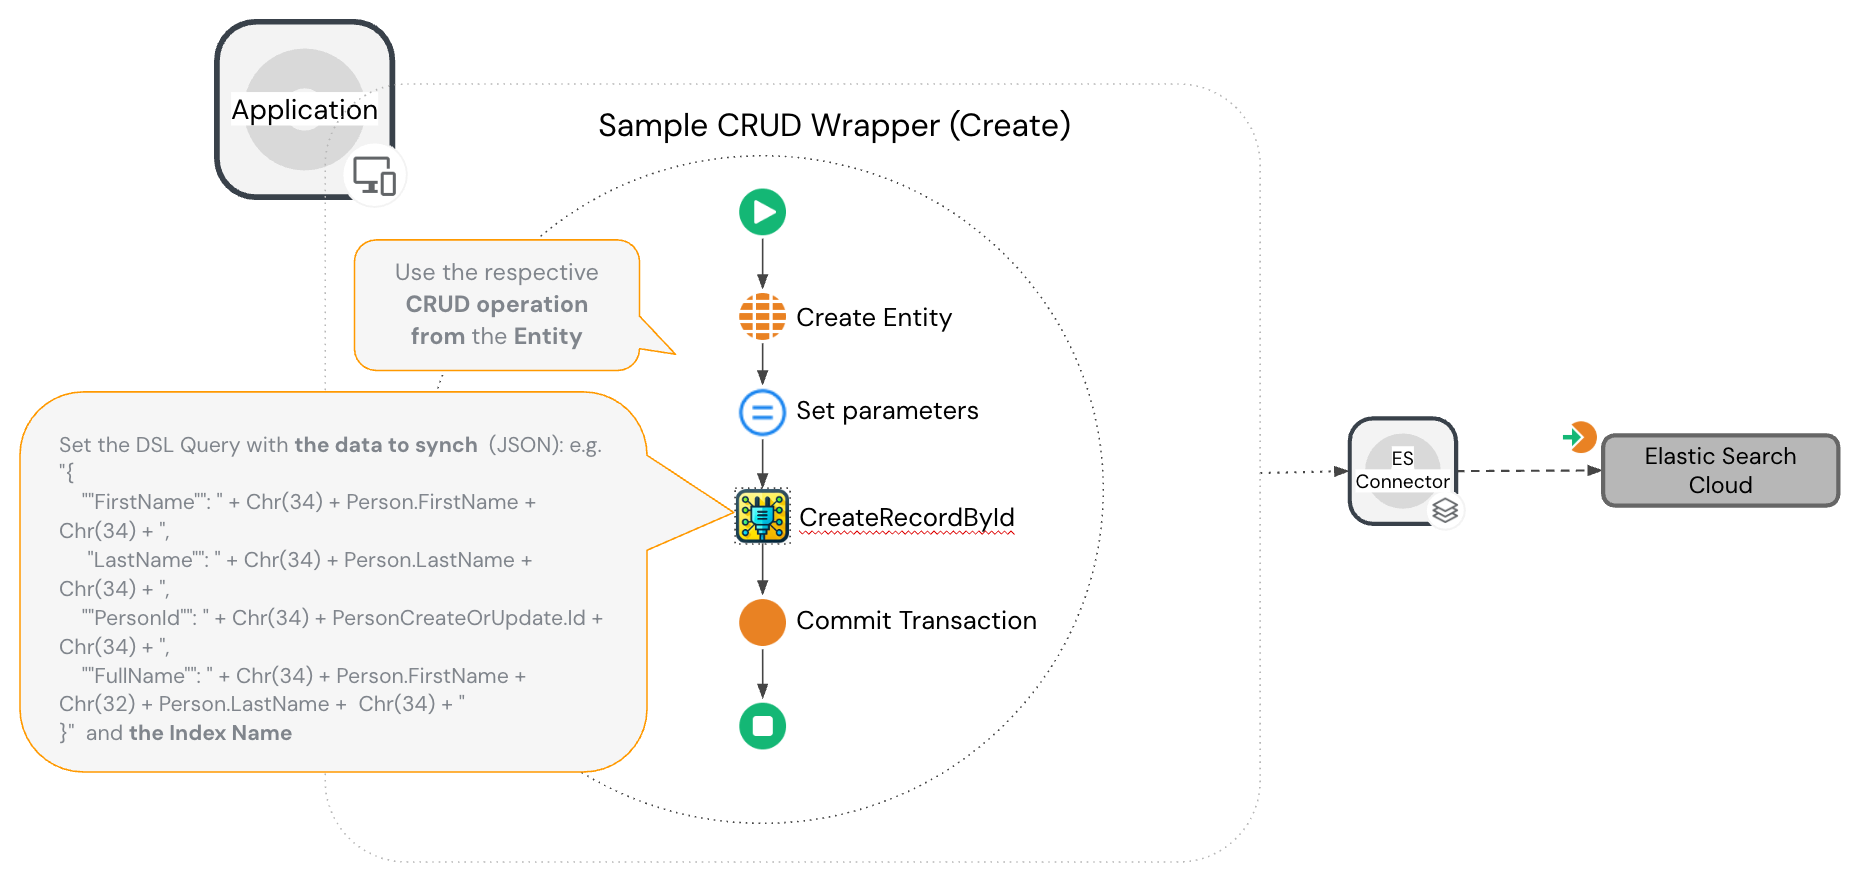
The cleanest way to handle this is by creating CRUD Wrappers for your main entities.
Instead of calling the CreatePERSON entity action directly in your app, you'll call your own action, like Person_Create. This wrapper action does two things:
- Calls the standard CreatePERSON entity action to save to the database.
- Uses the new Person.Id to call the CreateRecordById action from the ES Connector, sending the data as a JSON string.
You'll do the same for Update and Delete, using the connector's UpdateRecordById and DeleteRecordById actions. This ensures your database and search index are always in sync.
3. Loading your data (bootstrapping)
You have a few options for doing the initial, large-scale load of your existing data.
- For Prototypes: Use Kibana. It has a simple “Upload a file” feature. It's great for quickly testing with a CSV or JSON file (up to 500 MB) and will even create an index for you.
- For big data: To handle millions of records, use a dedicated pipeline tool like LogStash. LogStash is part of the Elastic Stack and can pull data directly from your source database (for example, SQL Server) and pipe it right into your Elasticsearch index.
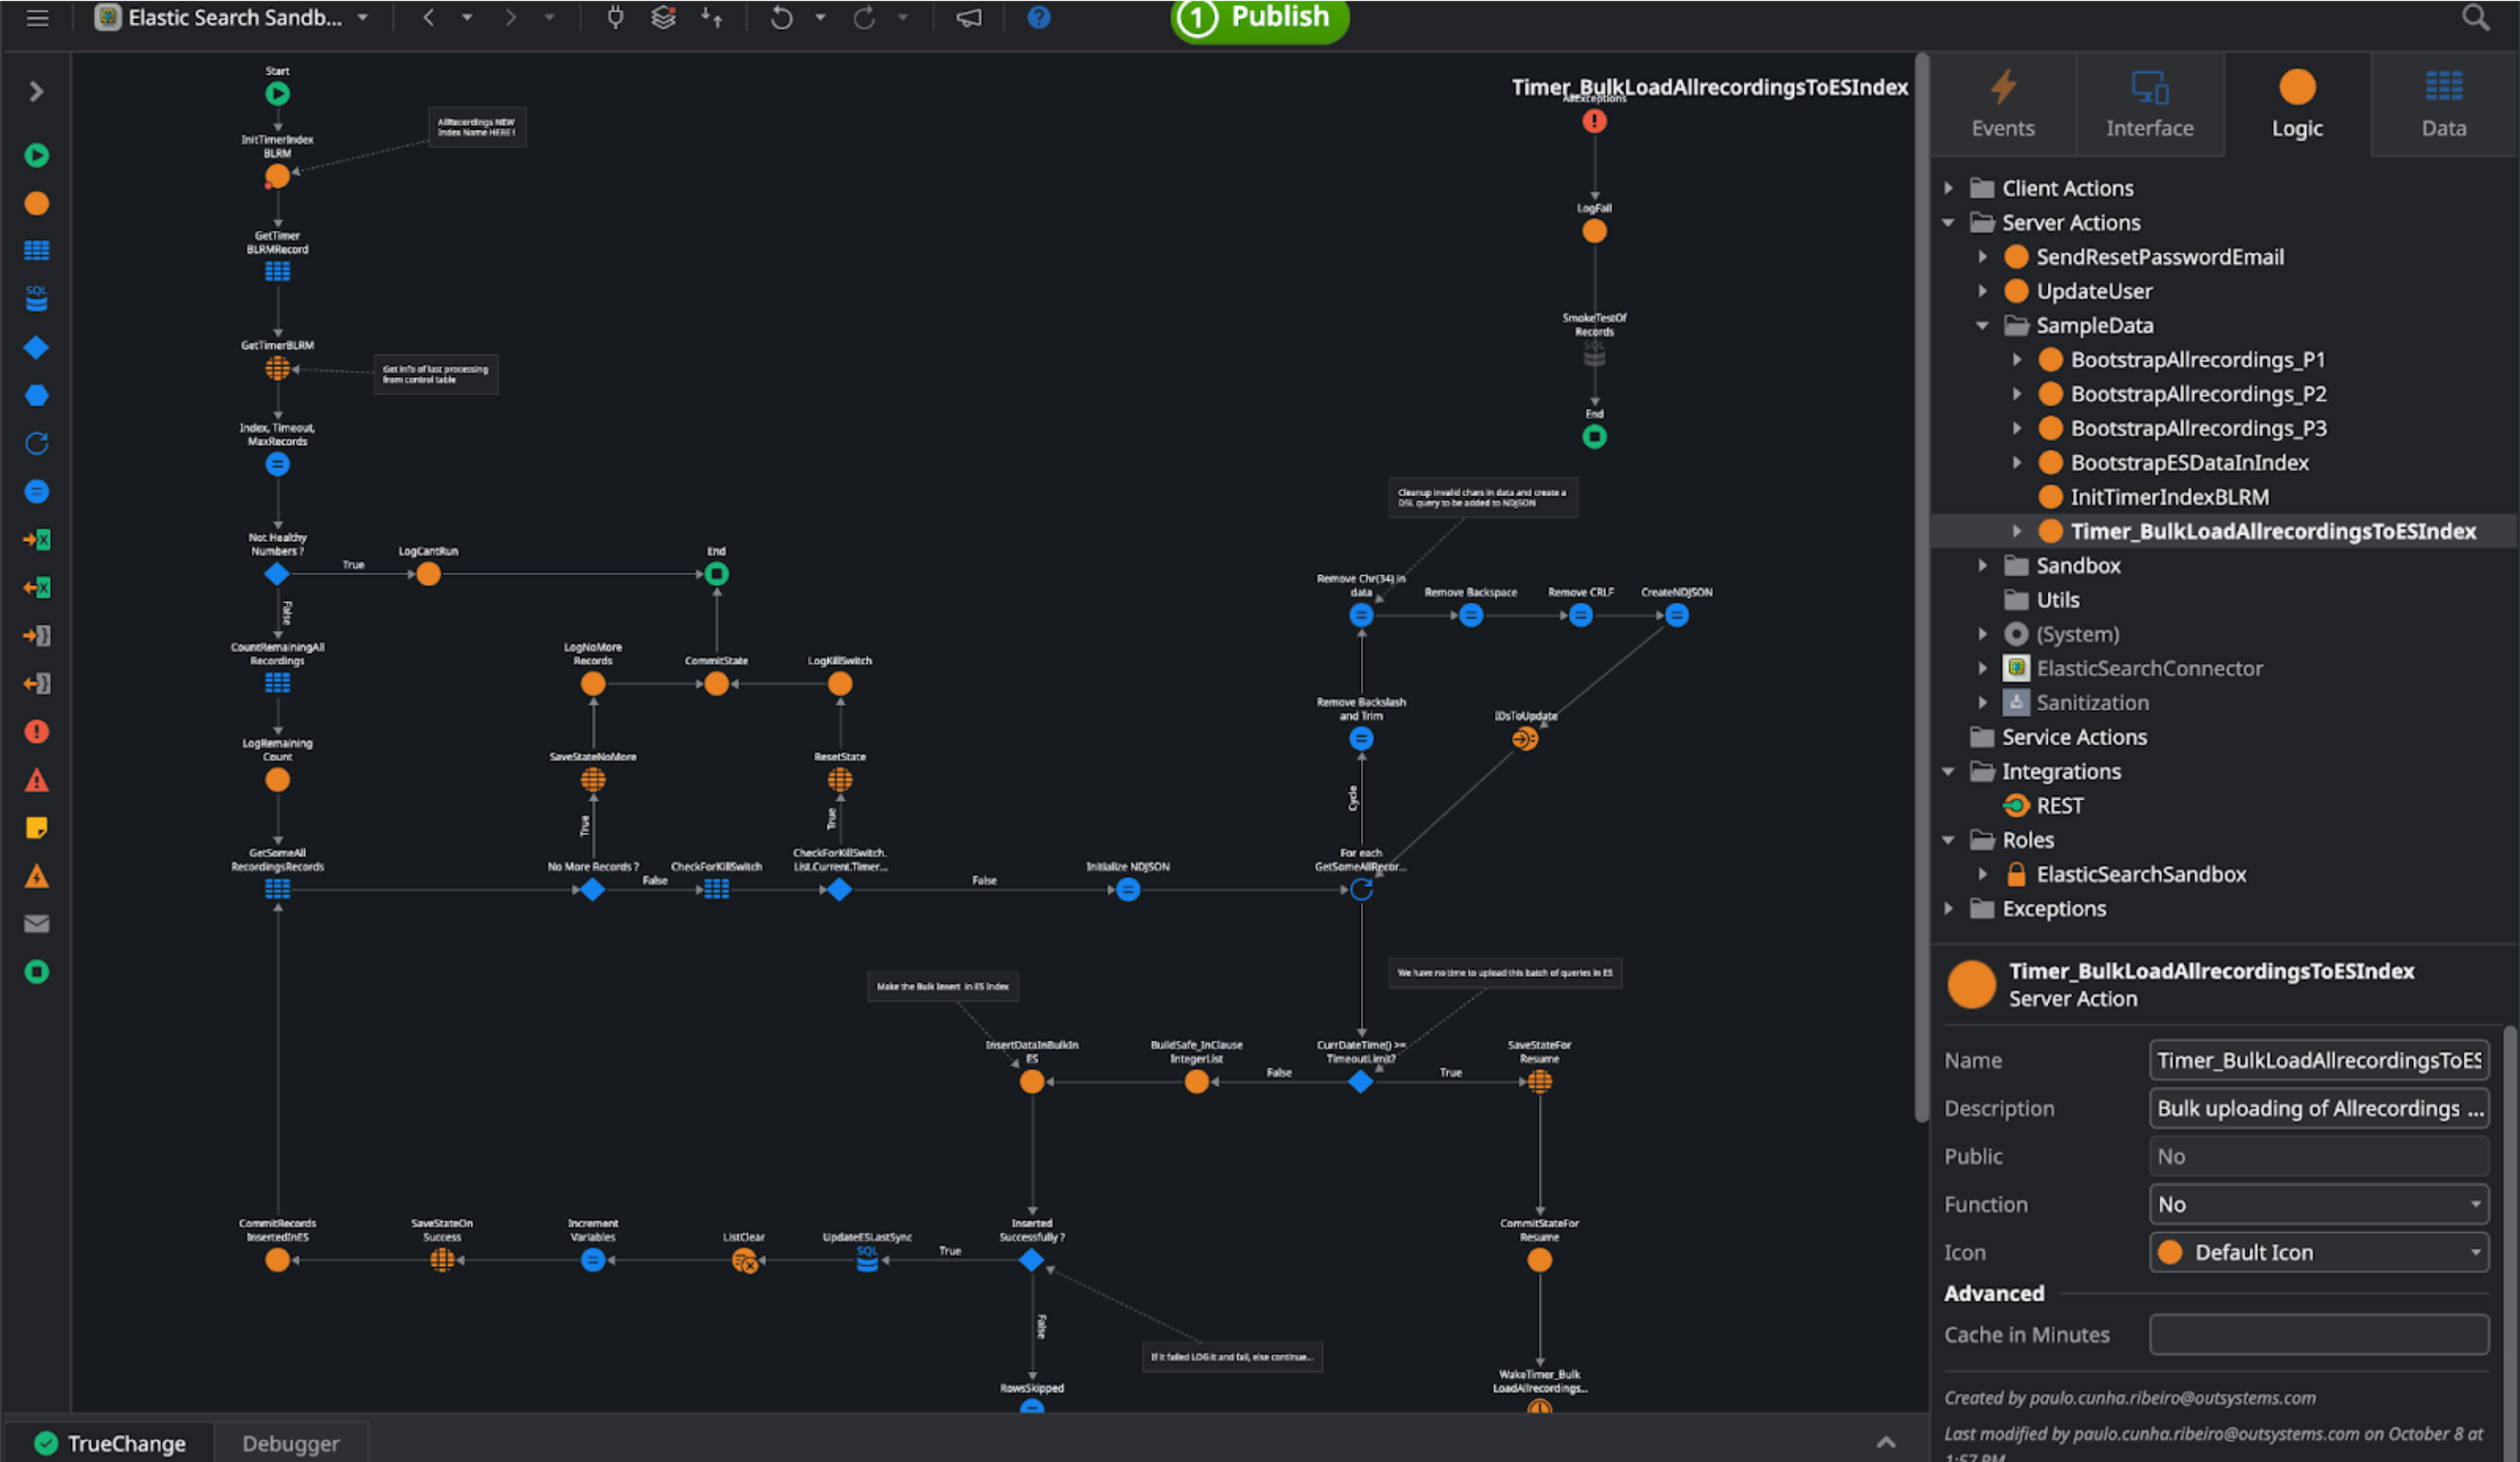
- The OutSystems way: You can build an ODC timer to batch-load your data.
- Fetch records from the database in chunks a.k.a. “buckets” (for example, 200 at a time).
- Loop through them and build a bulk-insert NDJSON string.
- Use the BulkInsert action from the connector to send the entire batch at once.
- The Elastic Search Sandbox app has a full example of this logic you can copy.
4. Running your first query
You're finally ready to search!
The connector expects queries to be written in Query DSL, which is a powerful, JSON-based query language.
Don't let the new syntax intimidate you. This is where the Elastic Search Sandbox app becomes your best friend.
You can use its “Search in Query” screen to build and test your queries live against your index. Once you get the JSON query right and see the results you want, just copy that JSON.
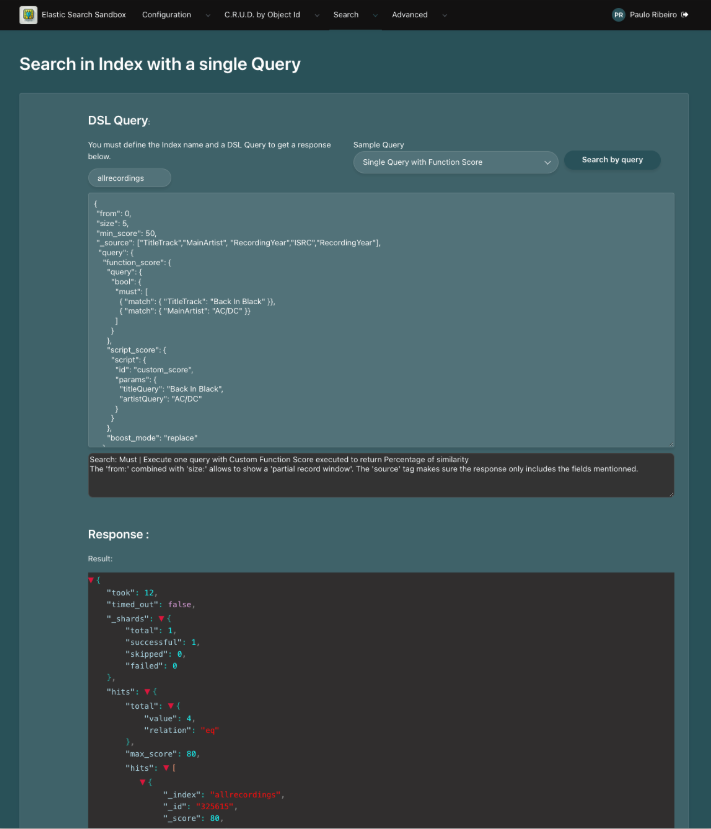
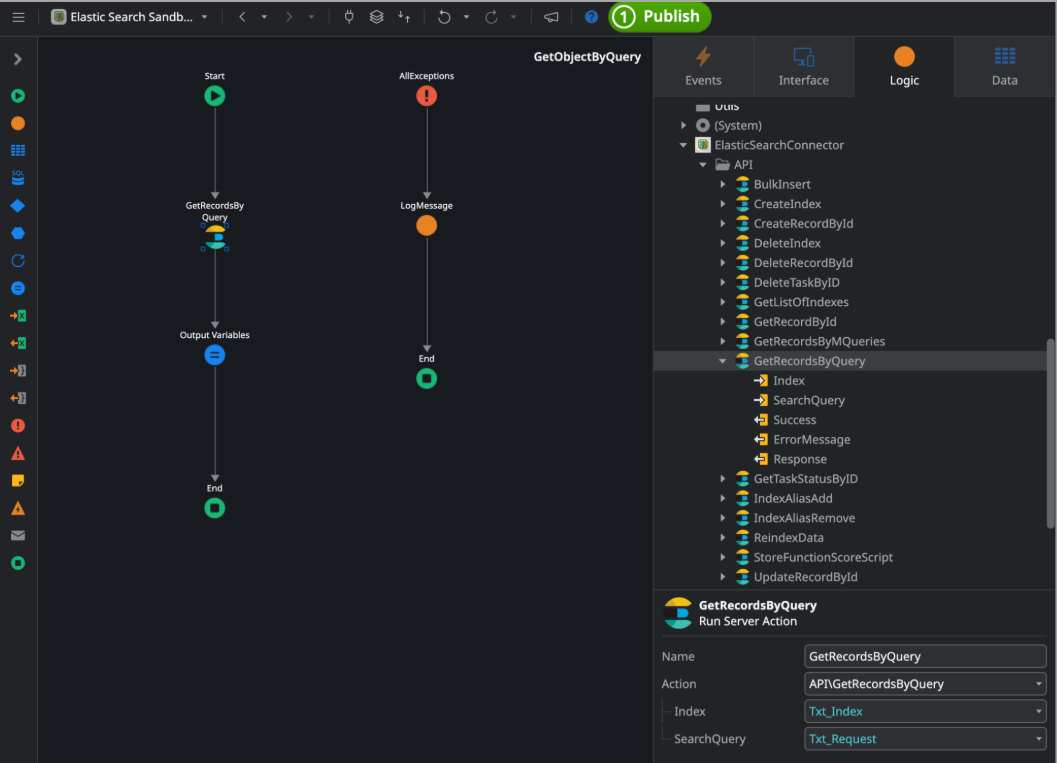
Back in your ODC app, all you have to do is call the GetRecordsByQuery action and pass in your alias name (from your setting) and the JSON query string you just tested. The connector handles the rest and returns your results, blazingly fast.
You're ready!
You’ve learned:
- Why Elasticsearch revolutionizes search performance.
- How to connect it to ODC.
- How to design, sync, and query your data.
You now have everything needed to deliver scalable, real-time search experiences your users will love.
Next steps
- Explore advanced analyzers and custom scoring scripts.
- Integrate search results with OutSystems UI patterns.
- Find the Elastic Search Connector (ODC) and explore the Forge