Application Security Overview | OutSystems Evaluation Guide

Authentication and authorization are two security terms often used interchangeably. These two components together define Access Control in Software Development and they are essentially a method to guarantee that users are who they say they are and that they have the appropriate access to data and functionalities.
As cyber-attacks continue to increase and get more sophisticated — Microsoft announced that it had detected suspicious activities attempting to gain access to downstream customers of multiple service providers — authentication and authorization are in the frontline of defense to protect users' data.
But are they the same thing? Does one replace the other? Spoiler alert: no, they aren’t and no, they don’t.

Authentication vs. Authorization
Authentication is about who does something. We need to identify who is accessing our application and then validate the credentials like username and password. It’s the process of matching the visitor of an application with the predefined set of user identity in the system. In other words, it is the process of recognizing the user’s identity.
On the other hand, authorization is about what someone does. This requires that we validate if a certain user has the required permissions to do what they want to do. So authorization is, in fact, the process of giving permission to the user to access certain resources in the system, like screens, data, or functionalities.
Think of it this way: when you go to a concert, authentication is showing the ticket at the entrance to ensure it’s valid; authorization is checking which section of the arena you have access to — is it the golden circle? Is it the cabin? Is it the standing section?

Authentication vs authorization difference
Now that you know the difference between authentication and authorization, let’s see how you can implement them in your apps built with OutSystems.
How to implement authentication mechanism
OutSystems does the heavy lifting for developers, so when you start developing a new module it has the built-in logic for end-user authentication.
OutSystems comes with six distinct authentication methods:
- Internal
- Active Directory
- LDAP (Lightweight Directory Access Protocol)
- SAML 2.0 (Security Assertion Markup Language)
- Azure AD (Azure Active Directory)
- Okta.
- Types of authentication
You can check our documentation on end user authentication to learn more.
In OuSystems, the end-users are created and managed by the built-in Users application, or they can be managed programmatically, by using the built-in functions. This application is the default OutSystems User Provider and it has a back office that you can access using the browser. The core information that identifies the user is the username and password.
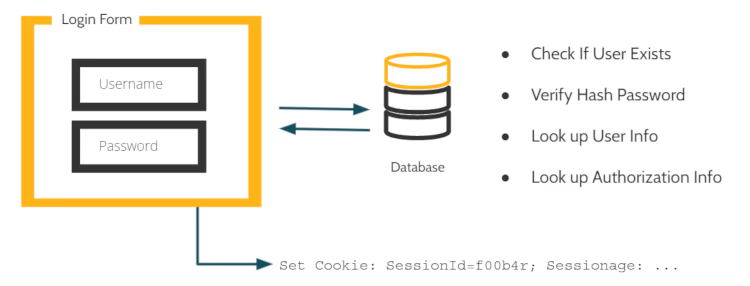
For every application, the OutSystems low-code platform creates a simple login form with a few basic widgets and functionality. This is a very simple flow based on username and password and it can be called Simple Login Authentication.

Sample Login Form
When the user inserts the information, the backend code hits the database to look up and see if that user exists. If so, it checks if the password matches.
It’s important to mention that the credentials are not stored as plain text, but a cryptographic hash function is computed using the credentials and only its result is stored. When the end-user attempts to log in, the hash function is computed again and its result is compared with what is in the database.
So if the user is verified, it will drop a cookie on the browser to keep track of the user.
Login screen
To access the Users application for a specific OutSystems environment, go to:
https://<environment_address>/Users.
You can learn more about OutSystems User Application here.
How to implement authorization mechanism
When managing users, it’s important to define what they do and what are the different levels of access — as we’ve seen, this is called authorization.
In OutSystems, authorization is managed via roles that are used to restrict or allow end-users to access specific screens and operations of your application.
You set Roles at design time and use them when designing the logic of your application.
When you create a new module in Service Studio, OutSystems IDE, the platform provides you with a default set of System Roles but you are allowed to define your own custom Roles.
To learn more about how OutSystems creates and manages role-based access control, take a look at this page.