Proactive app and agent performance

The primary purpose of BDD frameworks is to support Behavior-Driven Development, where all technical (e.g., developers) and non-technical (e.g., business analysts) participants in a software project collaborate to define a common understanding of how the software should behave.
In this blog post, we'll cover everything about automating BDD testing in OutSystems low-code platform using the Forge BDDFramework component. We'll also show you how to use the BDDFramework's test-execution REST API and do data-driven API tests.
.jpg?updated=20230807100819)
But first, let's familiarize ourselves with the basic concepts of BDD testing. Or, if you are already familiar with BDD Frameworks, you can jump to the next section. In this guide we’re going to walk you through three scenarios:
- Exercise 1: Set up everything you’ll need to automatically test an app. We’ll cover how to implement the BDD test using the BDDFramework, and how to run several tests inside one screen.
- Exercise 2: Set up a test environment, create a test scenario and implement it in OutSystems using the BDDFramework.
- Exercise 3: Data-driven API tests with the BDDframework - We’ll go over a few examples of how to test a server action in an OutSystems app. And for data-driven testing, we’ll be doing something different - testing a public API - to showcase how the framework can be used for such a scenario. Note that data-driven testing can be applied to server actions, and it is a perfectly valid type of testing in that context as well.
What's the BDDFramework Component?
The framework is a component that facilitates test-automation where tests are specified using the Gherkin syntax. Gherkin is a human-readable language for structuring and describing an app's expected behaviors. The resulting scenario can be used to build BDD test automation for your apps.
I Don't Follow BDD Processes, Is This For Me?
Anyone building with OutSystems can take advantage of BDD frameworks. Typically, during software development practices like continuous integration/continuous delivery (CI/CD), people analyze various test results daily. Efficient development and quality practice require that everyone involved understands the test results. Gherkin syntax’s structural nature is very appealing to many quality professionals and developers. It provides a standard for everyone to follow when setting-up certain levels of test automation. The tests serve as their living documentation, and are sometimes called specification by example (SBE).
When Should I Use the Framework?
The framework can be used for Traditional Web and Service apps, the server component of Reactive Web or Mobile apps, and REST and SOAP APIs. It's comparable to frameworks in other technologies, such as Cucumber, JBehave, or SpecFlow. You can use the BDD testing framework with different purposes and goals in mind, depending on what you need for your specific contexts. We'll show you how to build your first automated test scenario in a web app available in the OutSystems Forge.
Exercise 1: Introduction to the BDDFramework
Let’s set up everything you’ll need to automatically test an app. We’ll cover how to implement the BDD test using the BDDFramework, and how to run several tests inside one screen.
How To Lay Down the BDD Test Groundwork
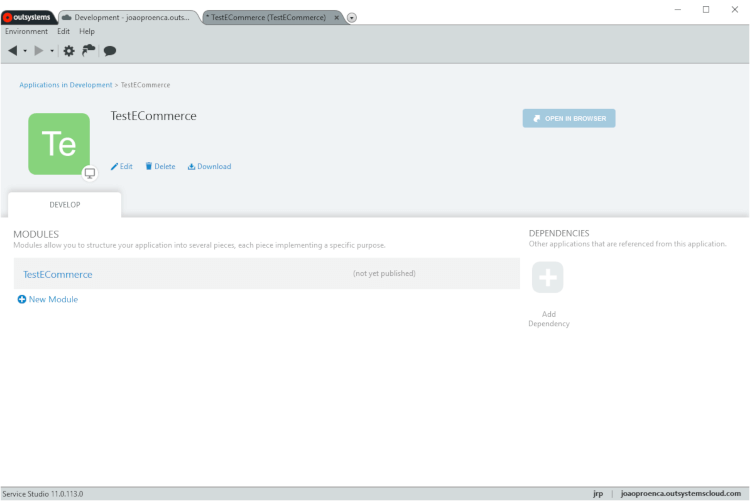
Step 1: Download the BDDFramework Component and eCommerce App.
Go to Service Studio, select the Forge tab, search for BDDFramework and install it. We’re going to create tests for the eCommerce app. Install the app from the Forge, as you did for the component.
Now we need to create a new app that contains the automated tests. We’ll call it TestECommerce. Implementing the tests in a separate app gives you more flexibility when deploying apps between different environments. For instance, it will allow you to avoid running test code in a production environment.
Step 2: Understand the BDD Test Scenario
Before diving into building an automated BDD test scenario using the BDD testing framework, let’s understand it from a user’s perspective.
Open the eCommerce Web app in a browser. You’ll see that it’s an online wine store. The test scenario is simple: adding a product to the cart will correctly update the cart with the added item and its price.
In the homepage, the user adds a bottle of Prosecco Armani DOC to the cart. The user then goes to the cart to verify that the correct wine, quantity and price have been added.
Step 3: Translate the BDD Test Scenario To Gherkin
This specific interaction can be translated to Gherkin, and used as a BDD test scenario in a BDD test automation framework. With Gherkin, we’ll structure the interaction (Scenario) into groups of steps using the following Gherkin syntax: Given, When, and Then.
Here’s the Gherkin scenario for what we’ve seen above:
Scenario: Adding a product to the cart
Given:
That I have a cart
And there is a product called “Prosecco Armani DOC”
When:
I add the product to the cart
Then:
The operation should be successful
And the cart should have been correctly updated
Scenario - describes the specific scenario that illustrates a business rule (adding a product to the cart).
Given - describes the initial context of the scenario — the required pre-conditions we need in place before conducting the action/event that we are testing (in this case, we should have a virtual shopping cart and a specific product to add).
When - describes the specific action/event — in many scenarios there should only be one such step (for example, adding the product to the cart). If you find yourself having to add more than one step here, you should consider if you need to break up the scenario into two or more.
Then - describes the expected outcomes of conducting the action/event in the system. These steps commonly contain various assertions that verify everything we want to check as a result of this test.
In this syntax, the scenario should be clear to anyone who reads it, whether they are technical or non-technical participants. This clarity is a highly valued characteristic that the BDDFramework maintains throughout the process of designing, implementing and running test scenarios.
How To Implement the BDD Test Using the Framework
We’ve defined the scenario, and now we can start creating an automated BDD test that can be automatically run using the BDDFramework. In this framework, the scenarios are defined in web screens using web blocks, and the logic for each group of steps is implemented in the screen actions.
Step 1: Create the Scenario and Steps With Web Blocks
In Service Studio, start by using the Manage Dependencies window, to include the BDDFramework public resources into the test module (eCommerceTests).
The BDD testing framework includes four web blocks you can use to build your tests:
BDDScenario - each scenario is represented by a BDDScenario web block.
BDDStep - each group of steps is represented by a BDDStep web block.
FinalResult - returns stats about all scenarios run on the web screen (count successful tests, count failed tests, and so on.) It should always be included at the end.
SetupOrTeardownStep - is a special kind of step that can be included in scenarios (before or after the actual test logic) to perform setup/cleanup operations of data that is outside of the scope of the scenario from a functional/business perspective (for instance, delete test data that was generated during the test.)
Add a BDDScenario to the screen and fill out the placeholder with the Scenario description.
Next, add BDDSteps (includes the Given, When and Then steps) and fill out each step description. In the end, you should have something like this.
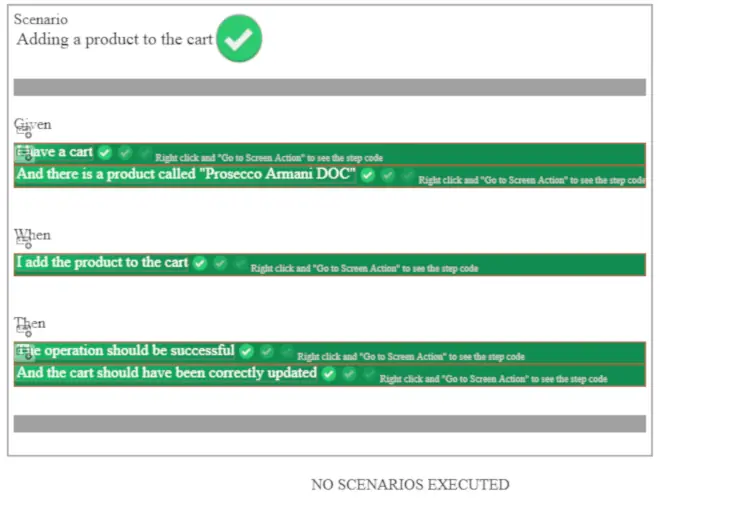
The entire scenario is implemented inside the framework’s BDDScenario. We also added the FinalResult block at the end of the page (the “No Scenarios Executed” block), because as previously mentioned, you should always include this web block for each screen that’s tested.
Step 2: Implement the BDDStep Blocks As Screen Actions
It’s time to implement each BDDStep as a Screen Action. In this test, we will be interacting with the eCommerce app and its module through public actions and entities. Regardless of our intention to put in place the automated tests, we should always follow the best practices for OutSystems app development. Therefore, the app's core functionality should be implemented in clearly defined steps and not, for instance, in Screen Actions. Or, we can also have BDDFramework tests that interact with REST or SOAP APIs from an OutSystems app, and even Service Actions.
To import the Screen Actions into the TestECommerce module, we need to make them public in the eCommerce module.
Now we’ll import the eCommerce Entities and because we'll need to access them from TestECommerce later on, we need to make them public before importing them.

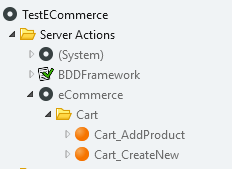
We’re ready to implement the Screen Actions for all groups of steps: Given, When, Then. The first step of the Given group is “That I have a cart”. We start implementing the step by right-clicking on the corresponding step in Service Studio. We then choose “Select OnNotify destination”, followed by creating a new screen action.
We’re calling the Cart_CreateNew action from eCommerce to create whatever the app needs to have a cart. The output of that action is a CookieID. Now we perform an assertion (AssertTrue from the BDDFramework) that validates if a non-empty CookieID is being returned, thus validating that the operation was successful.
If the operation fails, and we hadn’t created this assertion, we won’t get a valid CookieID as output, and it will be harder to pinpoint where in the test steps the failure has occurred.
The BDDFramework provides a set of assertion actions we can use, each one has a different purpose (true statements, false statements, values, etc.) it’s important that we select the appropriate one for each situation to improve code legibility and maintenance.
You probably noticed that we store the CookieID output from the Cart_CreateNew action in a web screen variable. This is because we’ll need this ID for other operations in other BDDStep actions and we pass data between them by using this sort of variables or records in the database.
Now we’ll implement the second step of the Given group “And there is a product called ‘Prosecco Armani DOC’ ”.
The first step is to create the following Screen Action:
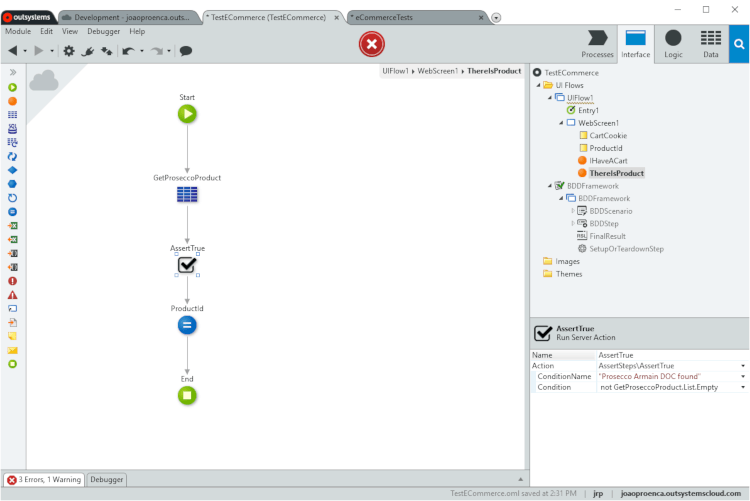
We must check if there’s a product in the database called “Prosecco Armani DOC” by performing a query to search for it, followed by using an assertion (AssertTrue from the BDDFramework) to validate that the result is not empty. We’ll also store the ProductID of that record because we’ll need it further along.
Now we’ll implement the “I add the product to the cart” step of the When group.
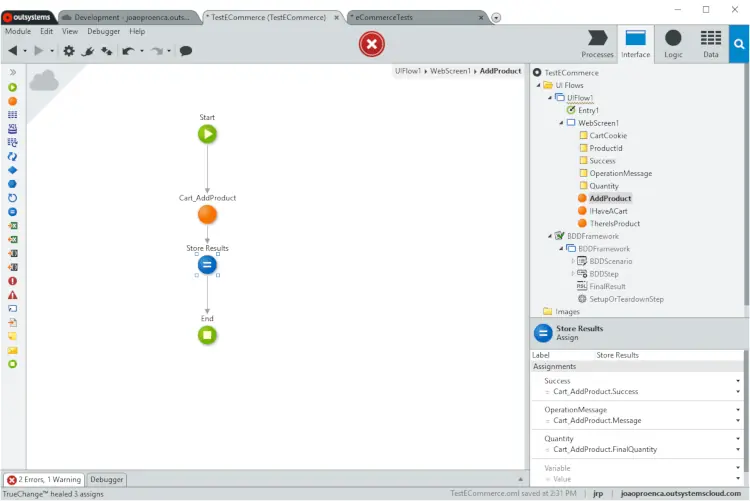
In this step, we call the Cart_AddProduct action of the eCommerce module - which holds the functional logic that is the main focus of this test. We pass the parameters that define which product we’re adding, the quantity (1) and the cart we’re using.
Next we store the results of that call: whether it was successful, the output message and the FinalQuantity - all of these are stored in variables so that we can proceed to the Then steps.
An important note about Cart_AddProduct: There’s a testability issue with this specific action in eCommerce, in the sense that it always uses the cart ID that’s stored in the current session. This ID is managed internally in eCommerce for each session, making it hard to test the cart mechanisms. As such, we must make a minor change to Cart_AddProduct in eCommerce for it to alternatively receive an optional CartCookieID that overrides the current session’s cart ID:

In the first Then step “The operation should be successful,” we assert that the output data from the previous action was correct:
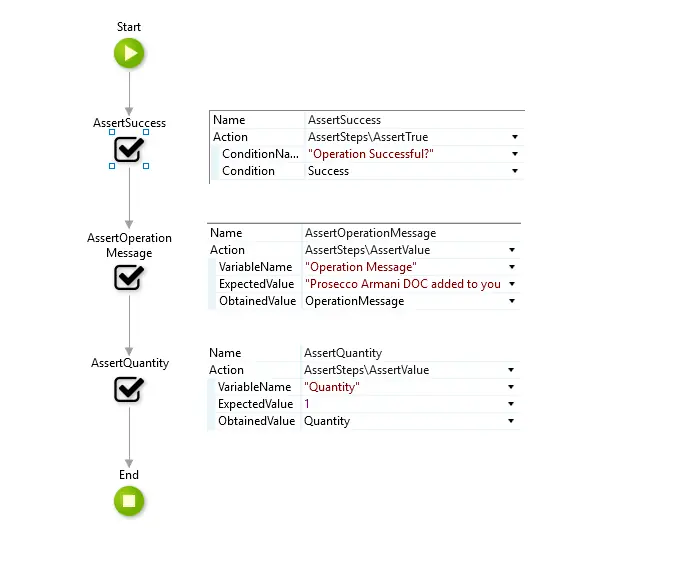
As for the last Then step “And the cart should have been correctly updated,” we also want to validate that the cart data in the database has been correctly updated.

We start by performing a query that includes all the data for purchase orders in the cart with the CartCookieID we stored and then conduct three assertions. In the first one we validate that there is only one product in the cart. In the second assertion, we check that the name of that product is the expected one: “Prosecco Armani DOC”. Finally, we verify that there is only one item of that product ordered. With this last action implemented our test is finished and we can publish TestECommerce.
Step 3: Run the Test Scenario
The test scenario we just created runs when rendering the web screen where it was created. If you open it through a browser, this is what you’ll get.

As you can see, the output is very similar to what you see in Service Studio when building/changing the BDDScenario. This makes it very easy for someone to jump from the test run report (the rendered web screen) into the implementation of the test.
You’ll probably notice in the above image that there are several green check marks along the BDDSteps. The BDDFramework will output one of these symbols for each assertion that is performed in the step - this is why the two last steps have 3 marks each. If there are no assertions in the step, the framework will always output one green check mark nevertheless, just to signal that the step was successful.
Let’s now check out what happens when one of the assertions fails. Imagine we edit the “Operation should be successful” Then step and change the AssertOperationMessage to expect the wrong message:

Running the test now in the browser, here’s what we get:

The test now clearly shows that in that step there were 3 assertions, but the second one failed. It’ll also inform you that it expected a specific value for “Operation Message” but obtained a different one. Once a step fails in a BDDScenario, all following steps will be skipped, as you can see in the image above.
In our experience, having this sort of information regarding the execution of the test really speeds up its troubleshooting, because anyone who is confronted with this output will be able to quickly:
- Understand the full test scenario.
- Identify in which step it is failing.
- Get information on what were the expectations that were not met by the system behavior.
- Jump into the portion of the test code where it’s failing.
Finally, let’s also see how BDDFramework tests behave when there are unhandled exceptions. Imagine now that we trigger an exception in the same point of the code where we put the failed assertion:

As you can see, the BDD testing framework shows that the first assertion was successful (there is a green check mark) but then there’s another symbol indicating there was an unhandled exception and what the exception message was. Similarly to a failing BDDStep, in this case the framework won’t run any steps after this one.
Step 4: Tear Down the Test Data
Going back to the BDDScenario block, you may also notice there are two grey areas stating “Click to add Setup/ Teardown” when you hover them. You can drag a SetupOrTeardownStep into these ones. One very common use case for such a step is to include it at the end of the scenario to perform a teardown (deletion) of data that was generated during the test.
In fact, in the example we’re building, we create data in the eCommerce database for a shopping cart used in the test and it’s highly recommended that we delete it in the teardown step. Here’s an example of how the action associated with that step could look like:
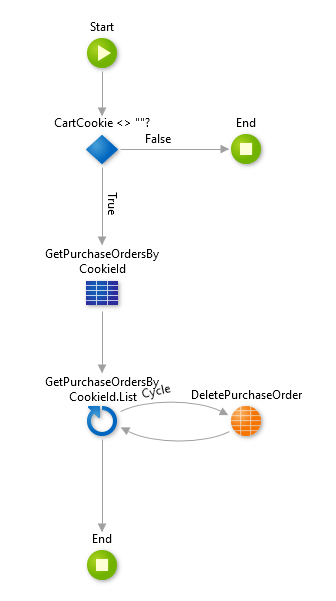
As you can see from this simple logic, if a CartCookieID was saved during the test, we access all records of the PurchaseOrder entity that are identified with that ID and delete them (should only be one such record). This ensures us that the test won’t leave data behind and puts the system back into the state where it was before it was run - a best practice when building automated tests.
How to Run Several Tests Inside One Screen
Now, let’s see how it’s possible to run several test scenarios (a test suite) inside the same web screen. When setting up a test suite, it’s best practice to build each BDDScenario in a separate web block inside your test module - this allows you to better organize different scenarios and have the corresponding implementations (the Screen Actions) grouped together.
As you can see in the following animation, we’ve copied the test into a Web Block. We also created a new test, similar to the first one but where we try to add another product called “Barca Velha” to the cart:
Once you have the two test scenarios in the same screen, you can run them on the same page.
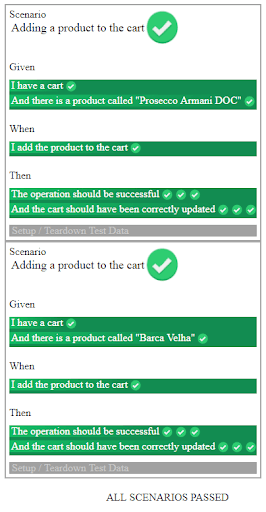
The two scenarios run in sequence and at the end the FinalResult web block indicates that all scenarios were successful. This is useful when you want to group tests in one test suite screen performing the tests on the same feature or action. So there we have it, in this first exercise we’ve looked at Gherkin, written a test scenario with Gherkin, implemented that test scenario using the BDD testing framework and ran several test scenarios inside a single screen. In the next exercise, we will look at how to run tests with BDDFramework’s REST API.
Exercise 2: the BDDFramework's Test-Execution REST API
In this exercise, we’re going to look at how to use the BDDFramework’s Test-Execution REST API.
How To Trigger Your Tests
To run these two test scenarios, all we have to do is open the TestECommerce web screen (it contains the tests) in a web browser. The tests run when the page is rendered. The final state of the TestECommerce web screen looks like this:

If you want to trigger your tests, such as by an orchestration process (for instance: a Continuous Integration/Deployment pipeline), you’ll need a way to programmatically run these tests.
Step 1: Access the BDDFramework REST API Documentation
You can use the BDDFramework REST API to run your tests. Look through the API documentation, by accessing the following endpoint, in the OutSystems environment where you’re developing the tests:
https://<YOUR_ENVIRONMENT_HOST>/BDDFramework/rest/v1/#!/v1/
Step 2: Call the Test Suite Through the REST API
You can start off by making a simple HTTP GET request to call an API method named BDDTestRunner. It passes the name of the module that contains the tests and the corresponding test suite screen. The method looks like this:
rest/v1/BDDTestRunner/{TestESpace}/{TestSuiteScreen}
We can test our specific scenario where the TestESpace is TestECommerce, and the TestSuiteScreen is CartScenarios, by opening a browser and inserting the following URL:
https://<YOUR_ENVIRONMENT_HOST>/BDDFramework/rest/v1/BDDTestRunner/TestECommerce/CartScenarios
Note: When calling a TestSuiteScreen, always make sure that it can be accessed through non-authenticated requests (in Service Studio, set the Anonymous Role in the Web Screen properties). When the BDDFramework makes a request to get the screen, it will be without authentication and as a result, it won’t work if not set up this way. This is a common issue we see people running into when using the API for the first time.
If you’ve caused the API to successfully run a single test contained in a test suite screen, your result should be a JSON response file that looks like this:
{
   "SuiteSuccess":true,
   "SuccessfulScenarios":2,
   "FailedScenarios":0,
   "FailureReports":[  ],
   "ErrorMessage":""
}
In this example, the SuiteSuccess output is set to true. This means all the tests in the suite passed. Then, we have 2 SuccessfulScenarios and 0 FailedScenarios. And, naturally, there are no FailureReports, and since the BDDFramework was able to call this TestSuiteScreen correctly, there is no ErrorMessage.
If we had made a mistake, for instance using a TestSuiteScreen that doesn’t exist in the module, we would get an error that looks something like:
"Could not find TestSuite screen 'WrongScreen' for module 'TestECommerce'. Exception: The remote server returned an error: (404) Not Found."
What Happens If the Test Fails?
To see what happens, we'll intentionally cause one of the tests to fail by swapping "Barca Velha" for a product called "Pera Manca." We know that when we try to add it to our cart, the test will fail because we know the store doesn't carry this product.

As you can see, when opened in a browser and running the second scenario, the test suite fails in the BDDStep where we search for the product in the database. Let’s test the same scenario, but this time, we’ll call the test suite through the API:
{
   "SuiteSuccess":false,
   "SuccessfulScenarios":1,
   "FailedScenarios":1,
   "FailureReports":[
      "------------------------------------\r\nScenario\r\nAdding a product to the cart\r\n------------------------------------\r\nGiven\r\nI have a cart [P] \r\nAnd there is a product called \"Pera Manca\" [F] \r\n    [F] Condition \"Pera Manca found\" is false\r\n\r\nWhen\r\nI add the product to the cart [Skipped]\r\n\r\nThen\r\nThe operation should be successful [Skipped]\r\nAnd the cart should have been correctly updated [Skipped]\r\n------------------------------------\r\n\r\n"
   ],
   "ErrorMessage":""
}
This time around we have 1 FailedScenarios and 1 FailureReport with the stripped down BDD output from the test that failed. Once you unescape (decode) that report, you get:
------------------------------------
Scenario
Adding a product to the cart
------------------------------------
Given
I have a cart [P]
And there is a product called "Pera Manca" [F]
    [F] Condition "Pera Manca found" is false
When
I add the product to the cart [Skipped]
Then
The operation should be successful [Skipped]
And the cart should have been correctly updated [Skipped]
------------------------------------
You get the exact same BDDScenario data for the failed test, as you got when running it through a browser. If you have more than one test failing in your suite, you’ll see a failure report for each failed test. We have found this to be useful when integrating with other tools, since you can include the full test output of each test report, accelerating the analysis of test failures.
The BDDFramework test-execution REST API is fairly simple to use, but as you can see, it’s also powerful enough to integrate with other tools you may use to manage your tests.
Exercise 3: Data-Driven API Tests With the BDDFramework
In this exercise, we’ll go over a few examples of how to test a server action in an OutSystems app. For data-driven testing, we’ll be doing something different - testing a public API - to showcase how the framework can be used for such a scenario. Note that data-driven testing can be applied to server actions, and it’s a perfectly valid type of testing in that context as well.
How To Test a Public API
Step 1: Design the Test Scenario
The public API we’ll be targeting in these tests is restcountries.eu. It’s a very simple public RESTful API where you can obtain data about countries around the world.
For the purpose of this example, we’ll be using a very simple test scenario where we ask for data about specific countries and validate if the country capital is correct. To use it, we just have to make a GET call to the following endpoint:
https://restcountries.eu/rest/v2/name/{name}
Let’s say for instance that we use “Portugal” as the {name} parameter:
https://restcountries.eu/rest/v2/name/Portugal
After you make your GET call, you should receive a JSON response that looks like this:
[
   {
      "name":"Portugal",
      "topLevelDomain":[...],
      "alpha2Code":"PT",
      "alpha3Code":"PRT",
      "callingCodes":[...],
      "capital":"Lisbon",
      "altSpellings":[...],
      "region":"Europe",
      "subregion":"Southern Europe",
      "population":10374822,
      ...
   }
]
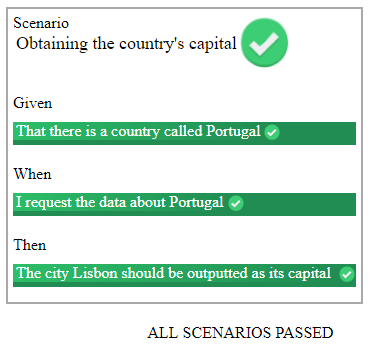
One of the output fields is the “capital,” Lisbon.
If we wanted to specify a test for this specific interaction using the Gherkin-syntax, it would be a very simple scenario:
Scenario: Obtaining the country’s capital
Given:
That there is a country called Portugal
When:
I request the data about Portugal
Then:
The city Lisbon should be outputted as its capital
To implement data-driven testing for this scenario, we use the following approach:
- Describe the scenario outline using Gherkin syntax parameters (in this case <Country> and <Capital>).
- Specify the examples that we’ll test. The test scenario can be run repeatedly using different values for <Country> and <Capital> (for instance: Portugal, Lisbon).
Scenario: Obtaining the country’s capital
Given:
That there is a country called <Country>
When:
I request the data about <Country>
Then:
The city <Capital> should be outputted as its capital

Examples:
|<Country>   |<Capital>   |
|Portugal    |Lisbon      |
|Argentina   |Buenos Aires|
|France      |Paris       |
|Spain       |Madrid      |
|Canada      |Ottawa      |
|Nigeria     |Abuja       |
|Japan       |Tokyo       |
Step 2: Implement the Scenario Outline
It’s time to implement the Country and Capital scenario outline, using the BDDFramework. We create the BDDScenario inside a web block, implementing the initial "Portugal" test. The BDDScenario is now a scenario outline we can use as a template for further tests.

The groups of steps are the same as defined in the previous section.
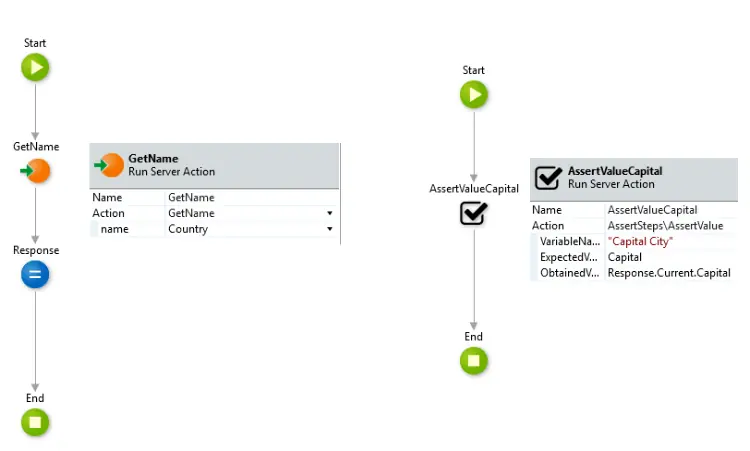
The first step is implemented as an empty action - its purpose is only to respect the integrity of the Gherkin specification. We could have used another API or database to validate that the country is, in fact, a valid one, but it’s fit for the purpose of this example.
In the When step, we call the API we’ve consumed inside this test module: restcountries.eu, requesting the data for the country “Portugal.” You can learn more about consuming a REST API in the knowledge base article.

We store the output of the API call in a Response structure that is inside the web block. We can use this to validate the Capital field in the final Then step:

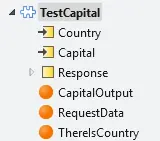
The implementation is pretty straightforward, but now let’s turn this into a scenario outline. The first thing we want to do is to create two input parameters (Capital and Country) for the web block (TestCapital) where we created the BDDScenario.

We now replace all of the usages of “Portugal” and “Lisbon” in the test scenario by the corresponding input parameters. Inside the BDDScenario, we replace the Gherkin syntax terms with expressions that show us the Country or Capital that we're using in the test.

In the When and Then step implementations we replace usages of “Portugal” and “Lisbon” with the parameters Country and Capital.
And now we have a reusable web block for testing different countries and capitals!
Step 3: Validate the Data-Driven Test
Let’s now drag that block into a web screen and define the parameters to have the same Portugal-Lisbon example working as we had before:
After we publish this module and access the web screen running the scenario through a browser, we see that it is working correctly.
Step 4: Implement Data-Driven Tests for the Scenario Outline
So, finally, we can now easily set up a set of data-driven tests for this scenario outline by using Static Entities and Table Records! First, we define a static entity containing all of the examples we defined in the previous section.

Then, we create a web screen where Table Records is fed with all of the data from the Static Entity, showing the Scenario Outline web block for each row.
When we run this test suite screen in a browser, we see the Scenario Outline repeatedly executed for all the records in the Static Entity:
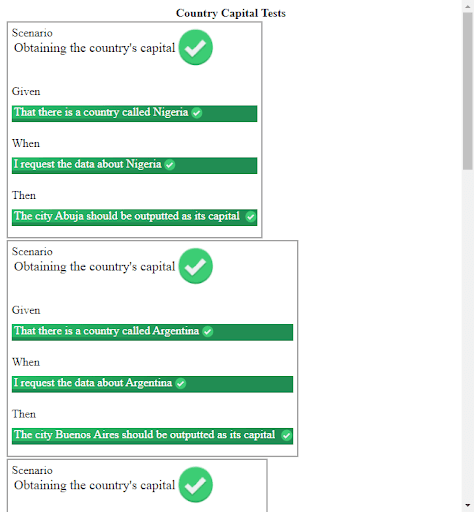
If one of the scenarios fails (for instance, we set the capital of Portugal to be New York), that specific test will fail, but the others will be executed, passing successfully. This sort of test design pattern is powerful when you want to use specification by example at scale. You can use it to both describe behavior and comprehensively test your system.
So there you have it, we’ve covered how to use the Forge BDDFramework to automate app testing, from running several tests inside a single screen, creating a test scenario in Gherkin and implementing it in OutSystems. We’ve also learned how to use the framework’s test-execution REST API and how to do data-driven API testing. Besides this blog post, you can also watch my video on BDD testing using the framework, though a few things were updated since the video, so use the exercises as a reference. Now go ahead and download the component, and please share your thoughts! Haven’t got a Personal Environment? Sign up for a free personal environment and see for yourself how easy it is.