Credit or Debit: The Story of Accepting Payments in OutSystems
"Mobile devices, high-speed data communication, and online commerce are creating expectations that convenient, secure, real-time payment and banking capabilities should be available whenever and wherever they are needed."
This quote by Jerome H. Powell is a good starting point for this story. Now, I’m going to ask you a question: when was the last time you made a payment online?
In my case, I’ve just bought a new domain for my professional website — which you’ll find at the end of the article . Technology allows us to buy pretty much anything, anywhere, anytime. After all, is there any reason I should be prevented from ordering some egg noodles and teriyaki sauce at 4am? I know that there’s a saying about nothing good happening after 2am, but… egg noodles, right?
So, I decided to challenge myself by implementing an integration wrapper (or plugin, as I prefer to call it) for a very well-known payment gateway called Adyen, which has an interesting backstory that’s worth the extra time to read. I started this implementation while I was working for My Game Solutions and continued it later as a freelance OutSystems developer. That’s when I decided to create version 2.0. But enough with the chit chat!
The Business Case
The business case was fairly simple: accept payments not just on a mobile device, but also on the web. Why? Because if the payment was made from a different sales channel or if there were some technical difficulties, a one-time web payment form could be issued. Therefore, we wanted to be able to generate that form. It was also important that we be able to issue refunds.
One concern was that we wouldn’t comply with the Payment Card Industry (PCI) Data Security Standard. Fortunately, Adyen supports non-compliant merchants with Client-Side Encryption (CSE). That took care of our one bump in the road, so we were good to go.
We divided the implementation into three parts: core services, mobile plugin, and web. This article covers the core services and the mobile plugin. The web part is the subject of a different article.
Core Services
The core services are centered on the remote API invocation. The API documentation is fairly extensive since they support ecommerce, in-app payments, and point-of-sales, among others.
Using the baseline stated before and the documentation from Adyen, we made two decisions. First, we’d implement the API using JSON and RESTful endpoints (rather than the SOAP services provided). Second, we wanted to log the requests and responses from the API and only use the fields that we really needed.
So, we implemented services for the following endpoints: /pal/servlet/Payment/v30/authorise for payment capture and /pal/servlet/Payment/v30/cancelOrRefund for processing refunds.
We used this endpoint instead of the one at /pal/servlet/Payment/v30/refund because we wanted to avoid the headache of implementing a new service when all we wanted was to support pre-authorization.
Moving on, we created an application called Adyen Core with a module named (you guessed it) AdyenCore. This app aggregates our core services and our support data model.

The Data Model
Fig. 1 shows the data model we implemented. We split it into three types of entities:
- Control entities: These help control the execution flow.
- Log entities: As the name suggests, these have the logging capabilities.
- Core entities: These store the user data related to the payments.
Let’s examine some of the core entities in more detail.
For the Currency entity, there’s an attribute called multiplier. This attribute stores a value that is to the power of 10, because the Adyen gateway doesn’t receive the decimal separator, and, depending on the currency, the number of decimal places may vary. For example, for the Japanese Yen, no decimal places are considered. On the other hand, for the Euro, it considers two decimal places. Also, the Currency entity is bootstrapped automatically upon publishing the module for the first time.
A payment may have various attempts. The PaymentAttempt entity works much like a history entity by storing authorizations, refunds, and possible rejections in the same entity and enabling us to build analytics and detect potential fraud.
The PaymentToken entity stores entries for a one-time payment. Administrators should use a GUI to create entries in this entity. Upon creating the PaymentToken record, a unique URL is generated and can be sent to the customer.

Now that the data model is covered, let’s look at service integration.
Service Integration
We wanted to implement two different endpoints, so we split the server logic into two actions (see Figure 2).
Adyen_CapturePayment
In the first action, Adyen_CapturePayment, we receive a payment that was already created (see Fig. 1 and 2) and more details for our “fraud detection” possibilities — at this point, only the IP address. Then, closing our input parameters, we have the EncryptedData parameter, which is the result of the CSE algorithm on the mobile and web interfaces. Finally, we return a PaymentResponseId (Not Executed, Refused, Technical Error, or Success), the identifier of the attempt (in the case we want to do some additional logic with it), and a common error structure (ErrorCode and ErrorMessage).
Adyen_RefundPayment
In the Adyen_RefundPayment action, we receive the same payment identifier, but the structure is more complicated because we want to know the user who executed the refund and the reference to the mentioned refund. We also have the common local records for logging (Payment*Log), for REST service invocation (*Request), and the payment attempt.
The Initial Logic

Since we receive a PaymentId as an input parameter, we need to assure two things:
- The identifier is valid: it exists and is in a state that allows modifications. If the payment identifier is not valid for the operation because it is either empty or in an invalid state (for example, a refunded payment that is not eligible for capture), the process is interrupted and an exception is raised. Then, the error is logged, the transaction aborted, and the error output structure correctly assigned.Easy peasy, right?
- The transaction is unique: there are no concurrent executions of the same payment. We assure that the transaction is unique and that other processes cannot access it by using GetPaymentForUpdate, which locks the record in the database until the transaction is finished.

Once we verified that everything was correct and that the request integrity was assured, it was time to build, log, and execute the request (Fig. 4). The initial part for authorizations and refunds was identical since we:
- Created a payment attempt with the transaction details — type, user, you know... the regular stuff
- Mapped the structure for the REST request
- Serialized it into a text data type (or, in plain “programming” language: a string) and mapped it in our logging record
- Invoked the integration with the mapped structure
If everything is properly done and your CSE integration is spot on, this should be a walk in the park. But this is programming and computers, right?

So, be prepared for two common issues when invoking this Adyen authorization service: 401 Unauthorized and 422 Unprocessable Entity. Fortunately, once you understand the root cause, you’ll find that they’re no big deal.

Regarding 401 Unauthorized, to fix it, you must provide the information for “Basic Authentication”. You can either do it here or use the OutSystems environment management console . I recommend the console, because the information will change between environments, and, this way, you come to grips with the integrations tab.

With 401 Unauthorized out of the way, 422 Unprocessable Entity still remains. I will address this a little later, but for now, let’s just say that these two hiccups are resolved, and we were able to get our request going.
Processing the Payment Response
I’m not sure if you’re aware of the old saying, “with a great request comes a great response,” but we value it, so we had to process the response as efficiently as possible—or kind of.

Since we don’t discriminate against requests or responses, we serialized the response and logged it with our support record and entity. Then, we evaluated a specific value in the response to see if the request was successful or not:


But, you might be wondering, what if it’s neither success nor refusal? Fig. 8 has the answer when it says that anything else is considered a technical error, since the response was not what we expected. So, what if the response was “successful”, but none of the previous result codes were returned? Then, we have a problem, and it’s better to flag it and manually follow up with our paying customer or service provider.
The remaining flow for each case is in Fig. 11. Based on Andrew Hunt and David Thomas’s Don’t Repeat Yourself principle, we could have had one “90%++ identical” flow instead of three. But, I’m more of a John Woods type of a programmer because, you know, the guy who ends up maintaining this could be a violent psychopath that knows where I live. Code for readability.
Processing the Refund Response

Last but not least, in this AdyenCore module, we have refund response processing. The flow and the logic remains the same, but this time we just have two possible options: either it is successful or not. There isn’t any “card refused” layer in this.
So, we just have to validate if the refund request was well received by validating one single output value: Response. If this response contains a given value, we know that it was successful. That value is -received], and we do the validation as shown in Fig. 13. This is the final remark on our AdyenCore module.
It’s time to put our core services aside and go deep into the mobile part. Let’s build an awesome GUI, shall we?

The Mobile Plugin
Our plugin had the following premise: it had to have a form for inserting the payment, and then the Pay action (client action) would do all the required encryption before we invoked the payment gateway. Simple enough, right?

So, let’s start with the overall look of our payment form.
It’s amazing, right? So beautiful. It looks like it was made by an amazing UI designer, one of those that wins awards. I know, I know, I’m kidding. It looks awful! But, before you start wondering, the answer is yes, there is a reason.
Let’s now take a look at this form when used on a mobile module with a proper theme defined:

Before we proceed, let me warn you that if the blue-ish background immediately tells you that this is the PreviewInDevices, do not double-click on the home button. I’m not liable for any side effects. You’ve been warned.
I’ve purposely decided not to add any style to the form, because that depends on where you want to use it.
The AdyenPlugin module doesn’t have a theme defined, and all the elements used are common elements, such as containers, labels, inputs, buttons, and the Columns2 widget (from the MobilePatterns module) . So you can have the same “producer” module with your own UI customization, depending on the context.
For the UI, we didn’t apply anything specific beyond the data type. The name field has a maximum size of 26 characters , which, based on my research, seems to be a common value despite the maximum value admissible on a card being around 100 characters. Apparently, for VISA and Mastercard, this value is even shorter: 21 and 22, respectively. Summing up, this should be fine.
The number field is numeric. On your device, the numeric keypad will pop up. The drawback? You need to take additional measures to avoid forcing users to type more than 16 numbers — the common XXXX-XXXX-XXXX-XXXX . These are measures that we didn’t put in place. The library already does some validation, so it could be redundant. Also, what if they increase the credit card number to 19 digits?
Finally, we applied the same for the expiry date and the CVC field. Funny story, though: the second time I had a payment that used a form similar to this, it was an American Express. I was expecting a 3-digit CVC code. Plot twist: AMEX has four digits , and it’s called CID. Not only that, but the card number is actually one number short : 15, the same length as a VISA (15 + 4 versus 16 + 3).
OK, enough with the UI. Let’s move into the technicalities of the encryption and payment.
Encryption and Payment: The Technical Details
Remember CSE (Client-Side Encryption)? Since we weren’t PCI-compliant, we couldn’t store credit card data. As a consequence, we needed the Adyen JavaScript library.
The first thing we did was to import this script into our module. To do this, go to the Interface tab, and look for the last folder. Then, just right-click the folder and select the imported script.
Once we had our script imported, it was time for the plugin.
Encryption
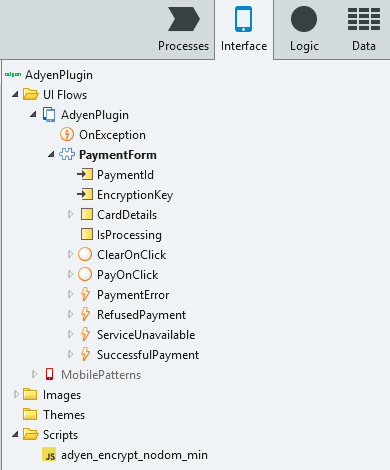
In Fig. 16, you can see the PaymentForm block with two input parameters: PaymentId (which is created beforehand) and the EncryptionKey. This encryption key is provided by Adyen and is accessible on your customer area. Besides this, you can specify the library version (Fig. 17). This plugin uses V0_1_20 since the V0_1_21 is throwing an error. It works perfectly, so until the error is fixed, we’ll use this version.

Regarding local variables, we have a CardDetails record, which stores the data from the form. Also, the more-than-common IsProcessing variable controls our UI changes. For client actions, we have one for each of the buttons and four other events, each one for a specific purpose. The RefusedPayment, SuccessfulPayment, and ServiceUnavailable events are not likely to cause any issues. But you might be asking why we have PaymentError. The answer is simple. If, for some reason, none of the other three events are raised, we’ll raise the PaymentError.

PayOnClick
Let’s take a closer look at our PayOnClick client action, since it’s at the heart of the mobile plugin.

In the PayOnClick action, we started with simple validations , such as if the form was filled out and valid according to the data types. If that was the case, we’d mark our IsProcessing flag as true. When processing, our UI is disabled to avoid some data tampering, multiple requests, or both.
The next step is to use our Adyen library to validate data with a JavaScript widget that returns the result of the validation. From Figure 20, you can see the overall flow and fields within the library that may return invalid: Number, Expiry Date, and CVC.


After passing the pre-checks, we instantiated Adyen’s library with the encryption key and a set of options. As you can see, there were no options defined since we didn’t need them. You can find the full list of options in their GitHub project.
Then, we created our cardData object by using the input parameters of the widget (through the $parameters alias). Once it was loaded, we validated the data and processed the result. If the values were valid, we would just invoke the validate method and a string would return. Something like this:
adyenjs_0_1_20_1$ERKC5mmDasXN+5YcQRaZsYGQkWra5rNlY7LQcnnkn3cT9MaKD6AvzlZD1Fwb394NVtx0nGQscR02OsbRbYqgzxvJC2dEj9z49VXaWzkpQ5RHtSP5MF4R2roRP6CH8Y4wVTxE6if207XdsomEajp1mug6ZDJVtisu6h6lC/UV1Zo+CS38YsSkFCdWXB3Y9ir/V3J4W1a4RoLjhqwLggPrZ6Ist+WCCpNirMIsLiqa6lY/XQhwd7tLqPwaMrOFSvjqQfN3RUw0Ihe2ahFBQmIHl+5NVFvHwybgIaekz5Bzjq/R3llsyotGsor/7oIEjjkbNAR+KGnJWdCNcYPTtQ2S1A==$yJXXA0GBGkqTIBH24vfZ45eluvLSeyByDCsDnW5FYQ/yQbTs65qQVSpPFKgsknSbdKlCa39LseepHdZBoSRM88RVKUxLzP8URiUKgB1wXIpdLm0qLAq+HuRhX1droyWcP7rQcnJSmQN91D1WitTUDvxzDL6rWYoO3AmiA3kjHV3Gni6SmvebOP48KJa0IdhHJqssxc+21guvRMHlt7itTQZUjgQQSyAK3WQ21C8j/fm6cMkPbjXClmH6CLG2py55kg5FunfSPrFQhReWtHBMC8SxfPf/ozE+KKHqeAuLJc4j+02Vud2aa6une3EHneKklO+/sfkNE2CFA0JfOJC+KwN/YXuBtrxRVL3wjtUYu54YwdSkzAA=
The library version you’re using will be highlighted in bold . This is very important, especially for debugging purposes. Remember the 422 Unprocessable Entity? Yes, that’s right. All , and I really mean all, the times I had this error, it was an issue with the encrypted data.
How did I know that? Easy. Adyen provides a “playground” called API Explorer, which you can use to validate your calls. Just retrieve the complete JSON that you’re sending to the endpoint ( headers are not required ), and you’ll immediately receive the issue, as you can see in Fig. 22.

Now that we have discussed this almighty error, let’s move on to the rest of the PayOnClick client action.
After successfully passing all the validation checks and get the encrypted data, we needed to: get more audit data and build our request data. Fig. 23 shows how this is done.

So, in our quest to retrieve more audit data, we obtained the IP address assigned to the device. I used an extension I built called NetworkInterfacePlugin. As the name suggests, this implements the cordova-plugin-networkinterface native plugin.
Unfortunately, this has a caveat: if you’re connected to a WiFi network, the GetIPAddressWIFI client action will return your internal IP address , which serves the purpose, but could be better. If we are not able to get any IP address (either internal or external), we stop the request, because you’re not connected to the internet, or you don’t have Cordova available. Both are deal breakers.

With an IP address, we can build the request data, which is a record with your IP address and the encrypted data , and invoke the Adyen_CapturePayment server action. This is the action that we have created beforehand in the core services (AdyenCore) module.
Depending on the return value from the Adyen_CapturePayment server action, we trigger one specific event and pass the corresponding parameters. For SuccessfulPayment, it’s the PaymentAttemptId — in case the user wants to do anything. For others, it will be the common error structure. Finally, we reset the value of the IsProcessing variable, so the user can type new details, if required.

As a freebie, I’ve built a sample mobile app that allows you to authorize and refund payments. If you have an Android device, you can use the QR code on the image [Username: neo; Password: 123!”#]. If you have an iOS device, you can either: buy me a beer (very important) and I’ll add your UUID to my developer account, or use the sample application below, and publish and generate the app yourself.
What’s Next?
And this concludes the mobile plugin part of the story. Be sure to check out the other chapter, where I discuss the web implementation and how we are able to have a nice looking experience that is also secure.
Before I forget, remember that professional domain that I bought and proudly announced at the beginning of this article? Well, you can take a look at it here (or just type https://armandogom.es). It’s still in the construction phase, but you’ll be able to find out a little more about me, what I have done so far, and what I’m trying to do right now. Feel free to reach me there or through hello@armandogom.es.
It was a pleasure . And, if you read everything up until the end, I really appreciate your attention. Take care.
Related links
AdyenCore Forge Component: https://www.outsystems.com/forge/Component_Overview.aspx?ProjectId=4015
AdyenPlugin Forge Component: https://www.outsystems.com/forge/Component_Overview.aspx?ProjectId=4016
AdyenPluginSampleApp Component: https://www.outsystems.com/forge/Component_Overview.aspx?ProjectId=4017
QR CODE is a registered trademark of Denso Wave Incorporated.*