How to Make a Mobile Stories Pattern Using the OutSystems Platform
Most of my professional life I have been what is usually referred as a full-stack developer, someone who had complete control over all the code I developed. So, it was quite a surprise to some of my peers when I decided to try OutSystems. The typical question was, “Why are you giving up control of what you do to work in a limited environment?”
My typical answer, after trying and understanding OutSystems was, “I’m not losing anything with it. The difference is that, most times I can just customize or use an out-of-the-box solution that it’s more than enough for my problem instead of building a solution from scratch every time.”
To make sure that this is clear to everyone (I don’t know why many of my former colleagues still struggle to accept my choice), I’m going to show how you can create and customize complex patterns in OutSystems quite quickly.
I’ve picked a request that I got some time ago. It’s an Insta Stories pattern, something that I’m sure has already caused some of my fellow developers to find themselves on the verge of throwing themselves out of a window (let’s hope you were on the first floor).
My proposal here is simple. I’ve created (and I’m sharing) the pattern in the “traditional” way. Then, I will show you a step-by-step (I’m sharing it, too) process for how you can do it in OutSystems and customize it with some CSS and HTML.
So, let’s go.
Going Back to the Start
When I was first asked to create a stories pattern, the first thing I did was what a well-prepared developer should always do. I investigated. I searched around to see if someone had already done something like this. My requirements were simple:
- Something that would rotate
- Something that could have different information in each one of the cards
So, I went to see what’s out there. I researched 3D carousels since they provide a movement that I could use in my new pattern:

Having found my a rotating pattern, it was time to search for the best way to make a parallelepiped rotation since I wanted to keep it simple and performant:

This pattern was exactly what I needed for the visual behavior of the rotation between stories.
After I had both the rotating feature and right behavior in the transitions, I came across the perfect pattern. One that had both features and also was supported by all the major browsers:

A Solid Foundation Leads to a Good Solution
Having investigated the possible solutions, I’m now able to make some assumptions on my approach to my challenge. It’s clear that I have two big building blocks here:
- An object that I’ll call OS_Story. This will be the stories wrapper, and it needs to be an independent object. Each story item will be created and manipulated (animation and content) from this object. This object will provide the rotation with swipe behavior.
- An object that I’ll call OS_StoryFace that will live inside of OS_Story and be a face and container for each story. It can have different types of stories.
Now that my approach is decided, it’s time to think a bit about performance.
I’m creating something that will run on a mobile device, so I needed to take a moment to think about the best way to improve the performance of the code. My first option is to work with a parallelepiped with four faces and change the content of the faces according to swipe behavior. Only having four faces (OS_StoryFace) in the DOM means the animations and behavior in general will be much more fluid than if I had more stories available. Also, the four faces assure that I can gracefully add new stories without messing with the user experience.
Building a Solution
I now had a solid foundation for building. First, I did it in a typical fashion with HTML + CSS + JS. How? By creating the objects, which I’ve already told you about.
If you are thinking, “Why do I need to create objects for this?” keep in mind that:
- First of all, you will add some behaviors to the parallelepiped wrapper (OS_Story) that will contain the four faces (OS_StoryFace). This OS_Story will be the base object of your structure; in other words, this will be the parent for all the other items (OS_StoryFace).
- Next, you need to think about how each face of that wrapper could have different structures, like text with a background image, text with background video, or just text with a background color. If you want to complicate this further, each face could have different blocks with a different type (e.g., one face with text with background video and another one with text and background color).
If you think in terms of object-oriented programming concepts, you will have a similar approach here. The parent (OS_Story) will have faces (OS_StoryFace), and it’s the parent that give “orders” to the children. As a result:
- The HTML structure contains the parent item box3d-wrapper, which, in turn, contains the box3d-container and the faces, boxFace, each of which will be a parallelepiped face.
- The CSS has all the styles needed to make the HTML Structure be like a 3D parallelepiped.
- The JavaScript provides all the code needed to for all the behaviors I’ve just mentioned, like limiting the faces to a maximum of four faces in the DOM and the main object (OS_Story) that is responsible for swapping info inside the faces according to the user interaction.
You can see check the CodePen with all the code comment here.
Making Beautiful Stories In OutSystems
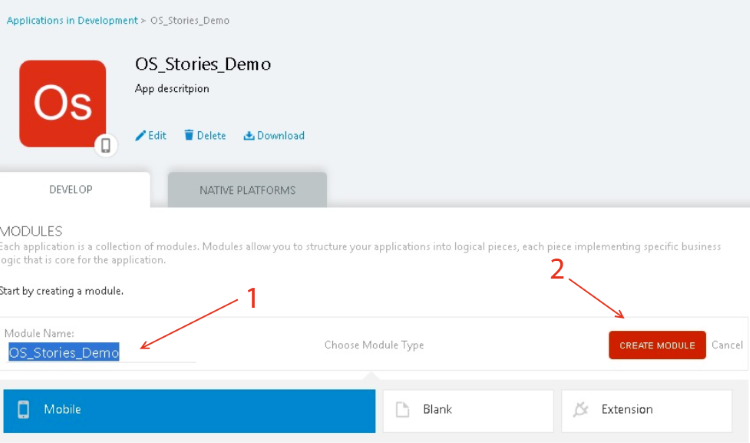
Paving the way to what I really want to show you, let's start with by creating a mobile app in the OutSystems IDE (Service Studio). We’ll name it OS_Stories_Demo and add a description:

Now it’s time to create the eSpace (module) where we are building the pattern:
Building the Blocks
With the basics in place, it’s time to start building our two big blocks:
- The OS_Story that will feed our parallelepiped.
- The OS_StoryFace that will contain the content of the stories.
Here’s how to do it:
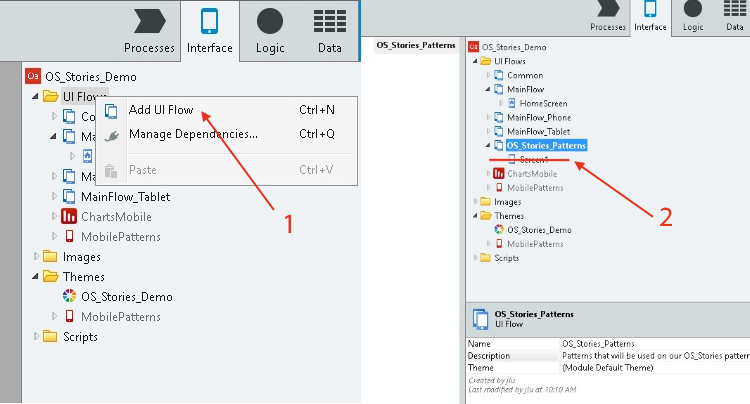
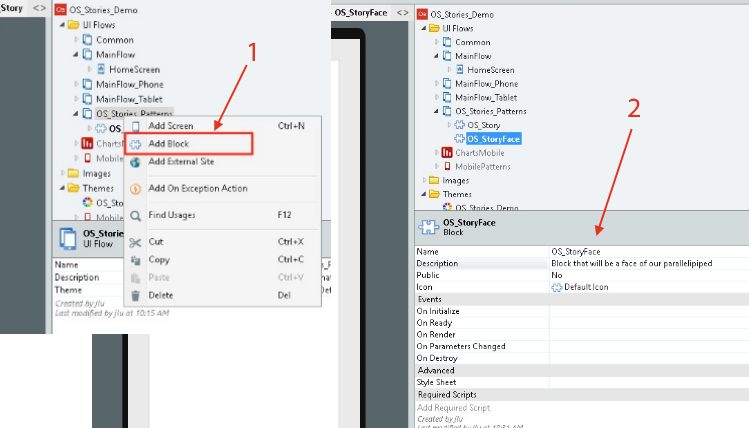
1. Inside the eSpace, add a new flow called OS_Stories_Patterns and remove the screen that had been added by default. This is where we are going to add all the blocks necessary to make this work:
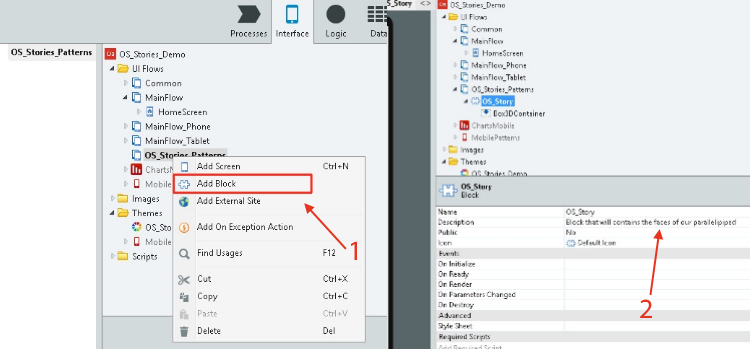
2. Inside the flow we just created, create a new block named OS_Story and add a description to it:
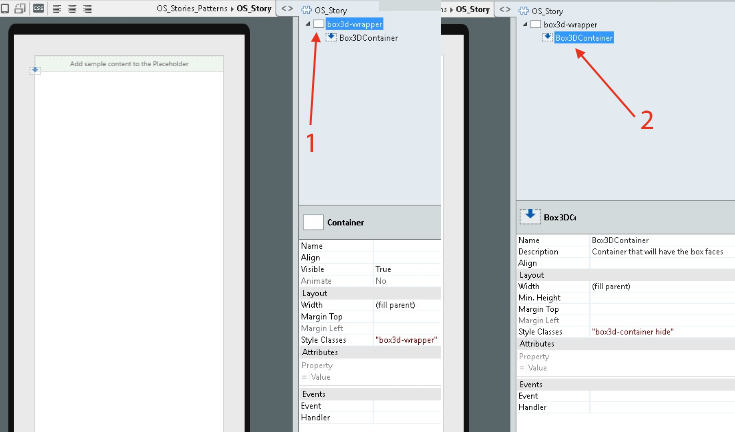
3. Create the OS_Story structure by adding a container:
4. Create a new block, name it OS_StoryFace, and add a description to it:
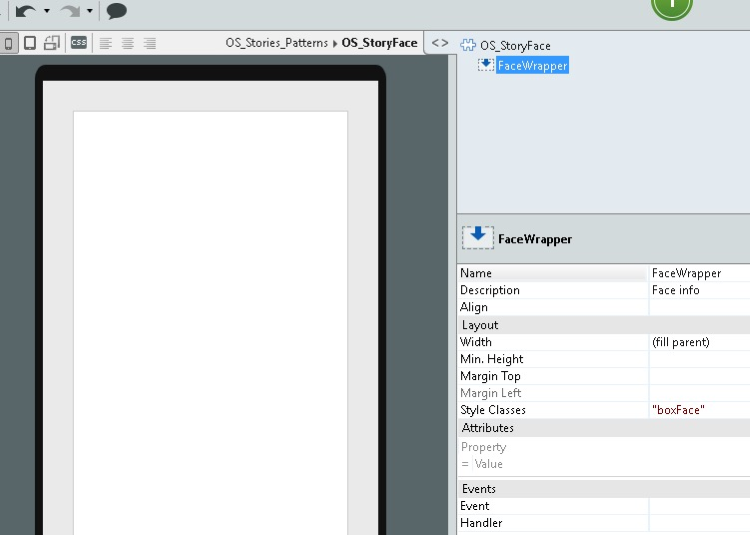
5. Create the OS_StoryFace structure with a container with the boxFace style:
We now have the two main blocks needed to create our custom pattern. It’s time to take care of the data.
Creating a Data Structure
For this, we will create a static structure that will be used to add items (OS_StoryFace) inside the OS_Story content. To do this:
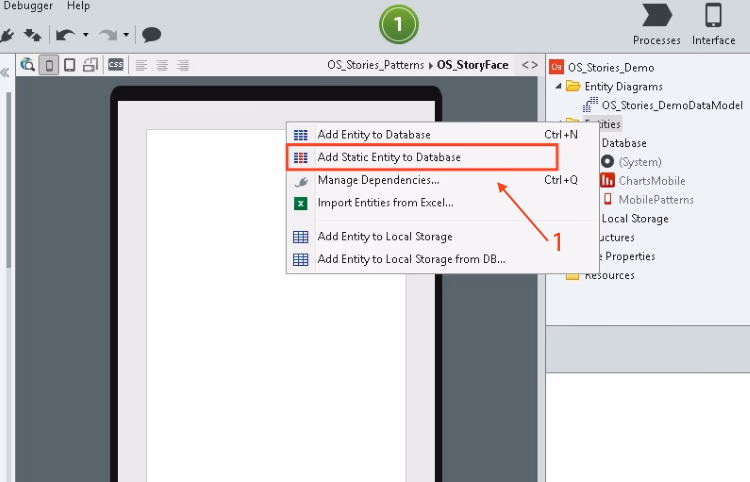
1. In the Data tab, right-click on Entities and select Add Static Entity to Database:
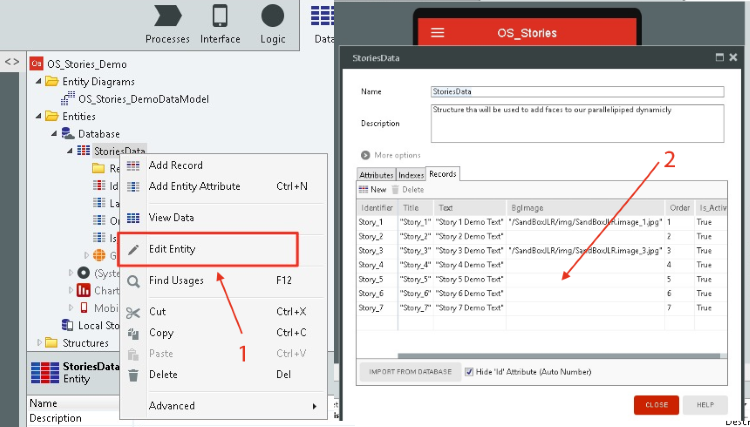
2. Name the entity StoriesData and add the new attributes:
- Title - type Text and length 50
- Text - type Text and length 50,
- BgImage - type Text and length 25
3. Edit the entity to add the records (in our case we created seven records to be able to show as many as seven stories):
The data structure is now set. In this case, we will have seven faces, but remember that our OS_Story only will have 4 faces in the DOM. What this means is that we can have seven stories but, we will just load a maximum of four the first time and then add one at a time, with a maximum of 4 loaded concurrently.
Assembling the Pattern
Now that we have the main blocks, it’s time to create the pattern. Here’s how:
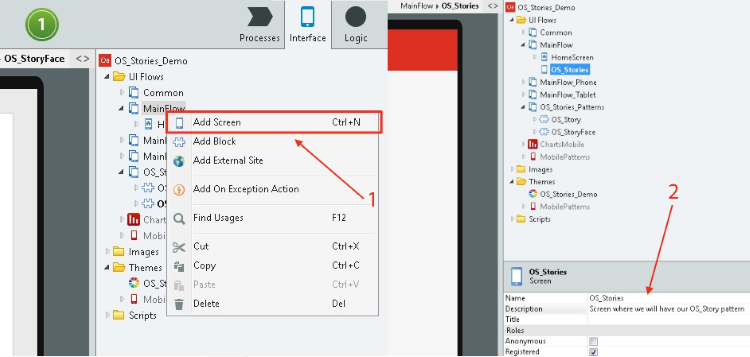
1. Add a new screen named OS_Stories and add a description:
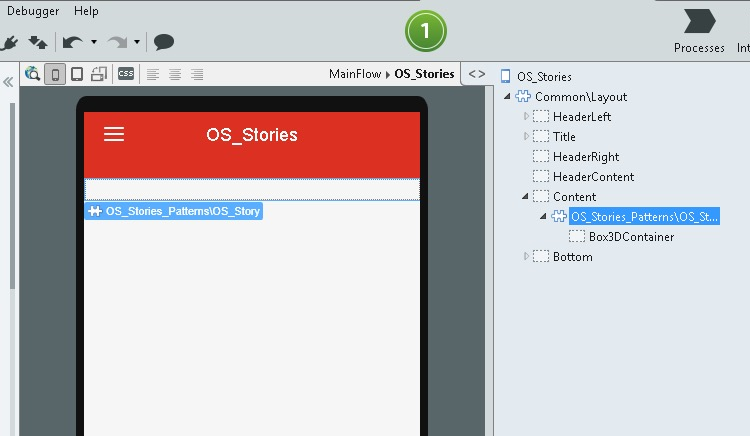
2. Drag the OS_Story block to the OS_Stories screen content:
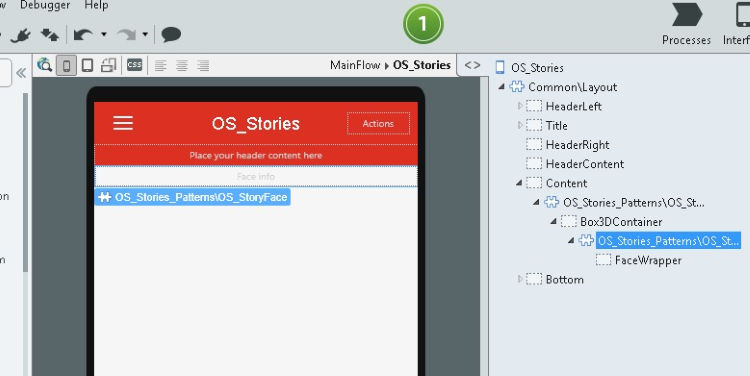
3. Drag the OS_StoryFace to the OS_Story container (Box3DContainer):
Now we have our pattern basic structure. We already have our blocks in the page, but we just have one OS_StoryFace inside of OS_Story. It’s time to publish for the first time! Just click the 1-Click Publish button.
Retrieving Data from a Database
We have created the data structure, but we need to feed it with the dynamic data. Therefore, we need to fetch all that data as follows:
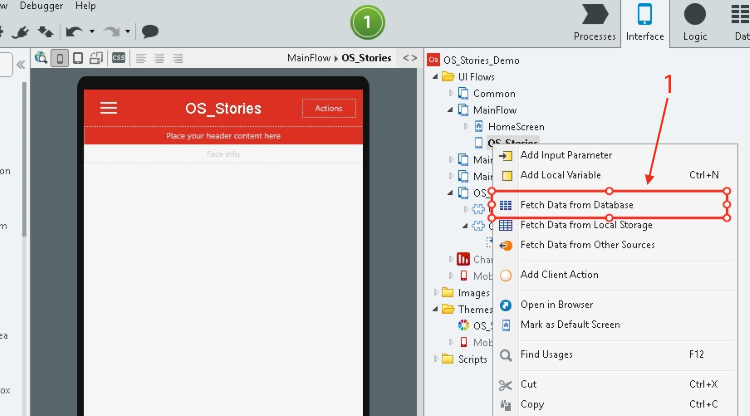
1. Right-click on OS_Stories and select Fetch Data From Database:
2. Drag and drop StoriesData to the Aggregator:
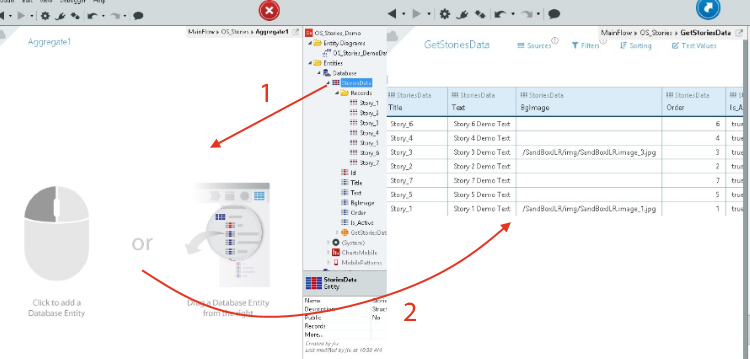
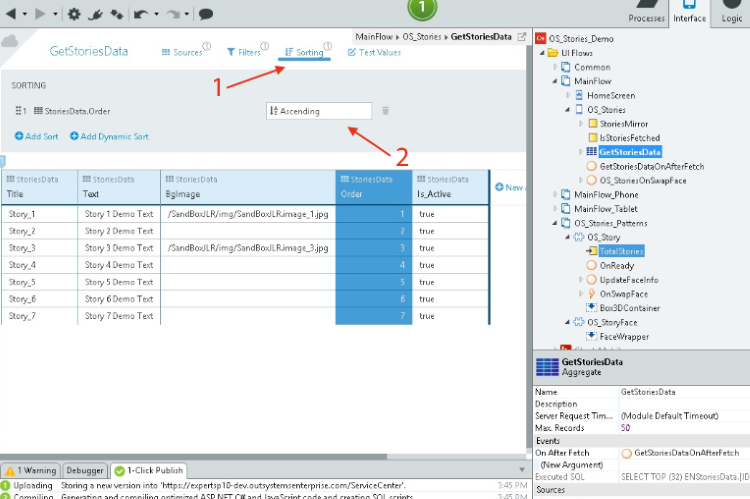
As you can see, the aggregator has a new name, GetStoriesData. We now need to organize the data based on an Order attribute. To do this, apply a sort to it to get the data organized from the Order attribute:
Having the Right Data at the Right Time
Now that we have access to all data in StoriesData, we need to make sure that we only manipulate that data when we have it all. For this, we will need:
- A client action to make sure that the necessary data is available, which will require us to add an OnAfterFetch event to the GetStoriesData aggregator.
- A local variable, to store the fetched data locally. We need to save four items from StoriesData at a time. This will serve as a mirror for StoriesData.
- A local variable to check if all data is already available or not.
Here’s how to do it:
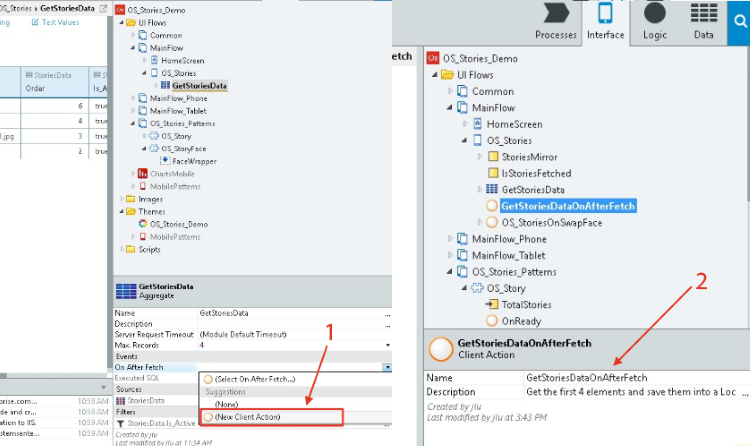
1. Create the client action by clicking in NewClientAction in GetStoriesData. This new client action only will be executed when all the data is fetched:
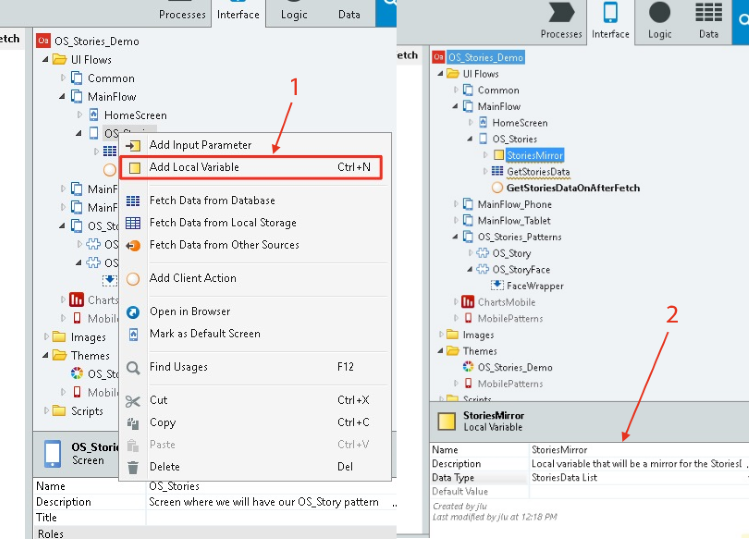
2. Create the StoriesMirror local variable in the OS_Stories screen:
Now that you have the client action and the variable for store the stories, go back to the recently created client action and:
1. Add a FOR cycle on the GetStoriesData record list with the Maximum Iterations parameter set to only four items.
2. Add a new client action, define it as a ListAppend for each item, and add it at StoriesMirror variable:
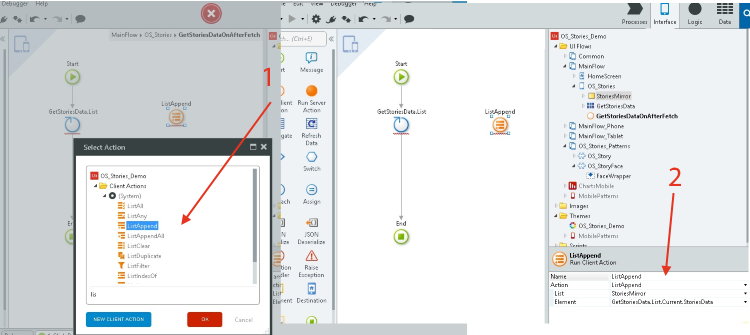
3. Connect the FOR cycle to the ListAppend:
With these steps, we are getting the first four items from StoriesData and saving them to the StoriesMirror local and mirror variable.
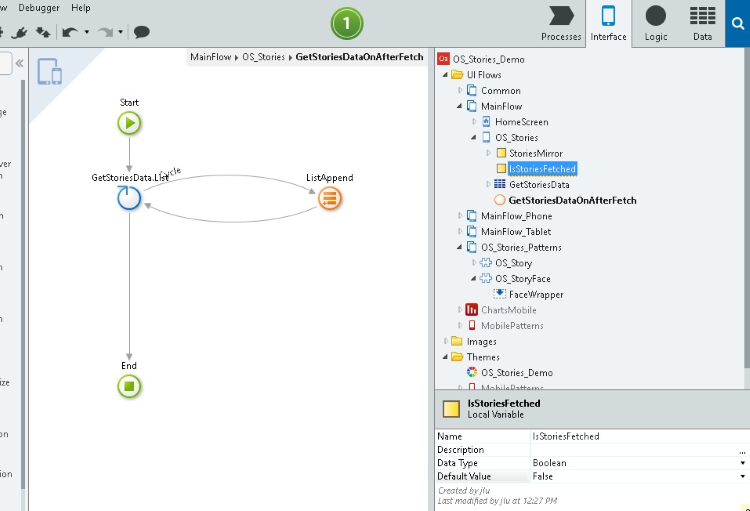
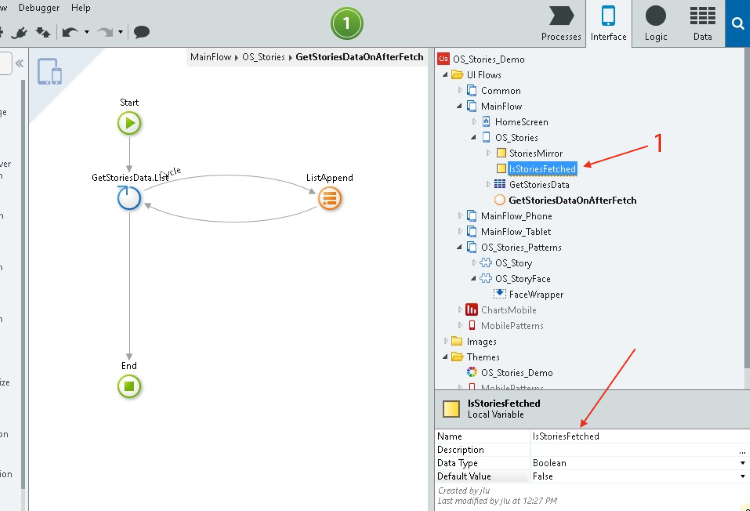
Now it’s time to add a variable that will be used to control the moment that OS_Story block is initialized on the screen as follows:
1. Add a new local variable IsStoriesFecthed, Boolean and False as a default value:
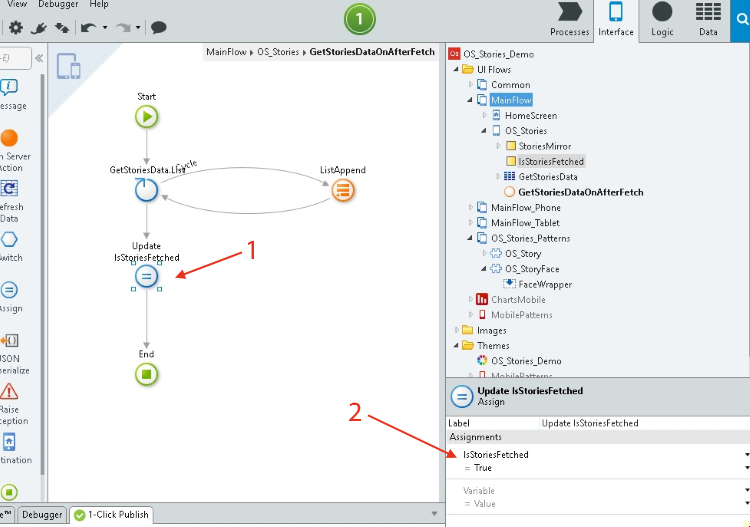
2. Change the IsStoriesFecthed value to True when the ListAppend ends:
To finish all the processes of retrieving and manage your data, publish the application:

Now we have the blocks, the data structure, and the logic to get all that data that will be used at the right moment.
Revealing Moments
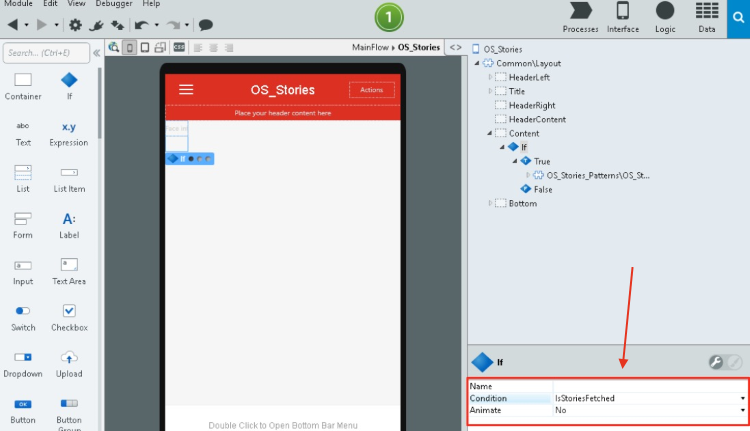
Next, we need to ensure that the OS_Story block will only be placed on the screen when the IsStoriesFecthed is True. So, we’ll:
1. Add an IF statement around the OS_Story, and assign the IF condition to the IsStoriesFecthed value:
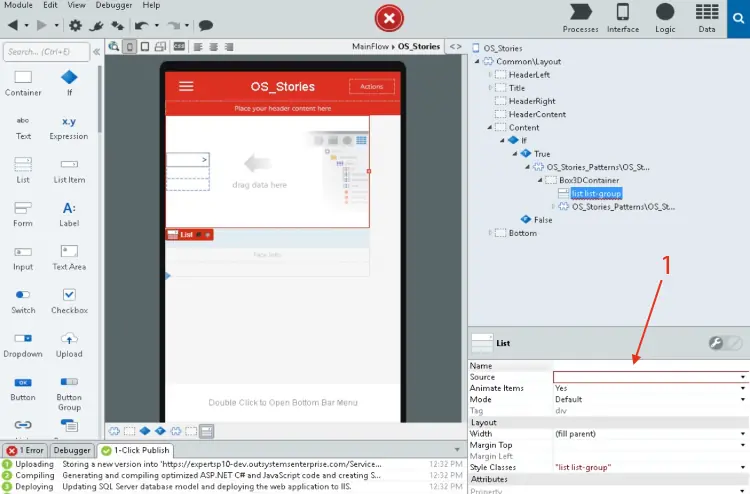
2. Dynamically add more than one face to OS_Story block by adding a List block to the OS_Story placeholder:
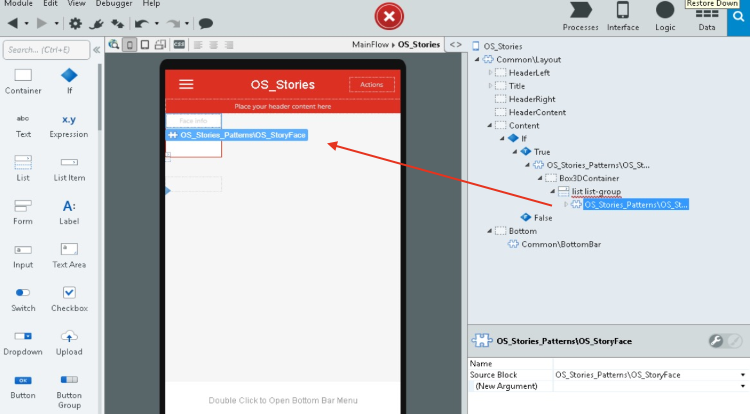
3. Now that we have a list, we need to fill it. So, move the OS_StoryFace inside the List block; this will make the OS_StoryFace a repeated list item:
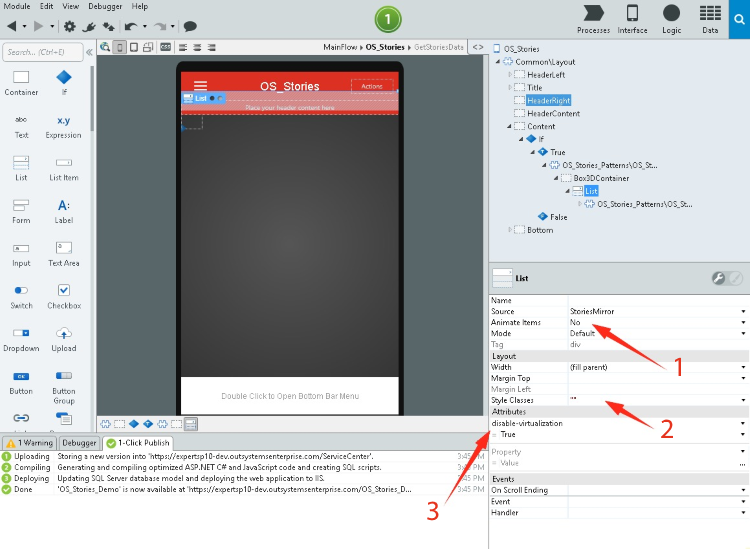
4. To finish creating our four-faced pattern, we need to change the attribute source of the list to StoriesMirror, which will make sure that all items from this list will come from your local list. Also, we need to remove all the style classes and add a new attribute disable-virtualization = True to disable the virtualization list:
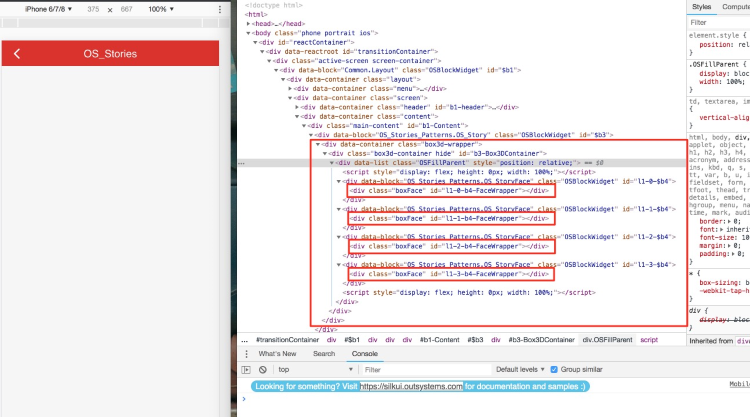
5. Re-publish the application and open in your browser. At this moment, nothing is visible, but in inspect mode, you will see the HTML structure that we’ve created. You can also see that we have already the desired structure, which is already dynamic:
Making It Beautiful
The pattern is almost finished; it’s time to make it as beautiful as a native solution:
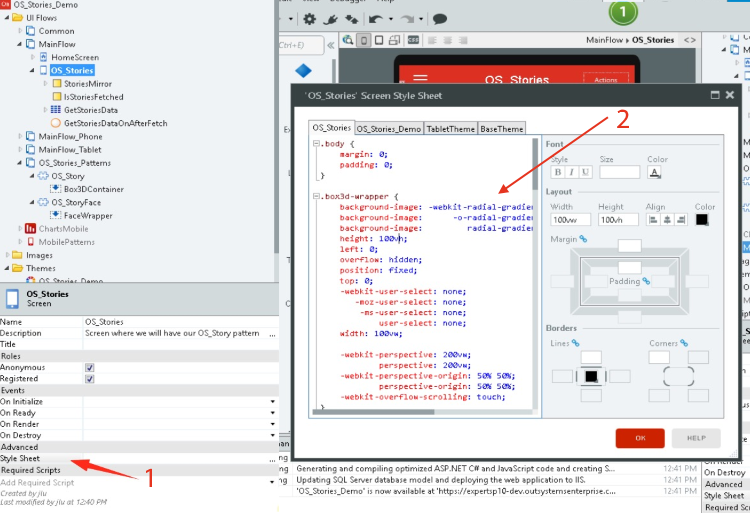
1. Go back to my codepen, copy the CSS to the OS_Stories, and paste it all in the StyleSheet attribute:
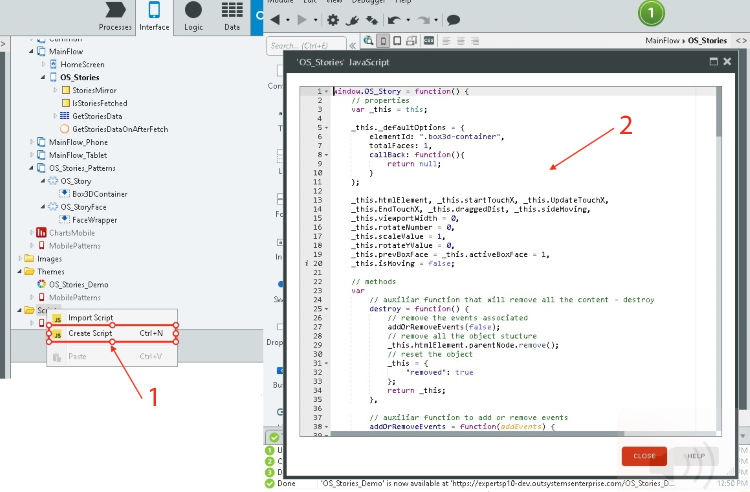
2. Copy the JavaScript object from the codepen. Back in the platform, create a JavaScript file, and add the OS_Story JavaScript object to it:
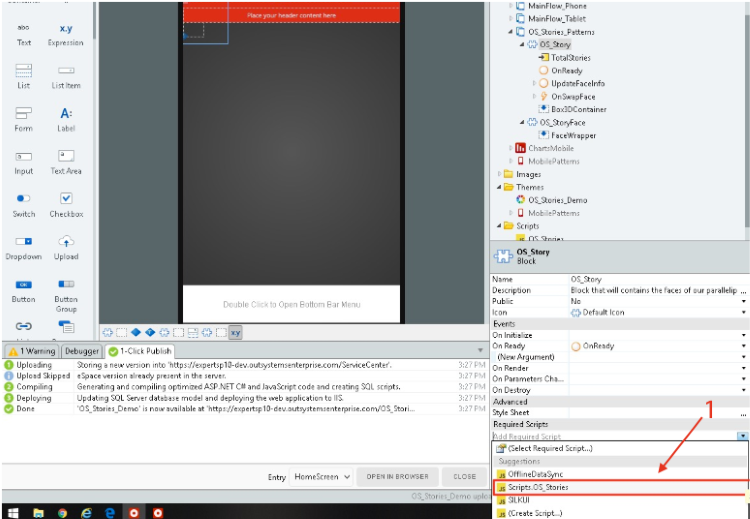
3. To apply the JS to our pattern, we need to create a reference between the JavaScript file and the OS_Story block. Select the OS_Story and in Required Scripts, select the JavaScript file created:
Now the CSS and the JavaScript object are the right place, and the pattern has the right look and feel.
Making It Live
Out next step is to add the javascript code to create the OS_Story instance and pass the parameters that are expected in the object:
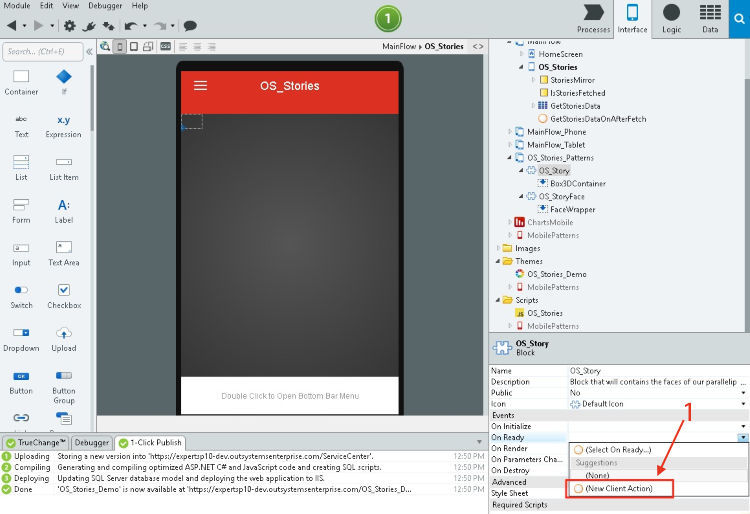
1. Add the JavaScript block to create the instance of the OS_Story object. Select the OS_Story block and add a New Client Action in the OnReady event:
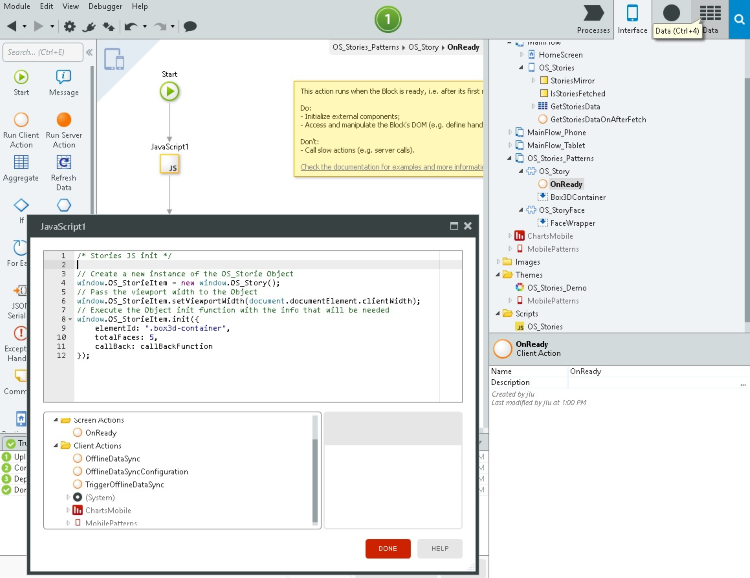
2. Inside the OnReady client action, add the OS_Story object initialization:
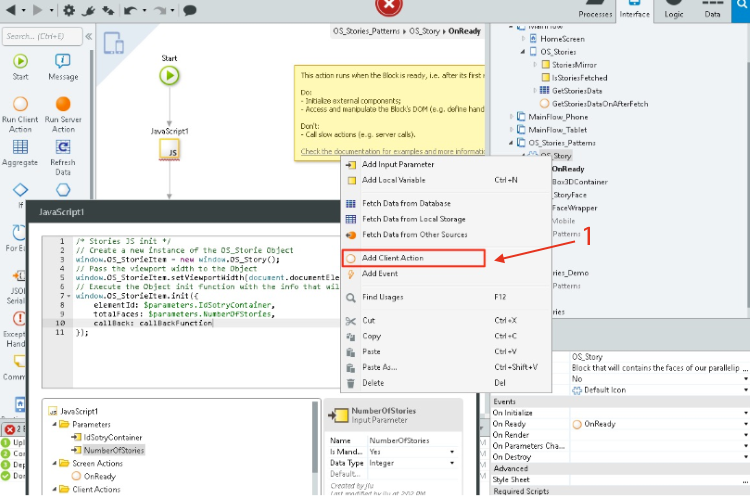
3. Change the elementId and totalFaces values to input parameter values:

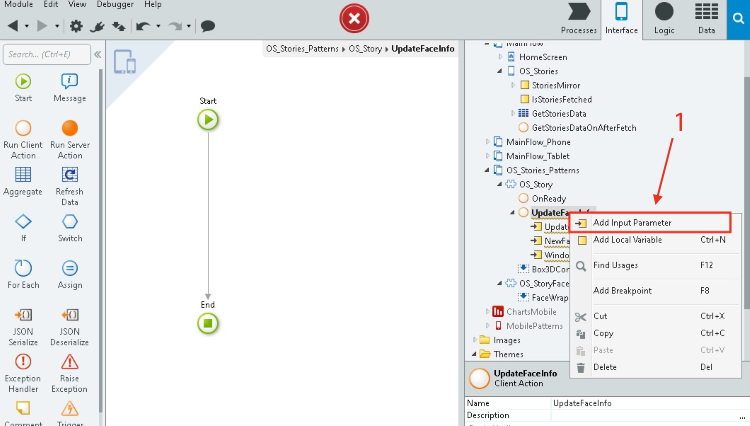
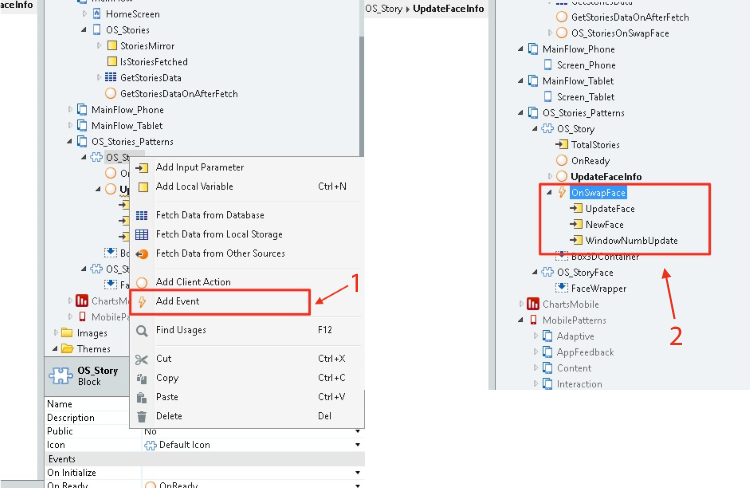
4. Define the callBackFunction by right-clicking in the OS_Story block, adding a New Client Action, and naming it UpdateFaceInfo:
5. If you remember our JavaScript code, this callback function will be used to trigger an event that will be responsible for changing the faces content. That function (UpdateFunctionInfo) needs to receive 3 input integer type parameters (UpdateFace, NewFace, and WindowNumbUpdate):
6. Add the OnSwapFace event that will be triggered by the function that we just created and add the same parameters that we added to the function:
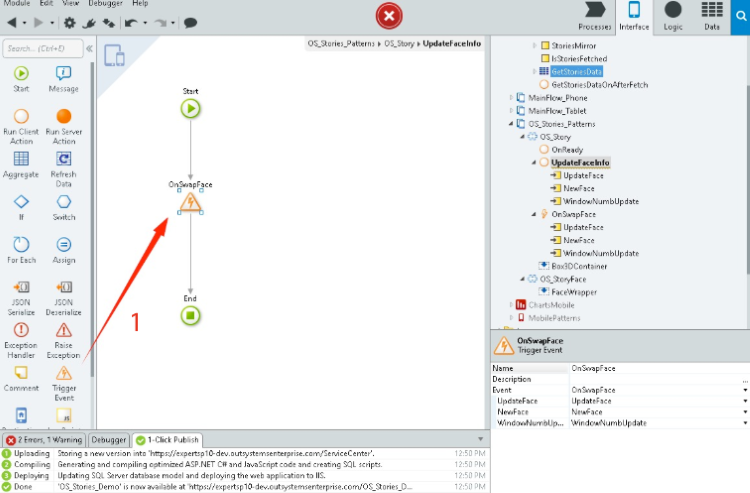
7. Inside the UpdateFaceInfo function add the Trigger Event, then select the OnSwapFace event to the trigger, and assign the event parameters to the function parameters:
8. Now it’s time to add the UpdateFaceInfo reference to the OS_Story init in the OnReady javascript block:
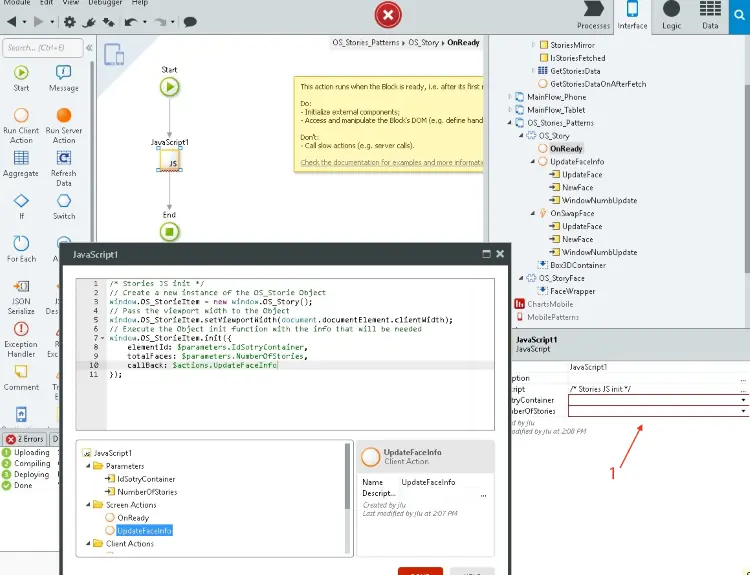
9. Assign the values to the inputs:

10. Add a TotalStories parameter to the OS_Story block with Integer type:

11. Assign the TotalStories input in OS_Story block to the total items:

We’ve now already assigned all the info that we need to OS_Story block.
My Story vs. Your Story
Our final step is adding a Client Action in the screen that will be assigned to the OS_Story trigger event. In other words, this function will be responsible for swapping the face content.
So, add a new Client Action to the OS_Stories screen, call it OS_StoriesOnSwapFace, and add it the three Integer type parameters that are passed in the trigger event (UpdateFace, NewFace, and WindowNumbUpdate):

Inside this client action (function) we will assign the new face values according to the rotation. Add an assign and assign the value:
StoriesMirror[WindowNumbUpdate-1] = GetStoriesData.List[NewFace-1].StoriesData

Assign the OS_StoriesOnSwapFace client action to the OS_Story block trigger event and then publish the application once again:

If you preview your work, you will see the same information in all faces.
To change the information between faces, open the OS_StoryFace, convert the text to an Expression, and assign the value to the StoriesMirror.Current.Title:

Publish the application:

Open in Browser:

And check the behavior.
You have accomplished the main goal: a parallelepiped with 4 faces and changing the faces according to the rotation. To make your life even easier, click here to get the solution.
The Final Swipe
Now that you have seen how to create an advanced pattern in OutSystems, it’s up to you to take it from here and work to improve this custom pattern. On paper, it might seem a bit fiddly, but I’m sure that you will understand two things. After you grasp the platform, the speed for create these kinds of patterns will increase. Also, the possibilities are endless. As you can see, with all the freedom to edit JavaScript and CSS in your hand, you can do virtually anything.