How to Use TinyMCE in Your OutSystems Applications
One of the things I love the most about OutSystems is the fact that, as fast as one can go -- and you can go really fast -- you'll never hit a wall. Yep, you read that right! You can extend your applications with your own front-end or back-end code, so you're never boxed in.
In the following article, I put the platform to the test and try to integrate the TinyMCE rich text editor into a simple application.
What are Components?
Low-code platforms like OutSystems speed up application delivery because they offer components for building your apps. A component is a reusable object, and the OutSystems Community maintains more than 2,000 of these in the Forge, a repository of open-source prebuilt and proven modules, connectors, applications, and more.
Thinking
Before creating your component, ask yourself the following questions:
- What will it do?
- What options will it have?
- What are the main use cases? How should you offer them upfront?
I want my component to make it easy to add a basic TinyMCE editor to an application. It will also have an option to include a custom button in the toolbar.
Building
Let’s start by creating a new application. Use a meaningful name, give it a description to help people understand the purpose, and use an icon to help identify it.

I’ll be using the TinyMCE 5 Dev Preview. You can download the pre-compiled zip here. We don’t need to include all the files. Here are the ones to add to the resources of the module.

Don’t forget to set the Deploy Action to Deploy to Target Directory. We’ll need to point to these files in the src attributes of <script> elements.

To make the component reusable, we will be using a web block.

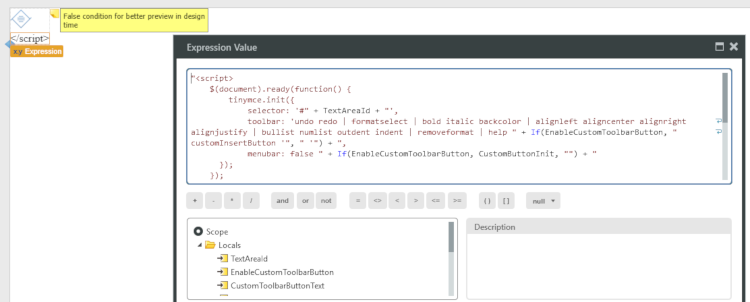
You can see a couple of important details in the image:
- The web block has one input parameter called TextAreaId. It will receive the runtime identifier of your text area where the editor will appear.
- The web block has an Ifwidget that surrounds the expression that will hold the JavaScript code necessary for initializing Tiny. The expression is in the False branch. Your web block will occupy less space in your screens during design time.
The init code in the expression looks something like this:
<script>
    $(document).ready(function() {
        tinymce.init({
            selector: '#" + TextAreaId + "',
            menubar: false
      });
    });
</script>
Notice we are using the TextAreaId, our web block parameter, as the selector in the JavaScript initialization.
Remember to change the Public property of the block to Yes; otherwise, you won’t be able to consume it in other modules.

Demoing
Now that we have the core functionality ready to be consumed, let’s create a demo module to test things. We’ll call it TinyMCE_Demo.
Create a new screen. To initialize the Tiny editor:
- Use an Input and change the Text Lines property so that the input can be rendered as a Text Area.
- Name the Input; otherwise, it won’t appear in the dialog for the TextAreaId input value in the web block.
- Drag the TinyMCE web block to your screen and pass the correct Input identifier.
- Publish the module.

After publishing, when you open the page, you will have a Text Area rendered, and the Tiny editor will be initialized!

Adding
Now that we have a basic editor running, time for extra functionality: a custom toolbar button that will add a string of text to the editor. Instead of creating a new web block, we will add two new input parameters to the one that already exists. One is for toggling the feature, and the other is for receiving the string of text.

In the web block’s preparation, let’s add an If widget and construct the extra bit of JavaScript necessary for the custom button.
Notice we are adding the custom text to the code and sanitizing it to prevent script injection.

Then, use the extra bit of code to initialize the editor in the web block’s expression.
When deployed, the new editor will render a new custom button that appends “Hello world!” to the text area.

Finishing
Before publishing the application in the Forge, remove the unused dependencies in your modules. We don’t want them to be bloated.

Want More?
Check out the “The Complete Guide to Creating Components”.