Circuit Breaker (ODC)
What if your most important API integration fails for a period of time?
We’ve all been there: you’ve delivered a high-performance application in OutSystems that’s fast, sleek, and seamlessly integrated with industry-leading APIs for payments, shipping, or AI. Everything runs beautifully until a third-party service, outside your control, encounters latency. In any modern architecture, these external hiccups can cause a ripple effect. Your ODC or O11 application remains dedicated to completing the request, but without a circuit breaker, it lacks the intelligence to know when to stop waiting.

In modern, distributed architectures, we design for failure. A less dramatic way to say this is that we proactively plan for the what-if. That’s why the Circuit Breaker is necessary for any resilient, modern integration.
Despite its importance, time and again, when I join a new project and mention the Circuit Breaker pattern, I’m met with blank stares. Even among veteran developers, it often feels like a brand-new concept.
So that’s why we are revisiting this topic. While this pattern was famously introduced to the OutSystems community by Carlos Sousa some time ago, it has become even more relevant with our shift toward cloud-native architectures like ODC.
Today, I’m excited to share a new OutSystems Circuit Breaker implementation with you. A full-featured toolset, this version introduces a dedicated backoffice to visualize API health in real-time, along with some 'cool' testing features. These features allow your QA teams to manually mimic different circuit states, turning what used to be a silent failure into a fully manageable, visible event.

Table of contents:
Why developers often miss this
In modern software delivery, avoiding the Happy Path trap is a global engineering challenge. OutSystems makes integrating complex REST APIs so seamless that it’s easy to overlook the physical reality of distributed systems, which is the vast web of fiber optics and third-party servers standing between our code and a successful response. OutSystems excels at orchestrating these connections, but even the most robust platforms are subject to the unpredictable nature of the internet. Without a resilience strategy, a minor lag in an external dependency can lead to thread pool exhaustion, where a single slow API can stall the entire front end.
The barriers to adoption
The black box perception
Abstraction is a core strength of low-code and cloud platforms. However, developers must recognize that this perception of a black box means they should proactively implement application-level resilience patterns. Yes, the platform provides a native timeout. But waiting a few seconds for an unresponsive external service consumes a web server thread for the entire period, making aggressive fail-fast logic essential for high-performance applications.
The state management headache
A true Circuit Breaker is stateful. It must remember failures and timestamps across all user sessions. Implementing a stateful Circuit Breaker requires robust state management, a known architectural complexity in distributed environments like O11 and ODC. Without a dedicated solution, many developers find the implementation too complex to tackle.
The wait-and-see culture
Resilience is rarely a functional requirement. Unfortunately, many development teams, regardless of the technology stack, have a wait-and-see attitude toward resilience. They only realize the need for a circuit breaker after a production failure stalls the entire application.
The Circuit Breaker: A quick refresher
For those who are unfamiliar, the pattern works exactly like the electrical breaker in your home. If a fault is detected (too many failed requests), the circuit trips, and all subsequent calls are immediately rejected without hitting the network. The struggling API has time to recover, which prevents your application from hanging.
The three states
- Closed: Everything is normal. Requests flow through. If a request fails, we increment a counter.
- Open: The failure threshold is reached. The breaker "trips." All requests fail immediately with a “Circuit Open” error.
- Half-open: After a cooldown period, the breaker allows a single test request through. If it succeeds, the circuit closes. If it fails, it stays open.
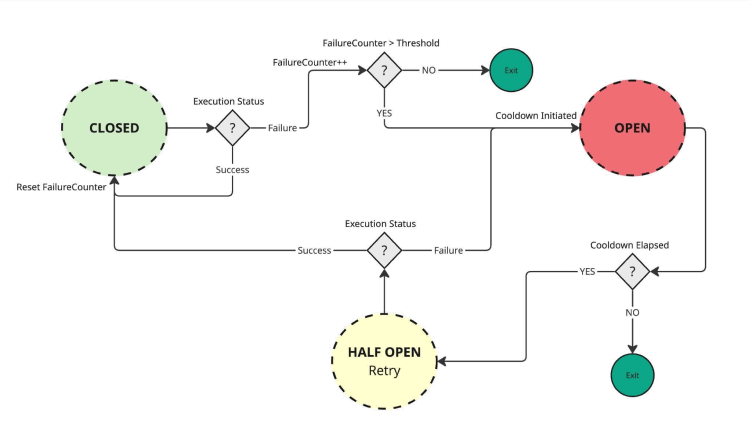
Figure 1: The circuit breaker state machine
Getting started with the Circuit Breaker in OutSystems
Implementing a resilient architecture shouldn’t be daunting. This is why we’ve made this new Circuit Breaker pattern available for both O11 and ODC via the Forge. Whether you are maintaining a legacy core or building the next generation of cloud-native apps, you can start protecting your integrations in minutes.
A seamless integration
The goal was to make adoption as simple as possible. You don't need to rebuild your API logic from scratch; you simply wrap your existing REST integrations with the Circuit Breaker logic.
By downloading the component from the Forge, you gain immediate access to:
- The core logic: The state machine that handles the Closed, Open, and Half-Open transitions.
- The management backoffice: A centralized dashboard to monitor and override your circuits.
- Test-ready tools: Built-in features for your QA team to simulate failures without needing a "real" outage.
Step-by-step: How to wrap your first API
The philosophy behind this implementation is minimal intrusion. You shouldn't have to rewrite your entire integration layer to add resilience. Here is the straightforward process of wrapping an existing OutSystems REST method with the Circuit Breaker.
1. Identify your integration action
Start in Service Studio by opening the Server Action (or Service Action) that contains your third-party REST call.
2. Drag-and-drop the Circuit Breaker wrapper
Locate the <CircuitBreaker_IsAvailable> action in your dependencies and position this as the Gatekeeper (the very first node) of your integration flow. Immediately follow it with an If statement: if the action returns False, the flow should bypass the REST call entirely and redirect to your fallback logic or a graceful error message.
3. Map the configuration
This is the critical step. The wrapper needs a unique identifier for the specific API you are protecting. You should pass a unique identifier for the specific API you are protecting (Best Practice: Use a Static Entity to avoid typos), such as “MuleSoft.”
The Circuit Breaker wrapper will then check its internal state.
- If the Circuit is CLOSED (normal): The flow continues.
- If the Circuit is OPEN (failing): The wrapper will prevent your actual API call from executing.
4. Integrate your REST call (the happy path)
Directly after the wrapper, place your existing REST API call. If the flow reaches this point, you know the circuit is either closed or half-open, and it is safe to attempt the integration.
5. Add the success or failure feedback
This is how the Circuit Breaker learns and adapts to real-time conditions. Immediately following your REST call, you must implement the feedback loop using the <CircuitBreaker_Update> action.
- On success: Call <CircuitBreaker_Update> with Success = True. This resets the failure counter and reinforces the closed state of the circuit.
- On failure: Call <CircuitBreaker_Update> with Success = False. This increments the failure counter and, once your defined threshold is met, trips the circuit to the open state.
Crucial implementation note: To ensure your circuit accurately captures network issues, always place the failure update inside your OnException handler (specifically for AllExceptions or REST-specific errors). This ensures that even if the API times out or the server vanishes, the Circuit Breaker is notified and can protect your application from further attempts.
Visualize the flow
Here is what the final, protected logic flow looks like in Service Studio.
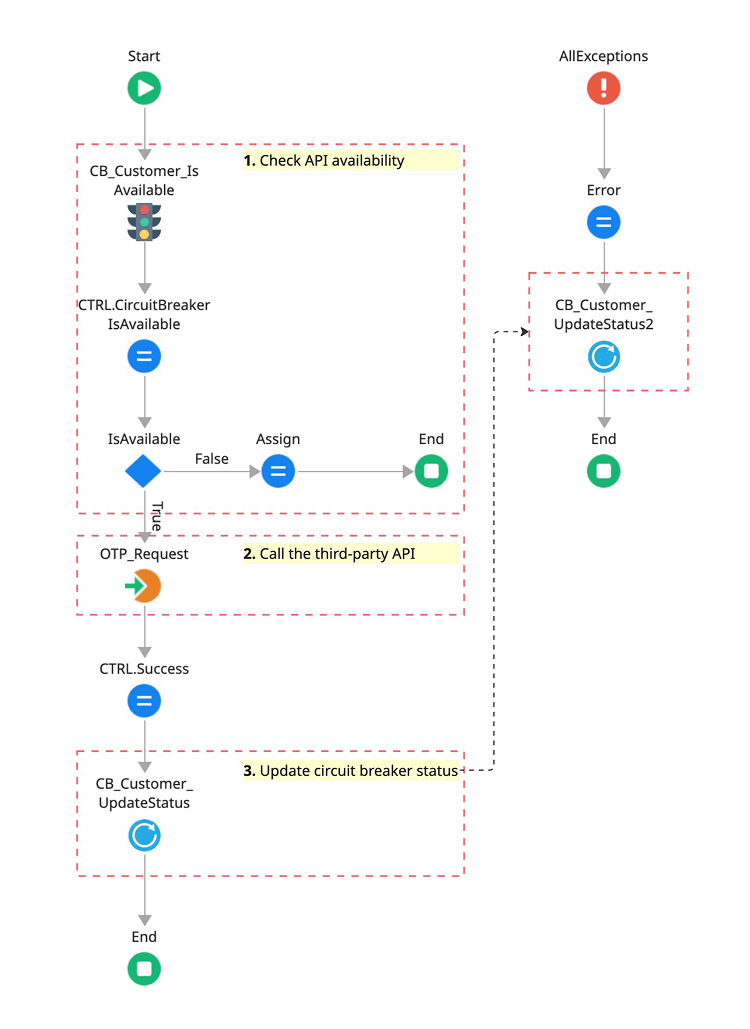
Figure 2: Implementation of the resilience pattern: Positioning the gatekeeper and the feedback loop.
What happens now?
If that OTP request integration suddenly starts timing out, the first few users will experience the delay. However, once your defined threshold is met (for example, 5 failures), the circuit opens.
From that moment on, every other user will immediately see an error message (handled gracefully), and your front-end web server won't waste a single thread trying to talk to the API.
Pro-tip: You define what failure means
One of the most powerful features of this implementation is its flexibility. The Circuit Breaker doesn't just guess when things are going wrong; it’s up to you to define the failure scenario. In your Exception Handler, you can add logic to decide which errors should count toward "tripping" the circuit. For instance:
- Trip the circuit: For Timeout errors, 500 Internal Server Errors, or connectivity issues.
- Ignore the failure: For 400 Bad Request or 404 Not Found (which usually indicate a user input error rather than a system-wide failure).
This level of granular control ensures that your circuit only "breaks" when the integration itself is truly struggling.
The core logic: IsAvailable and Update
At the heart of this implementation are two high-performance actions that manage your integration’s state. By separating the check from the update, we keep the logic clean and easy to follow.
The IsAvailable action
Before attempting a network call, call IsAvailable. This acts as your gatekeeper.
- Domain (input): This allows you to group multiple circuits by context (for example, payments, savings, or AI-services). It's perfect for organizing your Backoffice dashboard.
- System/code (input): The unique identifier for the specific API endpoint or service you are calling (for example, MuleSoft).
The result: If this returns False, your code should skip the API call and move straight to your fallback logic or error handling.
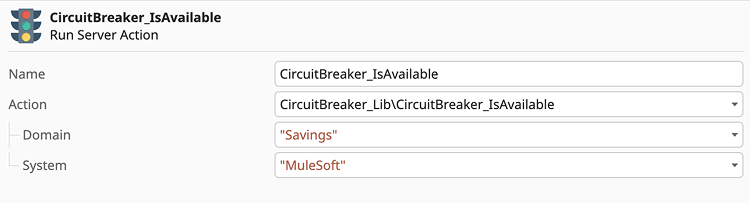
Figure 3: Configuring the IsAvailable Gatekeeper: Defining Domain and System identifiers.
Pro-tip: Zero-configuration deployment
The IsAvailable action is designed with built-in auto-provisioning. If the system detects a new Domain or System that hasn't been registered yet, it automatically creates and initializes the circuit on the fly.
This means you don't have to worry about manual configuration, SQL scripts, or backoffice setup when deploying to production. Simply publish your code, and the Circuit Breaker pattern will begin protecting your new integration the moment the first request is made.
The update action
Once your API call (or failure) is complete, you use Update to report back to the Circuit Breaker so it can learn from the outcome.
- Domain and system/code: Must match the values used in the IsAvailable check.
- Success (Boolean): Set this to True if the API responded correctly. Set it to False if you encountered a timeout or a systemic error.
- User identifier (optional): You can pass the UserId to provide an audit trail in the logs, allowing DevOps teams to quickly identify if specific failure patterns are tied to certain user actions. This added layer of observability turns a simple "service down" error into actionable intelligence.
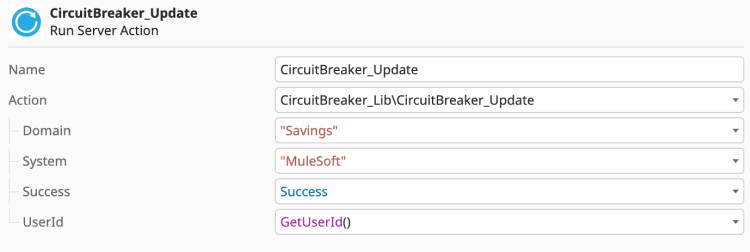
Figure 4: Capturing failure: Placing the Update action in the global exception handler.
Pro-tip: Use service wrappers to eliminate magic strings
Manually entering the domain and system into every action is not only tedious but also prone to typos. To keep your code clean and DRY (don't repeat yourself), I highly recommend creating a dedicated wrapper action for each API you protect.
Instead of calling the generic component directly, create a local Server Action like CB_MuleSoft_IsAvailable:
- Encapsulate the Inputs: Hardcode the Domain (for example, Savings) and System (for example, MuleSoft) inside this wrapper.
- Simplify the logic:
- Your local IsAvailable wrapper will have zero inputs and only a single Boolean output.
- Your local Update wrapper will have only one input: Success (Boolean).
The Result: The result: Your main business logic becomes much more readable. You aren't distracted by Admin configurations; you are simply asking the system, "Is the MuleSoft service up?" and then reporting back, "Yes, it is."

Figure 5: Using service wrappers to encapsulate domain and system logic and eliminate magic strings.
Performance and scalability: Under the hood
In high-traffic ecosystems, the gatekeeper must be invisible. This implementation offers two distinct modes for state evaluation via the StorageCache site property, allowing you to choose between absolute consistency and maximum performance.
1. DB mode (global consistency)
In this default mode, every IsAvailable check queries the database.
- Behavior: If an API fails on Server A and trips the circuit, Server B will instantly know. The entire factory acts as a single, synchronized unit.
- Best for: Environments where it is critical that no user attempts to call a failed service once the threshold is reached.
2. RAM mode (isolated performance)
In RAM mode, the circuit state is stored and evaluated within the individual server’s memory.
- Behavior: The state is decentralized. If Server A hits the failure threshold and trips its circuit, Server B will remain closed (available) until it encounters its own set of failures.
- Impact: This provides the absolute lowest latency because there is no database read during the IsAvailable check. However, it means that each front-end server must learn about the failure independently.
- Best for: Ultra-high-volume ODC or O11 environments where performance is the top priority and you can tolerate a few extra errors while each container independently trips its own circuit.
Summary of the tradeoff
| Feature | DB mode | RAM mode |
|---|---|---|
|
Read latency |
Optimized (low) |
Instant (zero) |
|
State scope |
Global (all servers stay in sync) |
Local (each server decides independently) |
|
Consistency |
Strong |
Eventual/Isolated |
|
Database hits |
On every check |
Only on state changes (Writes) |
Recommendation: For most enterprise use cases, stick with DB mode to ensure your entire factory reacts as one unit. Switch to RAM mode only if you are handling thousands of requests per second and need to squeeze every millisecond of performance out of your "Gatekeeper" checks.
Visibility is resilience: The Circuit Breaker backoffice
A Circuit Breaker that operates in the dark is only half a solution. To truly support a DevOps culture, you need to see your ecosystem’s health at a glance. This implementation includes a dedicated management console designed for two specific roles: the system architect, monitoring health, and the QA engineer, testing failure scenarios.
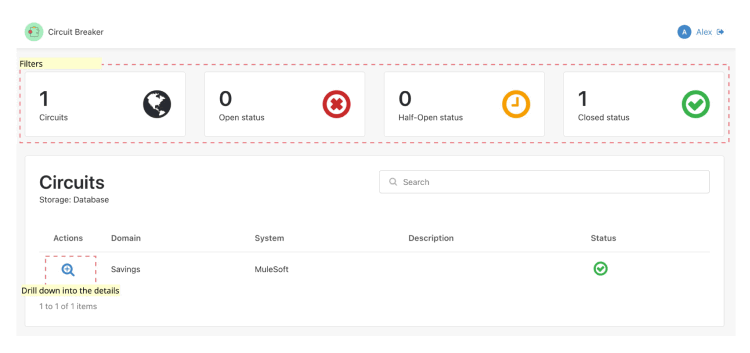
Figure 6: The Circuit Breaker backoffice - Main dashboard.
1. The command dashboard (main page)
The landing page provides a high-level overview of the health of your integrations using real-time counters:
- Circuit inventory: Total number of protected integrations.
- State distribution: A breakdown of how many circuits are currently open, closed, or in the cautious half-open state.
This dashboard acts as your early warning system. If you see the Open Circuits counter spike, you know exactly where to start investigating before the support tickets even start rolling in.
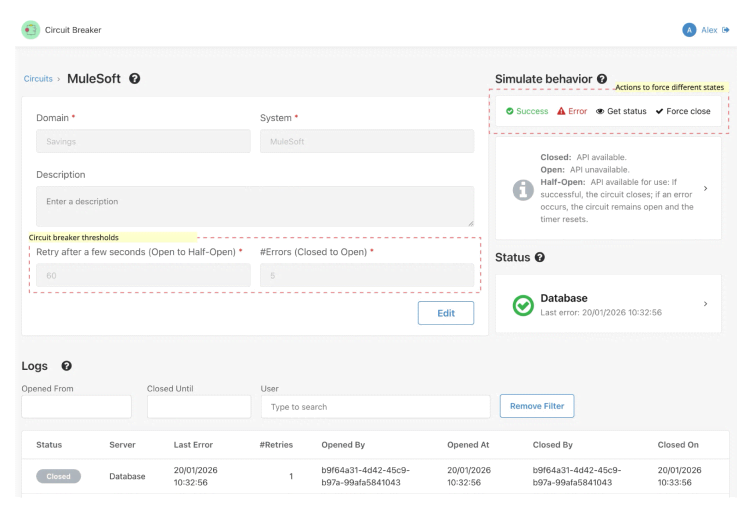
Figure 7: The Circuit Breaker backoffice - Details and configuration.
2. Deep-dive: Circuit details and configuration
When you click into a specific circuit, you get full control over its DNA. Here, you can define the "Thresholds" that dictate how the circuit behaves:
- Total failures: How many consecutive errors are allowed before the circuit trips?
- Cool-down period: How long (in seconds) should the circuit stay open before moving to Half-Open and allowing a "test" request?
3. The QA playground (simulation tools)
This implementation changes that dynamic entirely. It provides your test team with a "Chaos Engineering" toolkit to validate system behavior on demand:
- Simulate errors and successes: Manually inject success or failure signals into the circuit breaker. This allows QA to instantly verify that the UI responds gracefully (e.g., showing a friendly warning instead of a generic error) without needing a real outage.
- Force state override: Use the Force Close button to reset a tripped circuit. This is essential for unblocking development or testing specific 'Open Circuit' user paths.
- Real-time status interrogation: With GetStatus, testers can instantly verify the circuit breaker’s state during a test execution, removing the guesswork from automated or manual testing cycles.
Pro-tip: Global state and security
It is important to remember that the Circuit Breaker operates in a global state. When a tester simulates a failure or forces a circuit open in the backoffice, that change applies to the entire system, affecting every user currently interacting with that API, not just the user performing the test.
To ensure this power is used safely:
- Production caution: Manual overrides should be used with extreme care in Production environments, as tripping a circuit will immediately stop all traffic to that integration.
- Role-based access: Access to these "Chaos" features is protected by the CircuitBreaker_Admin role. Ensure that only authorized DevOps engineers and Lead QAs are granted this permission to prevent accidental service disruptions.
This global behavior is exactly what makes the pattern so powerful for "Big Red Button" emergency scenarios, but it requires the right governance to manage effectively.
4. Audit trail and logs
Transparency is key for post-mortem analysis. The backoffice maintains a detailed log of every state transition:
- Timestamps: Exactly when a circuit opened or closed.
- User context: If you passed the UserId in the Update action, you can see exactly who (or what process) triggered the change.
Closing the loop
By combining high-performance logic wrappers with this visual Backoffice, you turn your OutSystems application from a "hopeful" builder into a resilient, enterprise-grade machine.
What if your most important API fails tomorrow? With this pattern, you won't be holding your breath. You'll be in control.
Stop hoping. Start designing
We can’t control when a third-party API will fail, but we can absolutely control how our OutSystems applications respond to that failure. Transitioning from a happy path mindset to a design-for-failure architecture is what separates a standard application from an enterprise-grade, resilient system.
Implementing the Circuit Breaker is an act of architectural hygiene, ensuring that the resilience strategy in your OutSystems environment adheres to the industry best practice of preventing catastrophic failure from a single component.
Ready to build more resilient apps?
This new Circuit Breaker implementation is now available for the community. Whether you want to gain more visibility into your API health through the Backoffice or give your QA teams the tools they need to simulate real-world chaos, it’s all ready for you to explore.
- Download the component:
- O11 - Circuit Breaker and Circuit Breaker Backoffice
- ODC - Circuit Breaker and Circuit Breaker Lib
- Contribute: Found a way to make the funny features even better? I’d love to hear your feedback or see your ideas on the Forge.
Don't wait for your next production outage to realize you need a safety net. Install the Circuit Breaker today, wrap your critical APIs. That’s how you move from hopeful builder to a resilient, enterprise-grade architect.
