From Bad to Awesome - User Experience
Icons play a critical role in an application's user experience, especially mobile applications. Icons appear in menus, on the bottom bar in iOS, in Material Design's floating action button, in buttons, bulleted lists, empty states, and so on.
OutSystems applications come with Font Awesome by default. But sometimes you’ll have a type of application like a weather app that needs specific icons to represent conditions such as light showers, partly sunny, or hail. In those cases, you’ll need need custom icons. So, how can you use custom icons in the OutSystems IDE? Let’s take a look.

Why use icon fonts?
The short answer is: for your convenience. Long gone are the days when icons were saved as bitmaps (PNG, JPG, GIF, etc.) and arranged as image sprites. Using image-based icons was a maintenance nightmare. Did you ever need a bigger icon in a different color that was also retina-ready? Unless you were a Photoshop ninja, you had to ask a designer to change the icon, save a new image, update the files, and change the CSS—for every icon modification.
Here are just a few advantages of using icon fonts:
- You can easily scale the size of icons, just as you scale a type font.
- Having the same icon in a number of different colors is just a matter of creating and applying CSS classes.
- Screens render fonts perfectly, regardless of the type. You can combine media queries and CSS classes to automatically scale the size according to the screen resolution.
- Font files are lighter than images. Your app will load faster and make fewer network requests.
Where to get icon fonts
If you’re lucky, you work with a designer or design team that creates all the visual assets for your application. If that’s the case, just ask them to provide the icons in SVG format. Each icon must have a separate SVG file. Using bitmaps (PNG, JPG, BMP) or other vector formats (PDF, EPS, AI, Sketch) will not work as icon fonts.
If you don’t work with a designer, you can find icons or font generators online. Here are a few sources to get you started:
- IcoMoon is a free tool for generating fonts from any collection of SVG files (that can be icons as well as characters, numbers and other typographic glyphs). IcoMoon has free and paid icon libraries as well. IcoMoon is our tool of choice for creating fonts to use in OutSystems.
- iconmonstr is a collection of 3500+ simple icons designed by Alexander Kahlkopf. The icons are free, which means you don’t have to pay to use them for enterprise projects or commercial applications.
- The Noun Project is dedicated to compiling the most extensive library of visual symbols in the world. Any designer can contribute their icons to the collection. Any icons released in the public domain are available for free. Most of the icons, however, were released under CC copyright. CC, or Creative Commons, means that you might need to include the designer’s name (often as a link to their page) in your app, or that you may not be permitted to use the icon for free in commercial projects. You can find information about an icon's copyright and permissions on its page.
How to create a custom icon font
Go to icomoon.io and click on the IcoMoon App in the top-right corner.
![]()
You don’t need to register to use the app for free. However, you can get a paid account if you want access to advanced features (not required for this tutorial). In the application, you will see a matrix of icons. Click to select any number of icons to bundle with your font. Click them again to deselect and use shift to select several icons in a row.
![]()
If you scroll down to the bottom, you can add more libraries.
![]()
IcoMoon will append icons from other libraries to the icon list on the main screen. You can make your custom collection by picking icons from various libraries, as well as importing your own. To do so, click the Import button in the top left corner.
![]()
Note: Each icon should be in a separate SVG file and all of them should fit a 100 x 100 px space.
Having selected your desired icons, click on the Generate Font label at the bottom of the screen.
![]()
You will see a list of all the chosen icons along with their attributes.
![]()
![]()
IcoMoon has documentation that explains the role of each attribute. For us, the only one that matters is the class name. We will use it in the OutSystems IDE.
Before downloading, it’s a good idea to open the Preferences window and name your custom font. It’s also useful to specify a class prefix so that your app’s CSS stays organized and icons remain readily accessible in the IDE.
![]()
Close the Preferences window and download the font.
Use Your Custom Icon Font in OutSystems
- Import the font into your OutSystems IDE:
- Open your app in OutSystems, go to the Data tab, and select Import Resource.
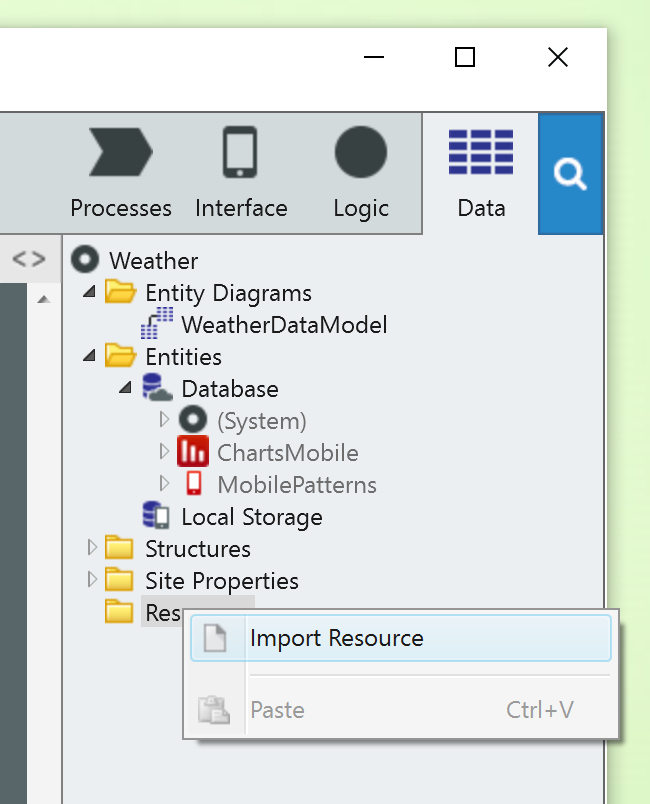
Add all the font files: icomoon.eot, icomoon.svg, icomoon.ttf, and icomoon.woff. It’s best to add all formats because some browsers and operating systems prefer a specific font file type. - Change one of the properties of each resource as follows:
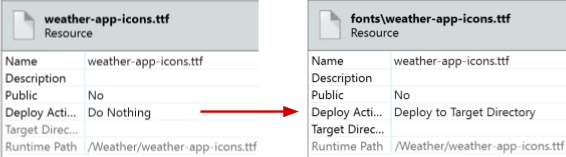
Under Deploy Action, select Deploy to Target Directory. - Update your app’s CSS stylesheet:
- Add CSS classes that define the icons to your app’s stylesheet. Open the style.css file that you downloaded from IcoMoon, and select everything.
- Open the CSS Editor in the Outsystems IDE and paste the classes into your app’s stylesheet.
- Change all the URL paths in the “src” property to match their deployed location:
- Use the icons in the interface (mobile apps):
Unzip the file you downloaded from IcoMoon.
![]()
You will need all the files from the Fonts folder and the style.css file.
Important: Make sure you paste the classes into the stylesheet for your app, not the stylesheet for the current screen.
When developing a mobile app, you can delete the line with #iefix hashtag:
![]()
![]()
Publish your app. Great! You’re all set to start using your icons.
Use the Icon widget to add an icon to your app’s screen.
![]()
When the icon picker pop-up appears, just press OK. It doesn’t matter which icon you choose; you will change it in a moment.
In Properties, type the class name of the icon from your custom set, such as icon-paper-clip, and it will appear in your app’s UI. That’s it
Hint: You can preview the classes and icons in the demo.html file you downloaded from IcoMoon.
![]()
Using custom fonts in a web app interface
Repeat the steps just as if you were developing a mobile app. But instead of using the Icon widget, use the container widget. You won’t see a preview of the icon in the IDE, but the icon will be visible in the app after publication.
With that, you are now ready to create and use custom icon fonts in your OutSystems applications. Remember, icon fonts are easy to use, incredibly lightweight, and can scale dynamically to any screen size. They're the perfect alternative to image icons and are worthy of your consideration.
If you need some inspiration, check out these apps from the Forge; they use custom icons:
Or gawk at some of these OutSystems UIs on Dribbble. Happy icon-ing!
Special thanks to CSS Wizard Alexandre Santos, author of some of our online best-sellers on the CSS practice, for all the help!