OutSystems on Azure: The Ins and Outs
“We had problems with the installation. We have to delay the project.” Famous last words.
When setting a big project and a vital development factory, no one wants to deal with uncertainty. That’s why we have our fully-managed cloud offer―and what a beauty it is, too.
Sometimes, though, OutSystems customers want to keep their ecosystems and stacks intact, meaning that they want to run their self-managed infrastructure on-premises or in a private cloud. These setups can take anything from a few hours to a couple of weeks, depending on complexity. A thorough and efficient infrastructure setup in an intricate entanglement of network appliances and VLANs won’t fall from the sky.
You need to take into account networking, virtualization, and database management, for starters; then you’ll have to consider whether your data center is on-premises or private cloud-based. This is usually when things start getting grizzly.
It was time to do something about it.
Enter OutSystems on Azure
We partnered with teams from Microsoft’s Fast Track and Noesis—our 2016 and 2017 partner of the year. Then, we went all-in on the design of a template that represents the very best of what Azure has to offer: solid infrastructure best practices with a handful of options for customization right out of the box.
As usually happens with all great ideas and projects, we got this started with a very high-fidelity mockup. One enlightened mind drew up a complex network diagram that represented every single piece of hardware and the all the automation processes that we wanted to include. Using several incomparable design tools, we came up with something that looked more or less (OK, exactly) like this:

We did eventually translate this into something human-readable, especially for those who weren’t present during that lunch brainstorming session. Look at this beaut’:

Setting the Foundations
From day one, this was going to be a straightforward, streamlined deployment. But it had to have all the goodies, too. The greatest challenge was finding a healthy balance of features and simplicity, especially when you’re considering the networking part of it all.
(Buckle up, because this is going to get serious now.)
How could we deploy something with its VNet and its own segments, while keeping the setup process from presenting a form with a myriad of input fields that asked for network ranges? How could we enable advanced users to define their own network segments in case they needed to match their other Azure Resource groups for easier integration (hi there, AzureAD users, we’re looking at you!) instead of having to create peering between VNets?
Let’s start with the foundation. We wanted to deploy a full VNet and then implement segmentation per environment. However, we did not want to make anyone go through every Virtual Machine that needed to be deployed and ask where it belonged in the “10.0.0.0/24” subnet.
The fastest and probably easiest path would be to hardcode all IPs, right? However, if your ecosystem is already on Azure, this new network could easily clash with what you have already deployed. So, we came up with a flexible solution: you can either use a default suggestion or change your VNet space, then have it immediately validated and reflected in every deployed asset.
Take a look at all the fields in the setup wizard populating automatically:
Next comes the validation followed by the display of a warning about invalid manual inputs. All changes to the primary address space are reflected immediately across the entire template.
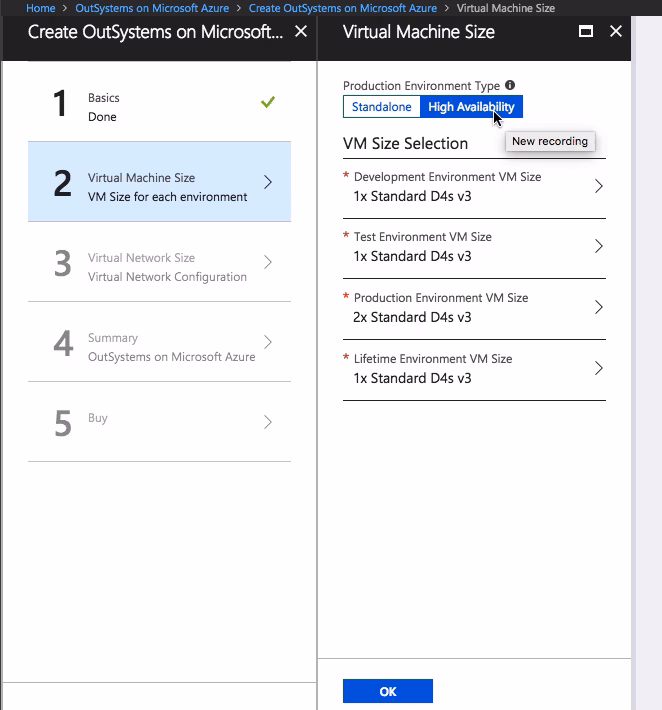
Then came the second big decision. Should we allow the topology of the deployed production environment to change from standalone to high-availability with just one click? You betcha.
We agreed on what the user interface should look like because we care about the last mile, too. Then it was time to develop the wizardry needed to make it happen behind the scenes. It’s not a kinda magic, though. It’s just the joy of repetition until you achieve nothing less than perfection. Some sleepless nights ensued.
Someone asked me to describe the process, and this is what I came up with:
One UI-related JSON that feeds another “main template” JSON. That “main template” starts by calling the network deployment JSON and once this one finishes, the Development, Testing, Production (standalone or HA, as per your choice) and LifeTime environment JSON files are invoked and run. Once they finish, they then invoke an Azure Virtual Machine Custom Script Extension per VM deployed and run an unattended installation for our OutSystems Platform pre-requirements, Platform Server, Development Environment, dynamic per-environment configurations that connect all this to the correct AzureSQL databases aaaaand then the system is tuned—all of it logged and placed in a storage account that you’ll own.

Like a monkey with a miniature cymbal, we threw ourselves into this rhythm. Each test deployment process included feedback translated into an action point that ended up represented in the form of new code in our JSON or Powershell scripts.
The Deployment
Over 80 test deployments later, you can deploy 1 Virtual Network, 5 SubNetworks, 5 Virtual Machines, 5 Application Gateways with Public IPs assigned, 4 Storage Accounts, 4 Azure SQL Servers, 8 databases, and a bunch of other logical resources.
The bottom line: An entire OutSystems Infrastructure is ready for your entire line of developers to start your digital transformation journey at a distance of a few clicks and in less than two minutes.
“Two minutes, you say?”
Yes, but caveat emptor: This will only happen if you’re slow while going through that wizard. If you’re trigger-happy like yours truly, this is what the process looks like when you head to the Azure Marketplace, search for OutSystems, and deploy it from there.
Remember that beautiful drawing, those network diagrams, those resources, all that technical magnificence? Head to this link and check out the details of how all that was translated into this:

Oh, so I just realized: I didn’t mention the fact that we’re also providing Azure Scale Set with this template, did I? Consider it our most sincere “thank you” for using our new Azure solution template and one-click trusting us enough to create the infrastructure of your brand-spanking-new digital factory.