Using NUnit in a Regression Test Strategy for OutSystems
NUnit is an open-source, very flexible, and widely adopted unit testing framework for .NET. Regression tests verify that software previously developed still performs correctly even after it or its environment is changed. The goal is to discover any defects introduced or caused by updates and modifications. Regression tests are run regularly, from once a sprint to every night or, in some situations, even after each change.
This post is a guide to using the NUnit framework to support a regression test strategy.
Before We Get Started
We will use the BDD Framework as the entry point to OutSystems code, where the actual test is coded using Gherkin-like language. It is available in the Forge, and it provides a set of tools for producing BDD test scenarios. It is a prerequisite for the examples we will present.
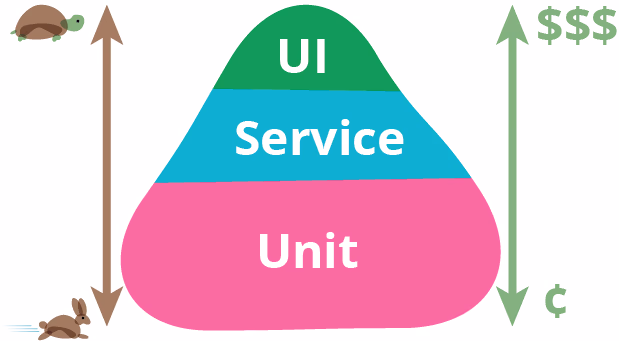
As very well explained by Martin Fowler, the test pyramid is a way of thinking about different kinds of automated tests that should be used to create a balanced portfolio. The essential point is that you should have many more low-level unit tests than high-level UI tests.
Unit tests have several benefits, like faster execution speed, faster feedback, and lower maintenance costs.
With all that in mind, you can follow these steps to use NUnit for regression testing.
Create the Test Project
We will use the Visual Studio 2017 Community to guide you through the creation and execution of an NUnit test. The source code is available in Github.
- Open Visual Studio and create a new project.

- The following screen appears.
- This screen will create a .NET Framework Unit Test (MSTest) project; that is a good start.
- Add a name for the project and a name for the solution.
- Press OK.
- For demonstration purposes, the “Cases_Tests” application available in the Forge will be used.
- The support for the Microsoft .NET Unit Testing Framework, MSTest, may be removed.
- To add NUnit support, select the Manage NuGet Packages option from the Project menu.
- The following screen appears:
- Select the Browse option at the top and search for “nunit.”
- Select NUnit from the list.
- For the version (in the right window), select 2.6.4, and press Install. (We currently recommend version 2.6.4 because it has a GUI that may be used for manual test execution; version 3 is having the GUI rewritten).
- The following window will appear; press OK.
- The installation steps are logged in the Output window:
- Our example requires an additional component: System.Web.Extensions. To add it, select the Add Reference option from the Project menu.
- The following window appears; select Framework under Assemblies on the left and put a check mark next to System.Web.Extensions. Press OK, and the support for System.Web.Script.Serialization is added.


Add an NUnit Test
Here’s how to add an NUnit test:
- When the test project is created, an initial MSTest class is also created: UnitTest1.
- Our goal is to create an NUnit test that invokes BDD Framework test scenarios, where the actual test is to make changes to the class until it has the following code:
- See this testing guide to understand how to use BDD Framework for unit testing
- In this example, the test eSpace is named Cases_UnitTests and is installed in the testenv environment; and the invoked test is named Case_CRUD:
- Build the project.
- Your NUnit test is ready.
- You may add other test classes (TestFixture) or other test methods (Test).
- You may create a utility library with the BDDTestSuiteResult class and the GetOutputMessage static method so no code is duplicated.
Execute Tests with the NUnit GUI
This how you can execute tests with the NUnit GUI:
- You may manually execute your NUnit tests from the NUnit GUI
- Go to www.nunit.org, and click Download (at the top of the page). Under Latest NUnit 2 Releases on the Download page, click NUnit 2.6.4.
- Download the NUnit-2.6.4.msi file (hosted in GitHub).
- Install NUnit 2.6.4 (that will install the NUnit GUI).
- Start NUnit GUI from the start menu.
- This will open the NUnit GUI:
- Select the New Project option from the File menu; the following window appears:
- Choose an appropriate name for the project and press Save.
- To add an NUnit test, select the Add Assembly option from the Project menu, as illustrated in this image:
- When the following window appears, navigate to the folder where the NUnit DLL built with Visual Studio is located. Select the correct DLL and press Open.
- The NUnit tests are extracted from the DLL and presented in the tree view like this:
- You may execute the test by pressing the Run button. This is an example of the execution:
- It the test fails, BDD Framework outputs the report with the scenario and step that failed (the following image shows that the Then step of the Close Case scenario failed because “Could not close Case”).


Execute Tests From Jenkins
You may trigger the regression tests from your Jenkins pipeline (or any other CI pipeline). We will illustrate this with Jenkins 2.107.2. The Jenkins NUnit Plugin must be installed (as well as its dependencies):
- Create a “Free Style Project”.
- Add the following Build step: Execute Windows batch command.
- Add the command “"C:\Program Files (x86)\NUnit 2.6.4\bin\nunit-console.exe" "<full path to your dll>" /xml=nunit-result.xml” (as illustrated in the following image).
- In the Post-build Actions area, add Publish NUnit test result report (also shown in the following image below).
- Press Save. The project will look like the following screen:
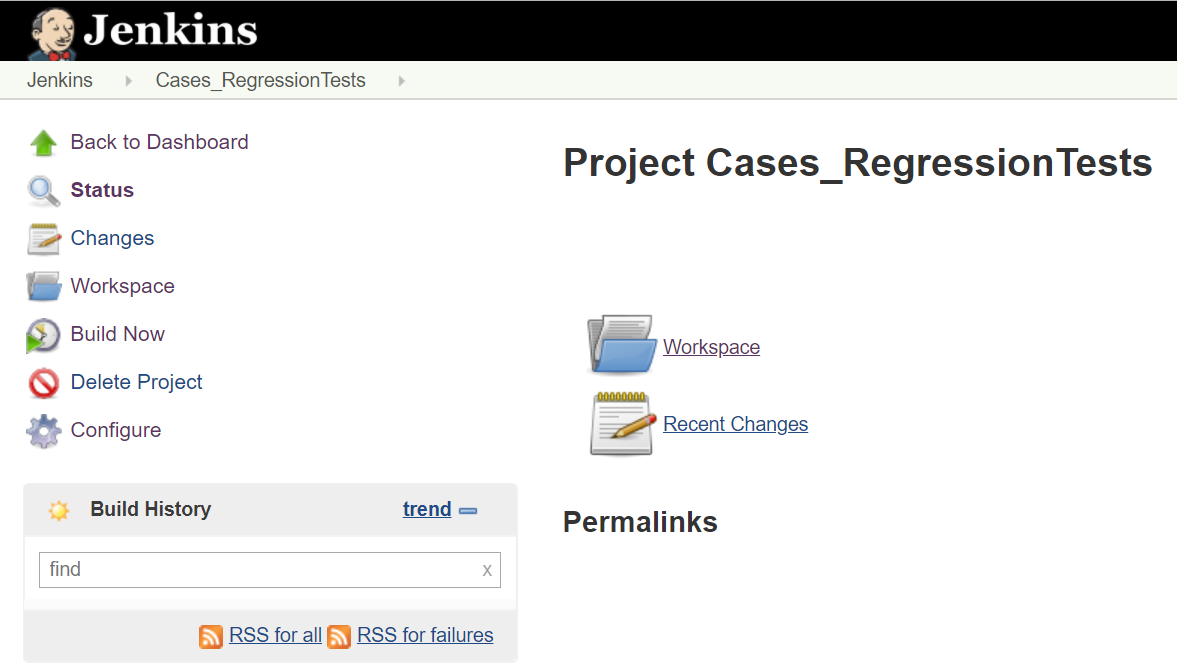
- To trigger this Jenkin project manually, press Build Now. (Jenkins Projects may also be triggered as a consequence of an external action like a successful commit of code, artifact promotion, or anything else.)
- After the build is executed, select the build number to see the results:
- If you press Console Output, you will see the execution of the build; it will look similar to this:


Debug NUnit Tests Inside Visual Studio
You may debug your NUnit tests inside Visual Studio as follows:
- To configure the debug, choose the <Project> properties option from the Project menu, and the following window appears:
- Choose Debug in the left nav; the following screen is displayed:
- In the Start External program field, enter the full path to the nunit-console.exe that was installed from the NUnit-2.6.4.msi file.
- In the Command Line Arguments field, enter the name of the DLL to test, as shown in the image.
- Press the Save button from the toolbar.
- You may debug the project by pressing ▶ Start from the toolbar.
- You may place a breakpoint in the code; if the execution does not stop at a breakpoint, then the nunit-console.exe.config file that is located in the same folder as the nunit-console.exe file has to be updated to support .Net 4.x, as shown here:


Final Considerations
This article introduces a method for regression testing using NUnit for .NET and BDD Framework. You could achieve similar outcomes with different technology, like Python and Cucumber, and the concepts would still be valid.
Want to Go Deeper?
If you would like additional information about testing OutSystems applications, we’ve got you covered. Check out these resources:
- Here are some testing principles for OutSystems applications.
- Here is guidance for unit testing and API testing.
- Here is guidance for architecture best practices (that make testing easier).
- Here is guidance for creating a build pipeline with Jenkins.
- Here is the guided path for becoming a tester with OutSystems.
- Here is a guide on how to use Selenium to do UI testing.