Building Mobile Apps with OutSystems

You’ve browsed Cordova’s 2,880 plugins and you couldn’t quite find the one that you were looking for. You’ve scratched your head, you’ve scratched your chin, and you’ve even scratched your back only to learn that no amount of scratching will help you acquire the native functionality you’re looking for. You have to build the plugin from… scratch.

In this tutorial, we’ll show you how to do that step-by-step. You’ll go from nothing to a fully-integrated Cordova plugin that you can use in your mobile projects built with low-code - in this case, with the OutSystems platform.
Prerequisites:
- Native Android development
- Android SDK
- Node.js
- Apache Cordova
- OutSystems IDE
Because it’s not possible to personalize blog articles (yet), this tutorial will go through the steps for building and integrating a plugin that already exists. It’s an Android Cordova plugin that grants your application the ability to display Android’s Toasts. Toasts are the text messages that pop up at the bottom of the screen and then disappear. This plugin will repeat some of the work done by Eddy Verbruggen and Nuno Lopes — you can find the existing Toast plugin in the OutSystems Forge.
1. Create a CordovaTest Project
To begin, you need a Cordova project that you will use as a base for testing your plugin. Assuming you’ve installed Node and the Cordova CLI, navigate to a work directory in the command line. My test project is called Toasty Plugin Test and this is how to set it up:
$ cordova create toasty-plugin-test com.stanleyidesis.toastyplugintest ToastyPluginTest
(Change the package name, if you like. Or boost my ego by giving me all the credit!)
Navigate into the project directory to add an Android dependency:
$ cd toasty-plugin-test
$ cordova platforms add android
This will install any prerequisites required to run your Android-facing Cordova application. Before you can test the application, you need to verify that all requirements are met. Do so by executing the following command in the toasty-plugin-test directory:
$ cordova requirements
During my attempt, my path variable was missing the location of javac and I hadn’t installed the latest Android SDK platform: 26. I added Android Studio’s built-in JRE to my PATH variable and installed version 26 of the Android SDK using the SDK manager. Downloading required SDKs and system images can take a little while, so return to this tutorial after they’ve installed, and you’ll be ready for step 2.
2. Test Your Empty Cordova Project
To guarantee that you’ve set up your project and dependencies properly, let’s run your empty project in an Android emulator. Before proceeding, verify that you have an AVD (Android Virtual Device) installed and running. If you’ve never created an AVD before, follow this handy guide from Google, Create and Manage Virtual Devices. I used a Pixel with API version 25 as my base device configuration and left the remaining parameters untouched — you can do the same.
Tip: install Intel HAXM through the Android SDK manager to guarantee best performance during X86 emulation.
After you establish your AVD and launch it through Android Studio, you should see a window similar to this:
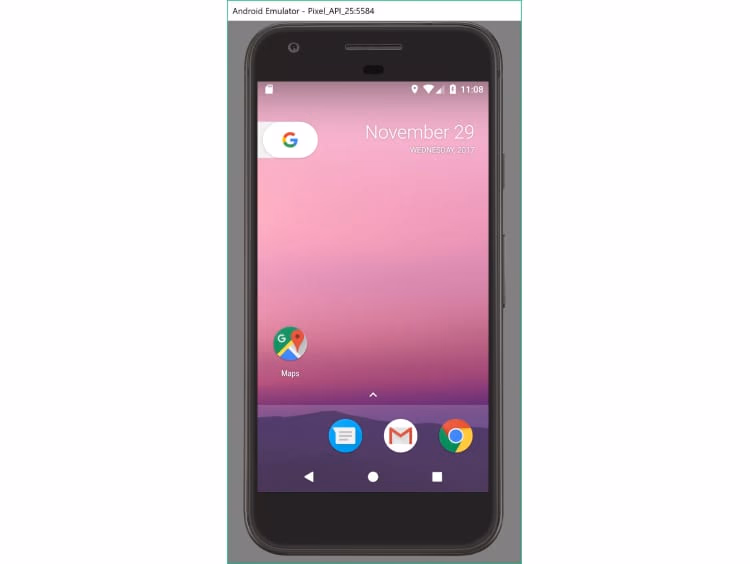
Emulator was set up properly!
This confirms that your emulator is set up properly and is ready to run your empty Cordova application. To run your Cordova app, you must first build it with the following command:
# Run all commands in your toasty-plugin-test project directory
$ cordova build android
After a little bit of waiting, the build should finish and you can run the app on your emulator with the following command:
$ cordova emulate android
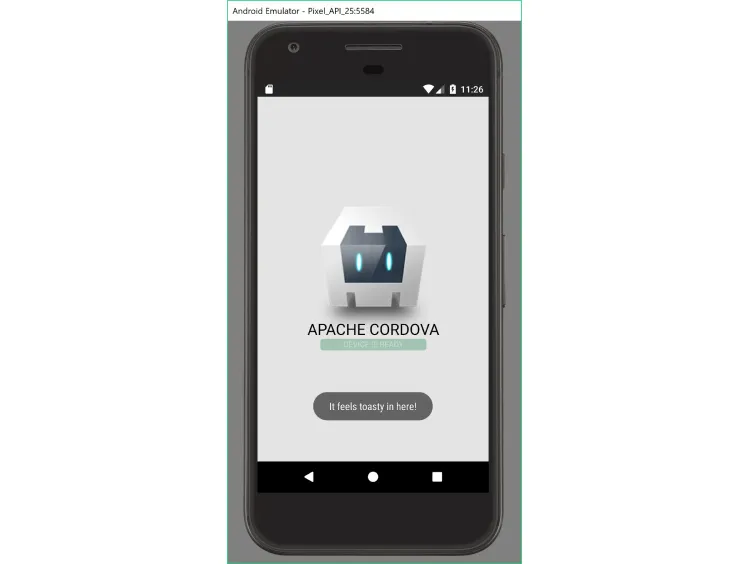
If you accidentally closed your emulator, don’t worry; Cordova will use the Android SDK’s command-line tools to start up a new one. After a bit of patience, you should see the following screen:

And that’s it! Your project is ready!
Now you can continue to the next step.
3. Create a Plugin Project
From Github or any other favorite source code repository, create an empty public project for your plugin. I named mine ToastyPlugin and assigned an MIT license. Pull the empty repository down to your machine and create a plugin.xml file at the root directory. Copy the following contents to your plugin.xml file:
The plugin.xml file provides the basis for your plugin and performs several functions. It names the plugin, points to the JavaScript source code that binds the plugin to the Cordova project, and assigns platform-specific source code and configurations to the project that includes it. To learn more about the plugin.xml file, check out Cordova’s plugin.xml documentation.
You need to create one more file before you can proceed to the next step: package.json. This is the npm registry file that combines standard npm attributes with Cordova specifics. You won’t need to publish your plugin to the registry before using it in your OutSystems project, but Cordova requires this file to install the plugin properly. Create an empty package.json file in your plugin directory and populate it with the following content:
Note: Replace the repository URL, author, bugs URL, and homepage URL values with your own.
In this step, you’ve created a lot of placeholders for files that don’t yet exist, so let’s make them in the next one.
4. Build JavaScript Bindings
Create a directory inside of your ToastyPlugin repository named www. And in this directory, create an empty toastyplugin.js file. This file dictates the API by which a Cordova project may interact with this plugin. Generally, this means that the plugin binds to the window element and by doing so, grants access to its parent project through simple JavaScript references. Add the following to your toastyplugin.js file:
The original Toast plugin by Eddy Verbruggen adds a bit more functionality and supports custom positioning, but your plugin is going to remain simple by sticking to native Toast functionality found exclusively on the Android platform. In this case, you will support the show function that is capable of displaying a message for a period of time (either long or short). The cordova.exec function is what sends this simple command to the native platform code that you will create in the next step.
5. Implement ToastyPlugin for Android
You’ve constructed a simple API that will allow your Cordova project to tap into your native Toast functionality, but now you actually need to implement that native code. There’s a lot to know about Android, iOS, and the other native platforms, but I’m going to assume that you know enough to venture down this rabbit hole of custom plugin development. So you won’t find any elaborate detail about how Android works in this post. However, if you’re interested in learning more, I recommend Udacity’s Android Nanodegree program.
In your plugin directory, create a src folder. In src, create an Android directory. And finally, create an empty ToastyPlugin.java file in the android directory. You can use commands similar to the following:
$ mkdir src
$ cd src
$ mkdir android
$ cd android
$ touch ToastyPlugin.java
And populate the contents of ToastyPlugin.java with the following source code:
Note: Again, make sure to use the package name you identified in plugin.xml.
If you’re unfamiliar with Android development, that’s okay. Most of the code is Cordova and JSON-focused. The only Android particulars we have here can be found between lines 40 and 43. The Toast API documentation explains the makeText and show methods, however, both of which are mostly self-explanatory. Ideally, if you’re building a native plugin, you’re familiar with Android (or you soon will be) and won’t require hand-holding to accomplish your task—just a little bit of help setting up!
6. Taste the Toast
To verify that your plugin is ready to work as expected, you have to install it in your ToastyPluginTest project (the project you created way back in step 1). To do so, first navigate your shell to the test project directory:
$ cd toasty-plugin-test
In my setup, I placed this project directory and my plugin project in the same root folder. So, to install my plugin to the test project, I used the following command:
$ cordova plugin add ..\toastyplugin\
Just make sure that the final argument is the path to your plugin directory, and Cordova should have no problems installing the plugin to your local test project. After this process completes, you need to add code to test the plugin. Open the pre-generated index.js file found under the www > js directory (in your test project folder). Add the following lines immediately after alert('Received Event: ' + id); (line 42 in my setup):
This bit of code will invoke the show method of your ToastyPlugin with the message, “It feels toasty in here!” and displays it for a “long” duration. Save the file and then run the following command in your project directory:
$ cordova emulate android
This will rebuild the project and run it once more on the emulator. If everything goes smoothly, you should see the Toast message appear at the bottom of the app window after your application launches:
Mucho successo.
Your next step is to commit and push changes made to your plugin repository. Make sure the version found on the master branch is identical to the version you tested.
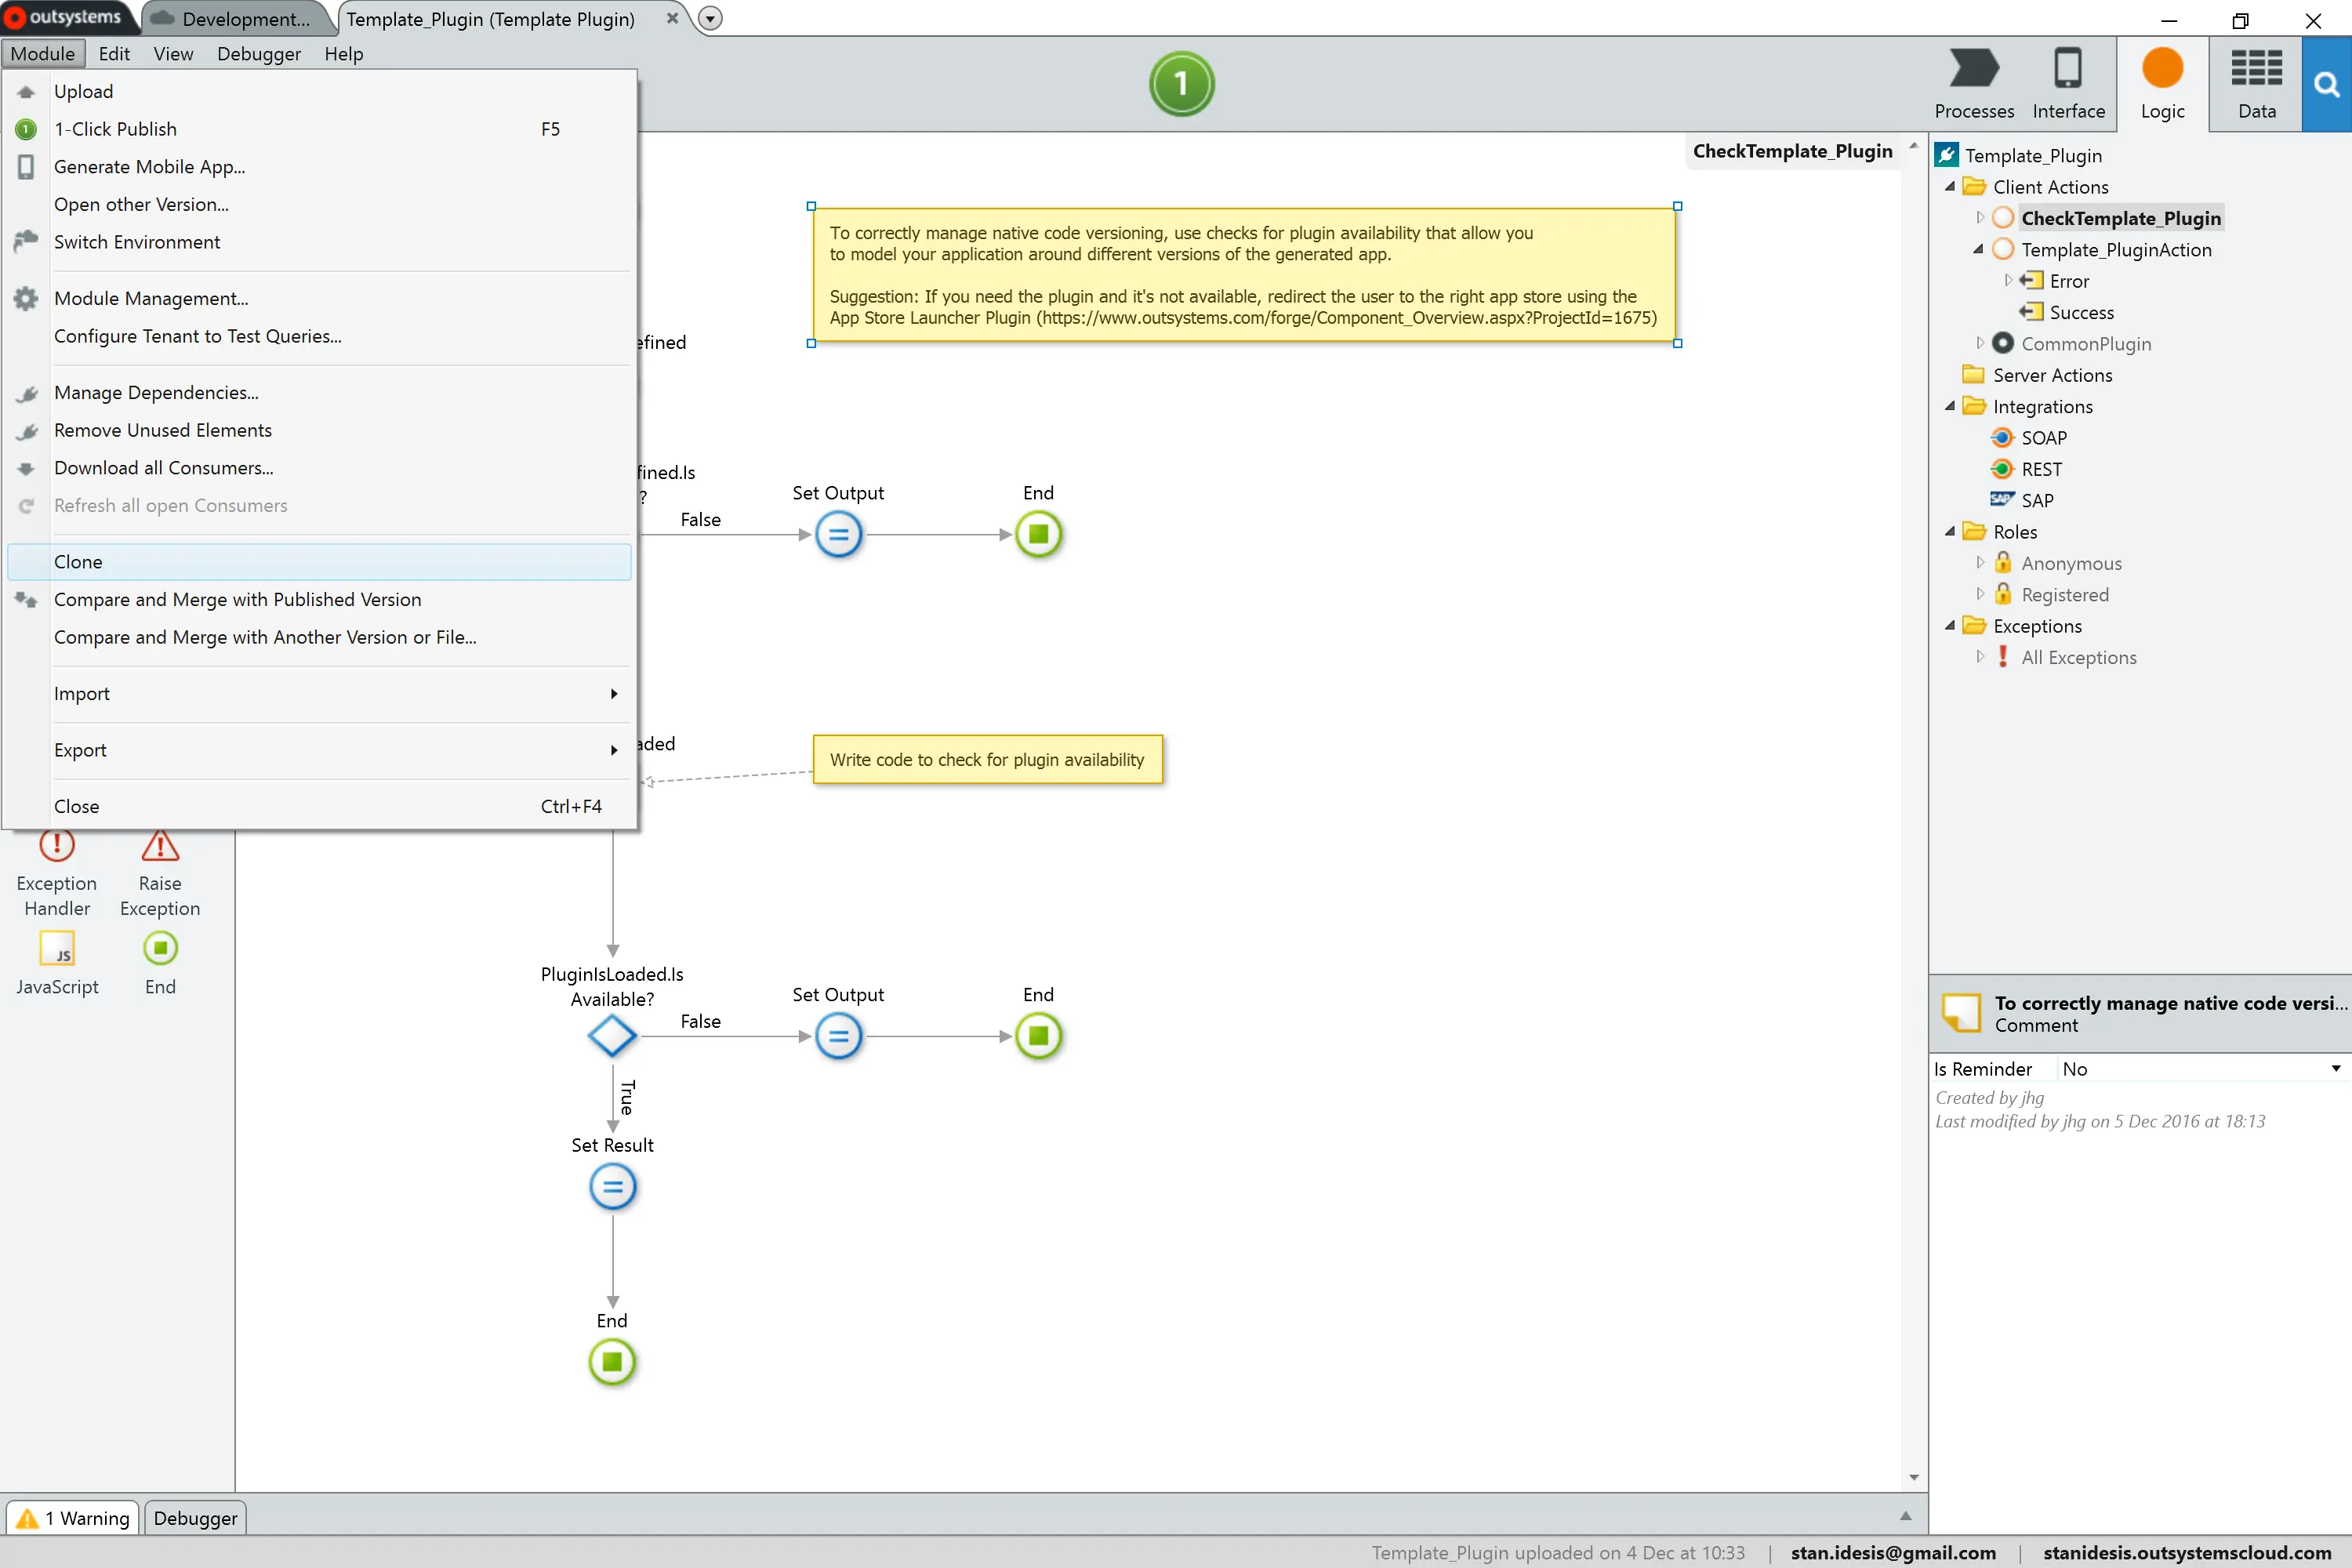
7. Clone Template Plugin
To use your ToastyPlugin in an OutSystems mobile module, download the Template Plugin from the Forge. This plugin, provided by the OutSystems Experts team, has laid the groundwork for all custom Cordova plugins. After you’ve downloaded the plugin to your environment, open the Template_Plugin module, click the Module menu item, and then select Clone.
Rename the module to ToastyPlugin, because that looks better than CopyOfTemplate_Plugin, am I right? Scroll to Extensibility Configurations and double-click to reveal the full JSON text:
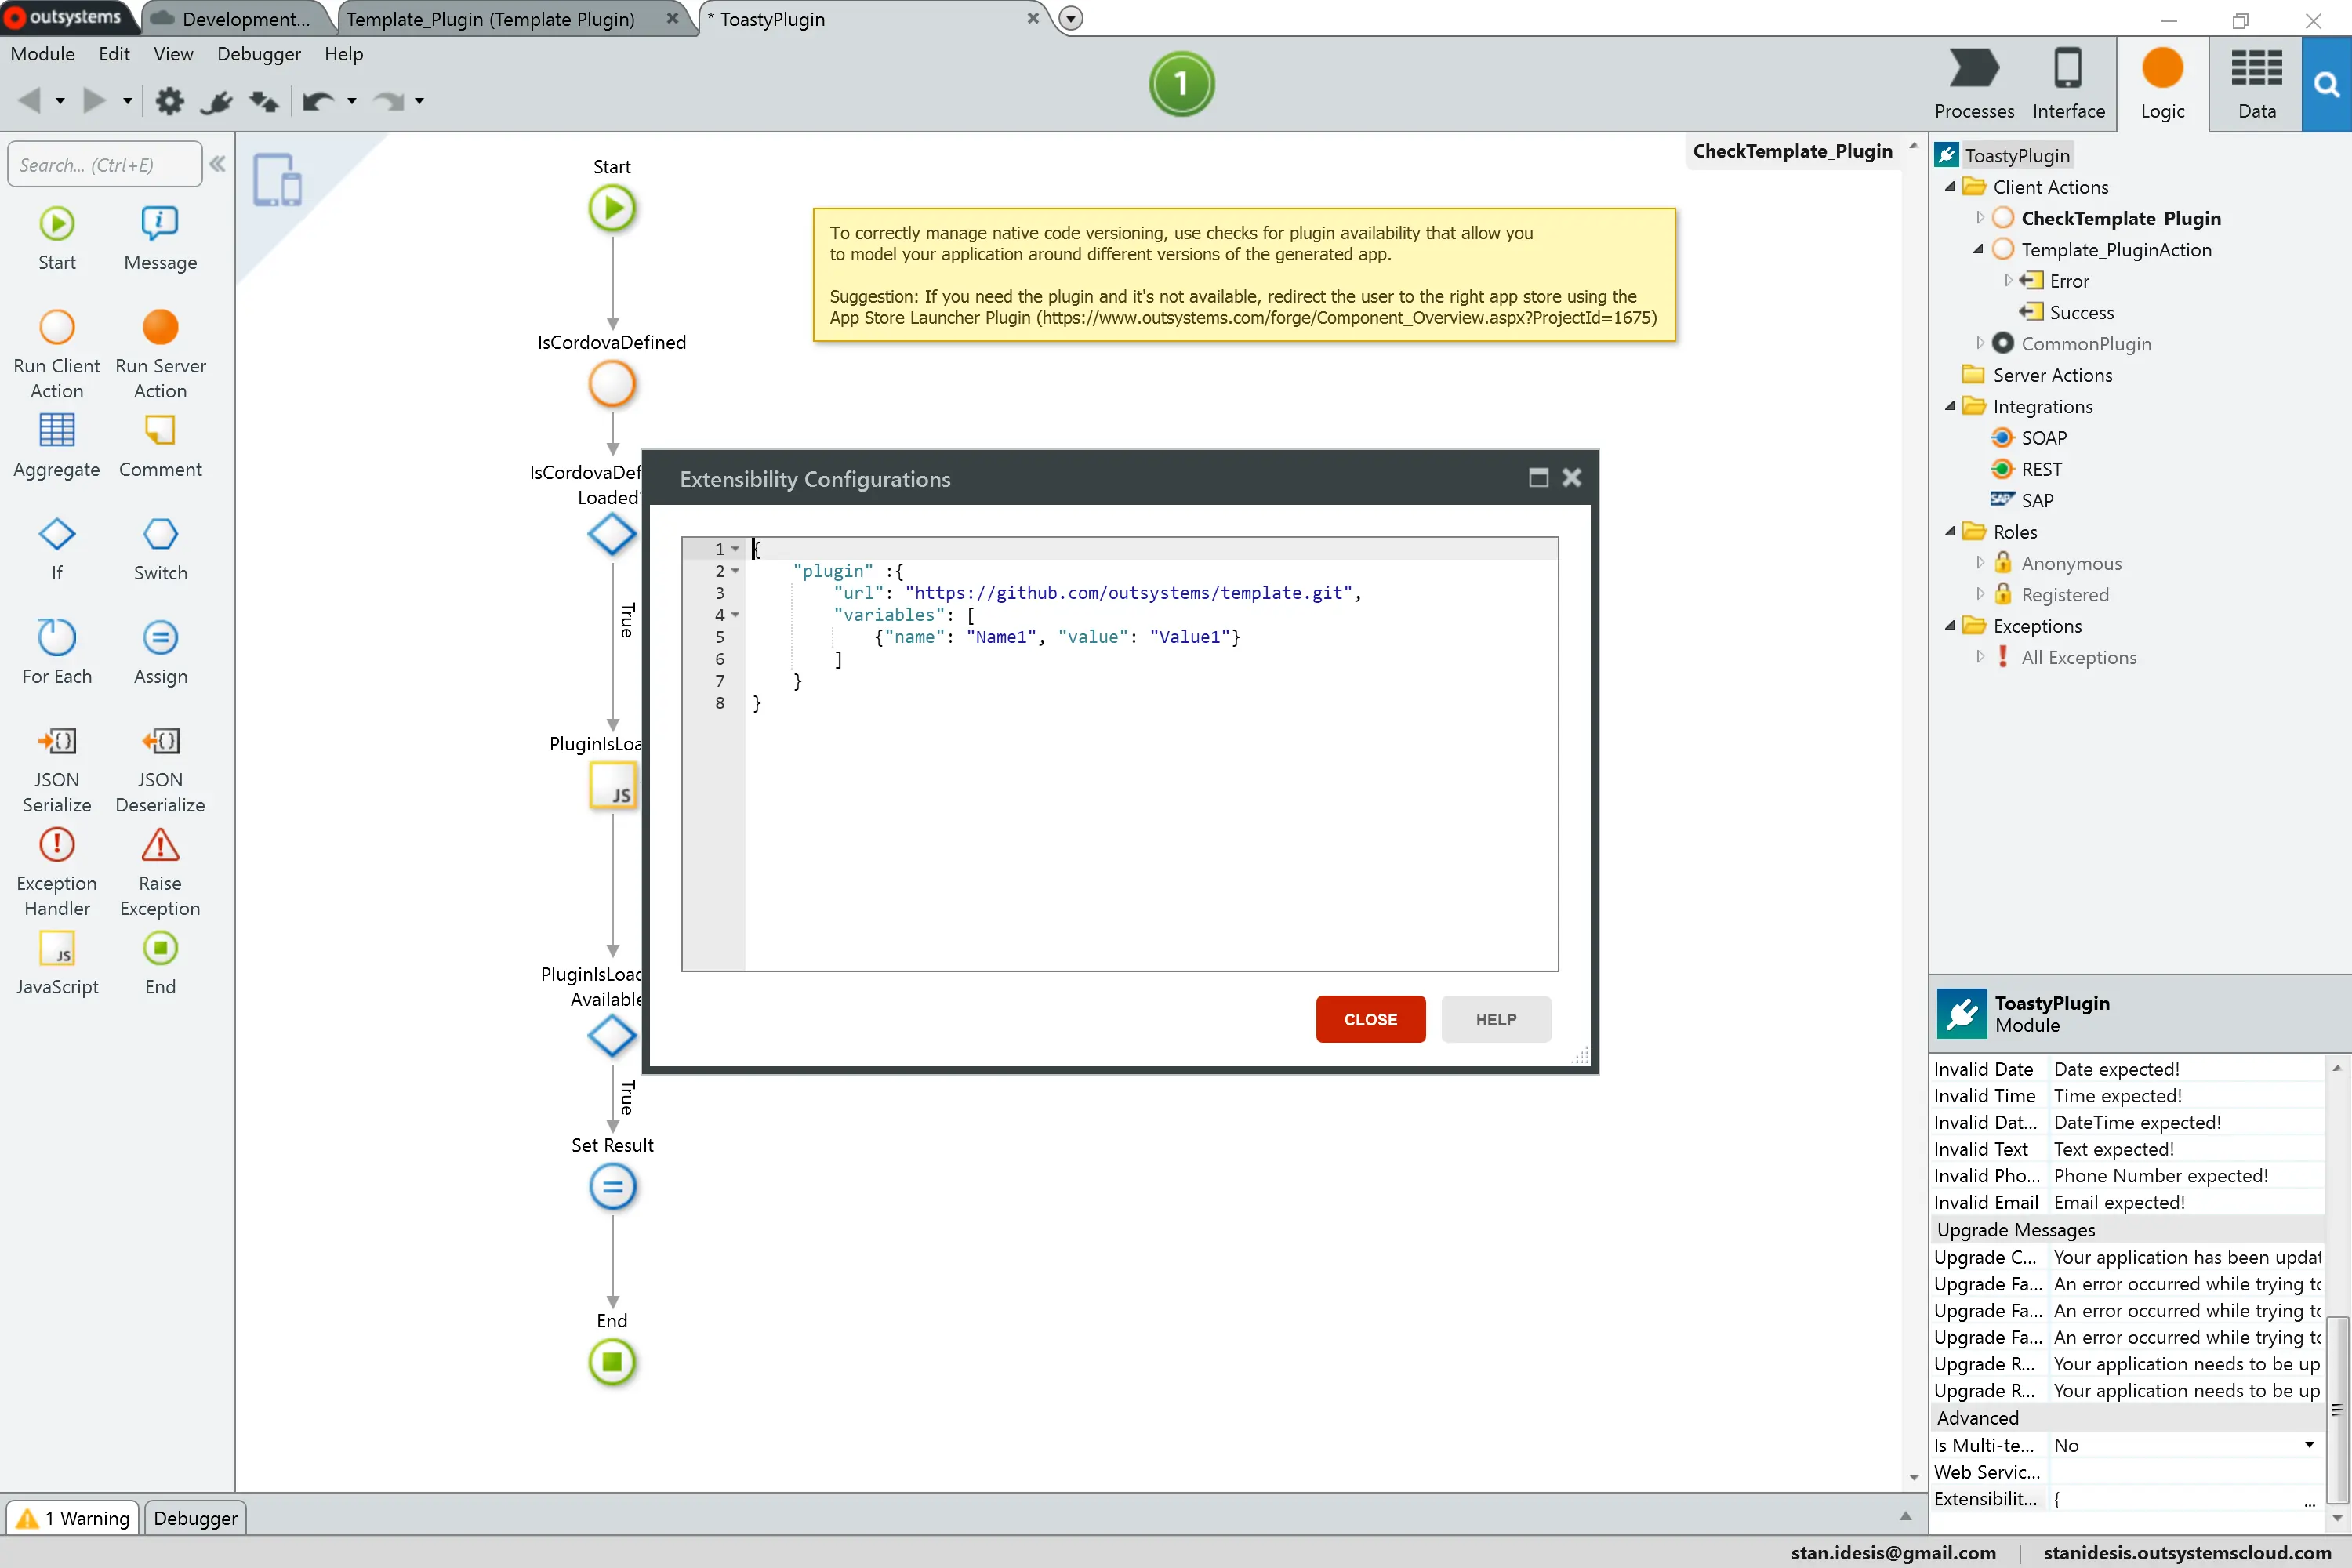
Change the JSON to match the following, but replace the URL with your own Git repository:
This template OutSystems plugin will incorporate the Cordova plugin found at the provided repository address. However, OutSystems offers two additional ways to include a plugin: as a resource or by its unique npm identifier. For the purpose of this tutorial, I’m going to assume you have access to Github or similar and feel free to create temporary public repositories for test purposes.
Note: If you ultimately plan to build private plugins strictly for company use, I recommend including the plugin as a bundled resource.
8. Modify the Template Plugin
You still need to make plenty of modifications to the template before you can use it as an actual dependency. First, let’s delete stuff. Under the Interface tab, delete the Template_Plugin_Flow web block and delete the Template_Plugin script. These elements enable you to attach per-screen listeners to callbacks that bubble up from the plugin. We won’t need this capability to show Toasts.
Next, switch to the Logic tab to do some actual work. Rename the CheckTemplate_Plugin action to CheckToastyPlugin, then open it. This action lets the user (your OutSystems mobile app, in this case) verify the plugin’s availability before invoking any of its methods. In this block, double-click the PluginIsLoaded script to begin editing. This script must assign true or false to IsAvailable before it returns. Replace the block with the following script:
This checks for both window.plugins and then verifies the presence of the toastyPlugin object. Assuming both are present, ToastyPlugin is ready to fire off Android Toasts. But first, you need to modify the generic plugin action to allow plugin users to show a Toast through an OutSystems action. First, create a static Entity that plugin users will pass as a duration, name it ToastDuration, and make the entity public. Then create two records under the static entity, one named Long and the other Short.
Pop back into the Logic tab and rename Template_PluginAction to ShowToast. This is the action plugin users will invoke to trigger a Toast message. Add two input parameters to the action: Message and Duration where Message is a text and Duration is a ToastDuration identifier type. Then add a local parameter named DurationText. You will pass DurationText as an argument into the TemplateJSAction script found inside ShowToast.
Add a conditional check to the beginning of ShowToast that compares Duration to Entities.ToastDuration.Long; if true, assign “long” to DurationText, otherwise assign “short.” Here’s how mine looks:
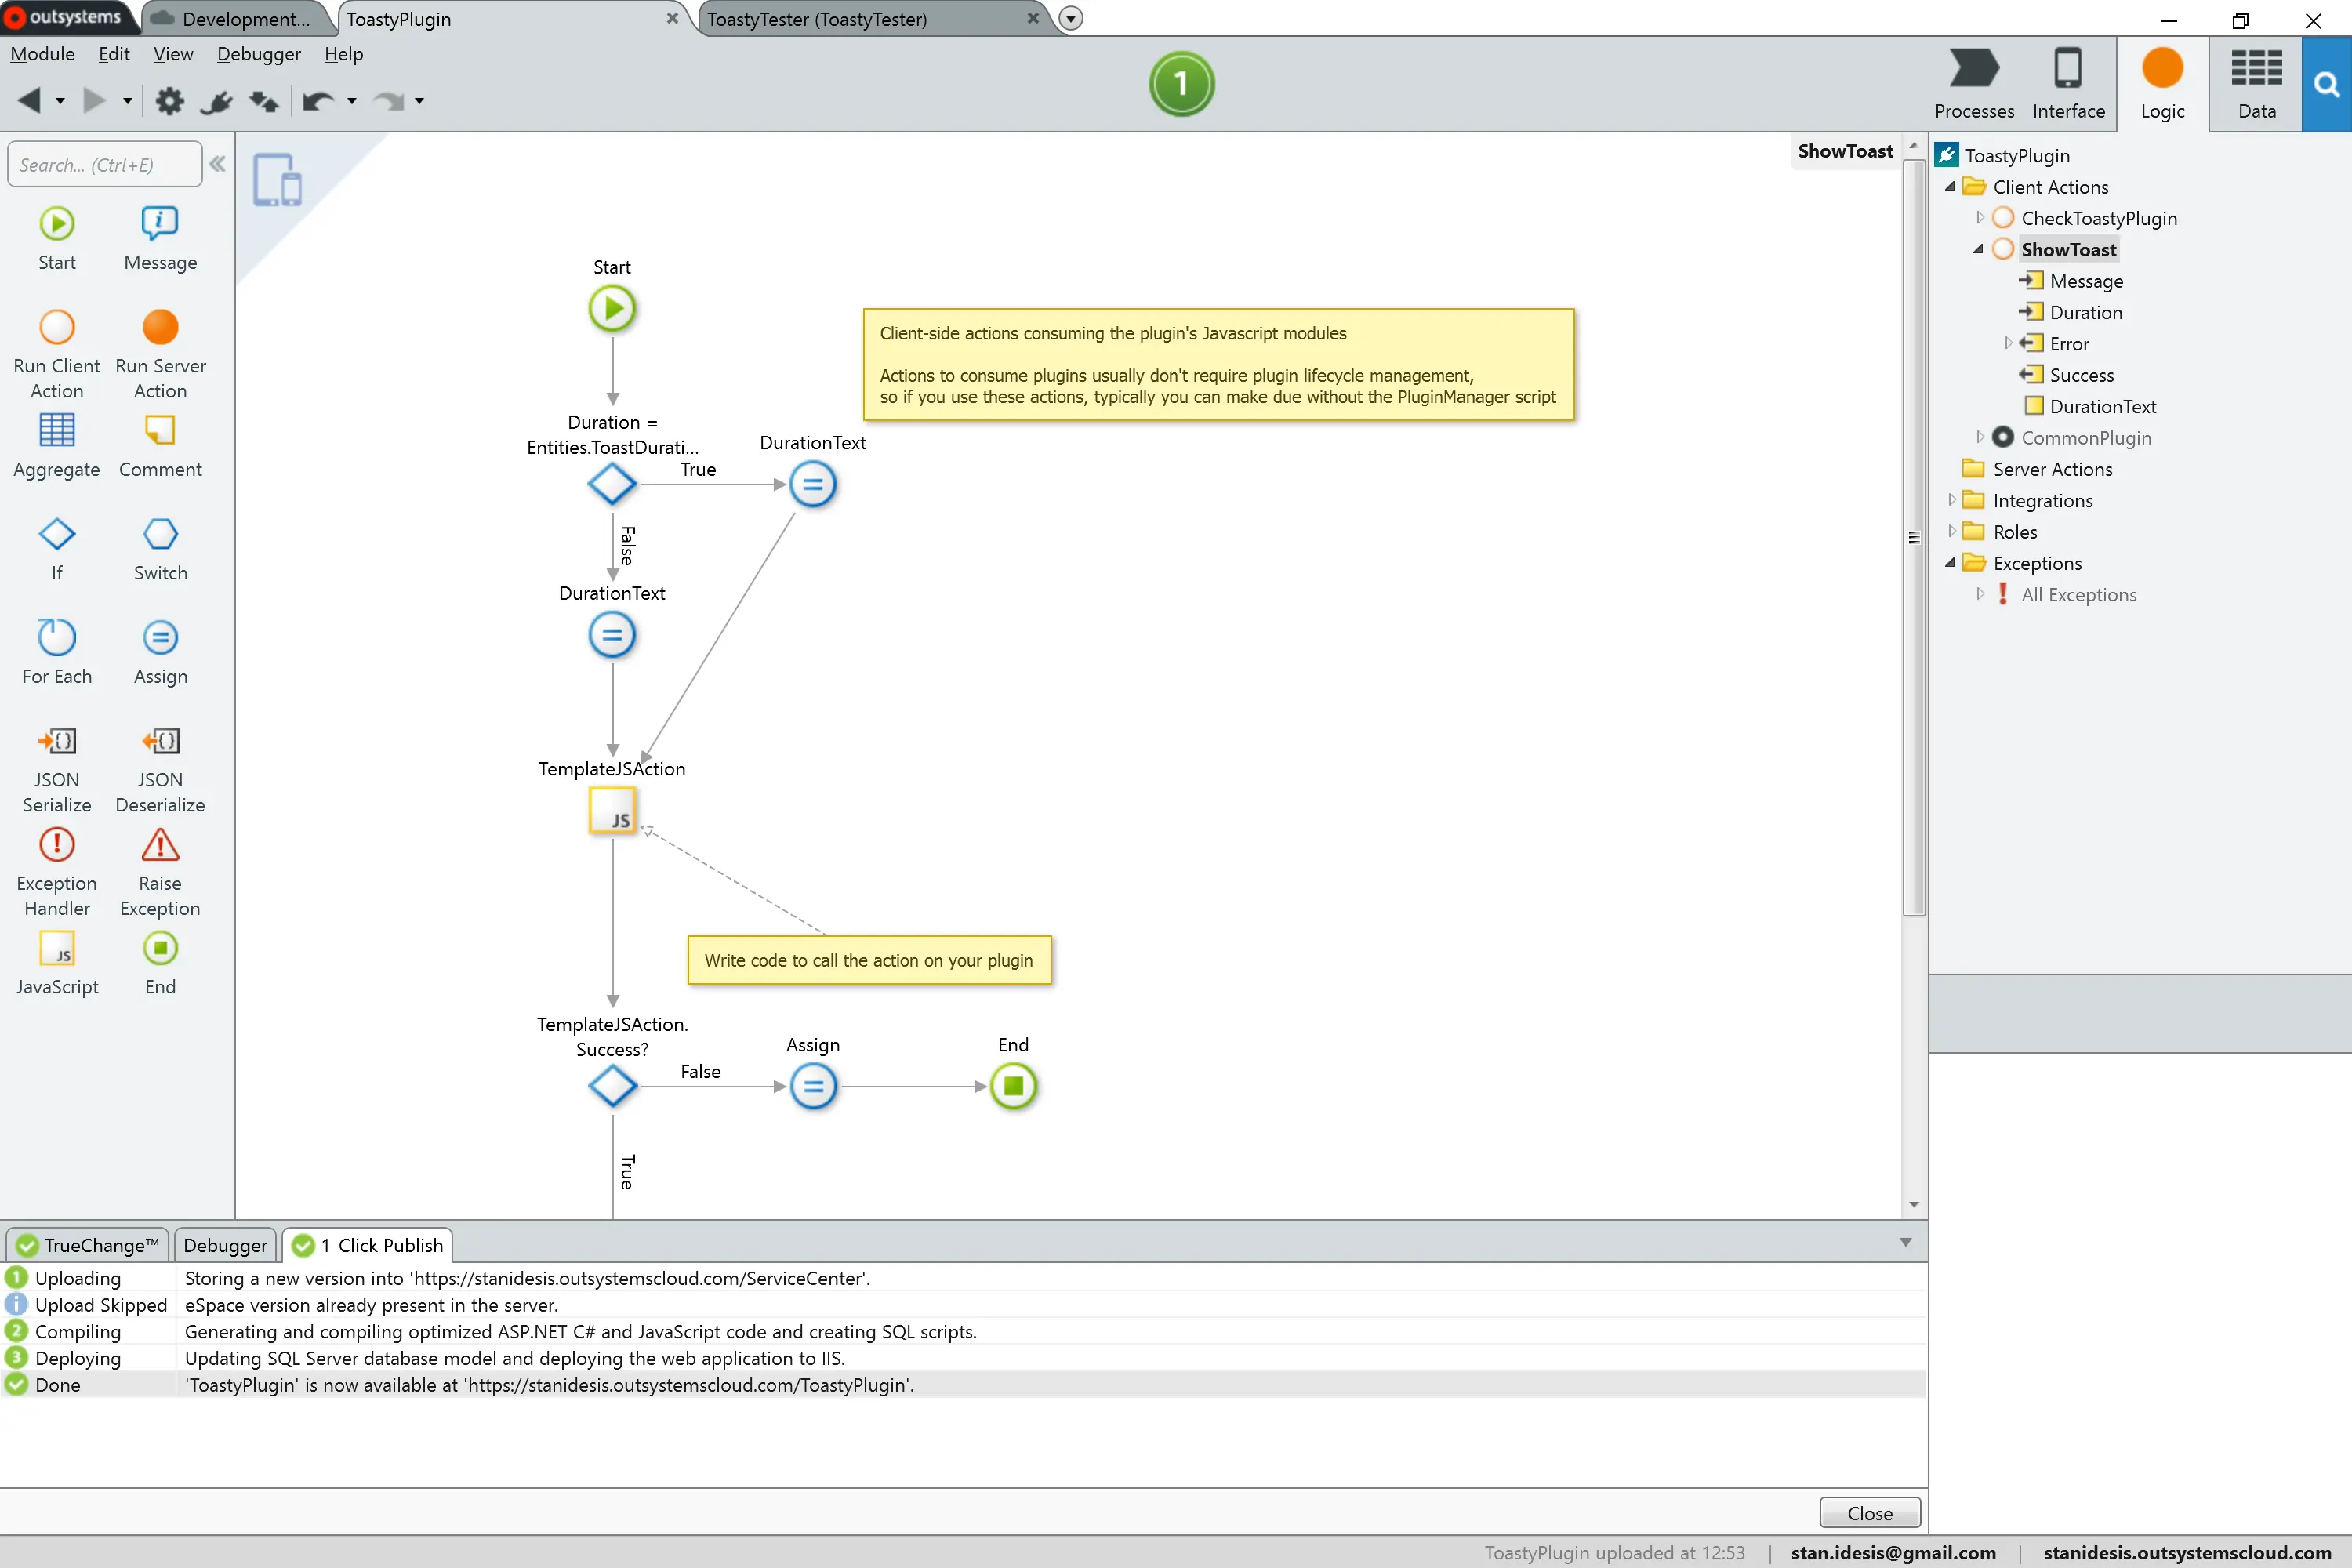
Add Message and DurationText as arguments to TemplateJSAction. Then open TemplateJSAction and replace the contents with the following:
The last line invokes your plugin by passing the message, duration, success, and the failure callback to ToastyPlugin’s show() function. With the plugin template prepared, go ahead and publish to your OutSystems cloud.
9. Test It Out
In a mobile project, add your plugin, its actions, and its data as dependencies. Here’s my dependency window:
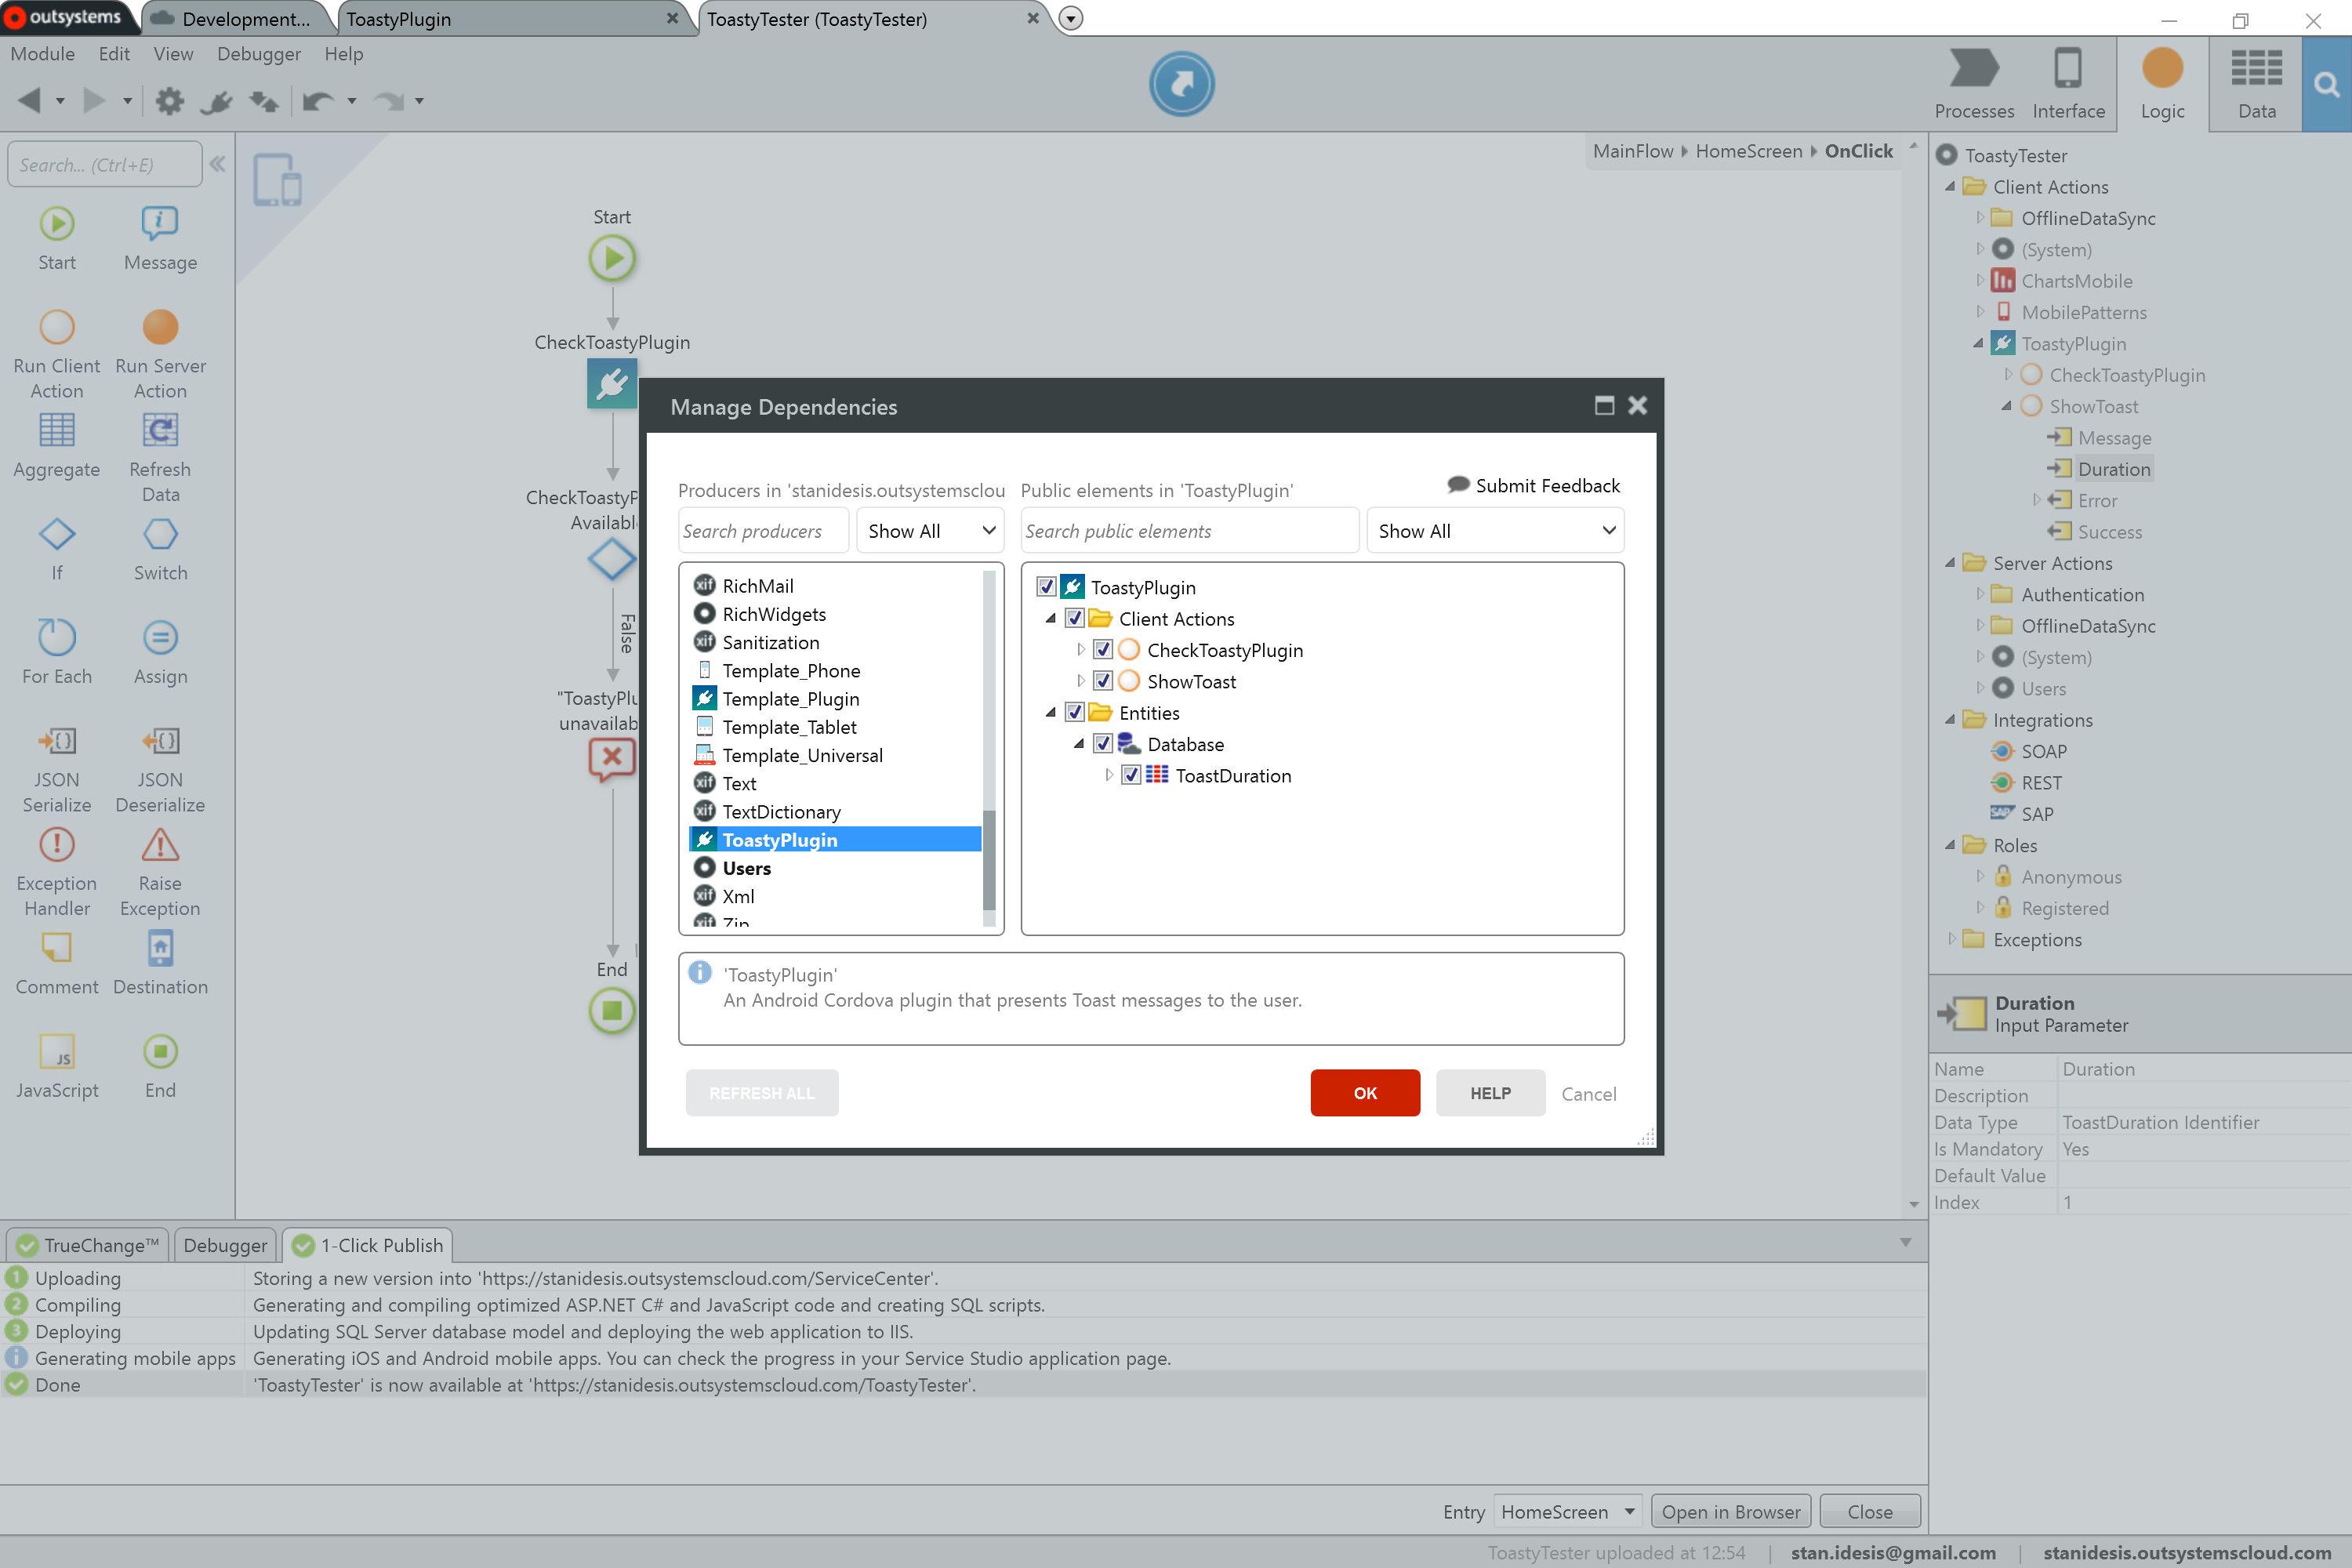
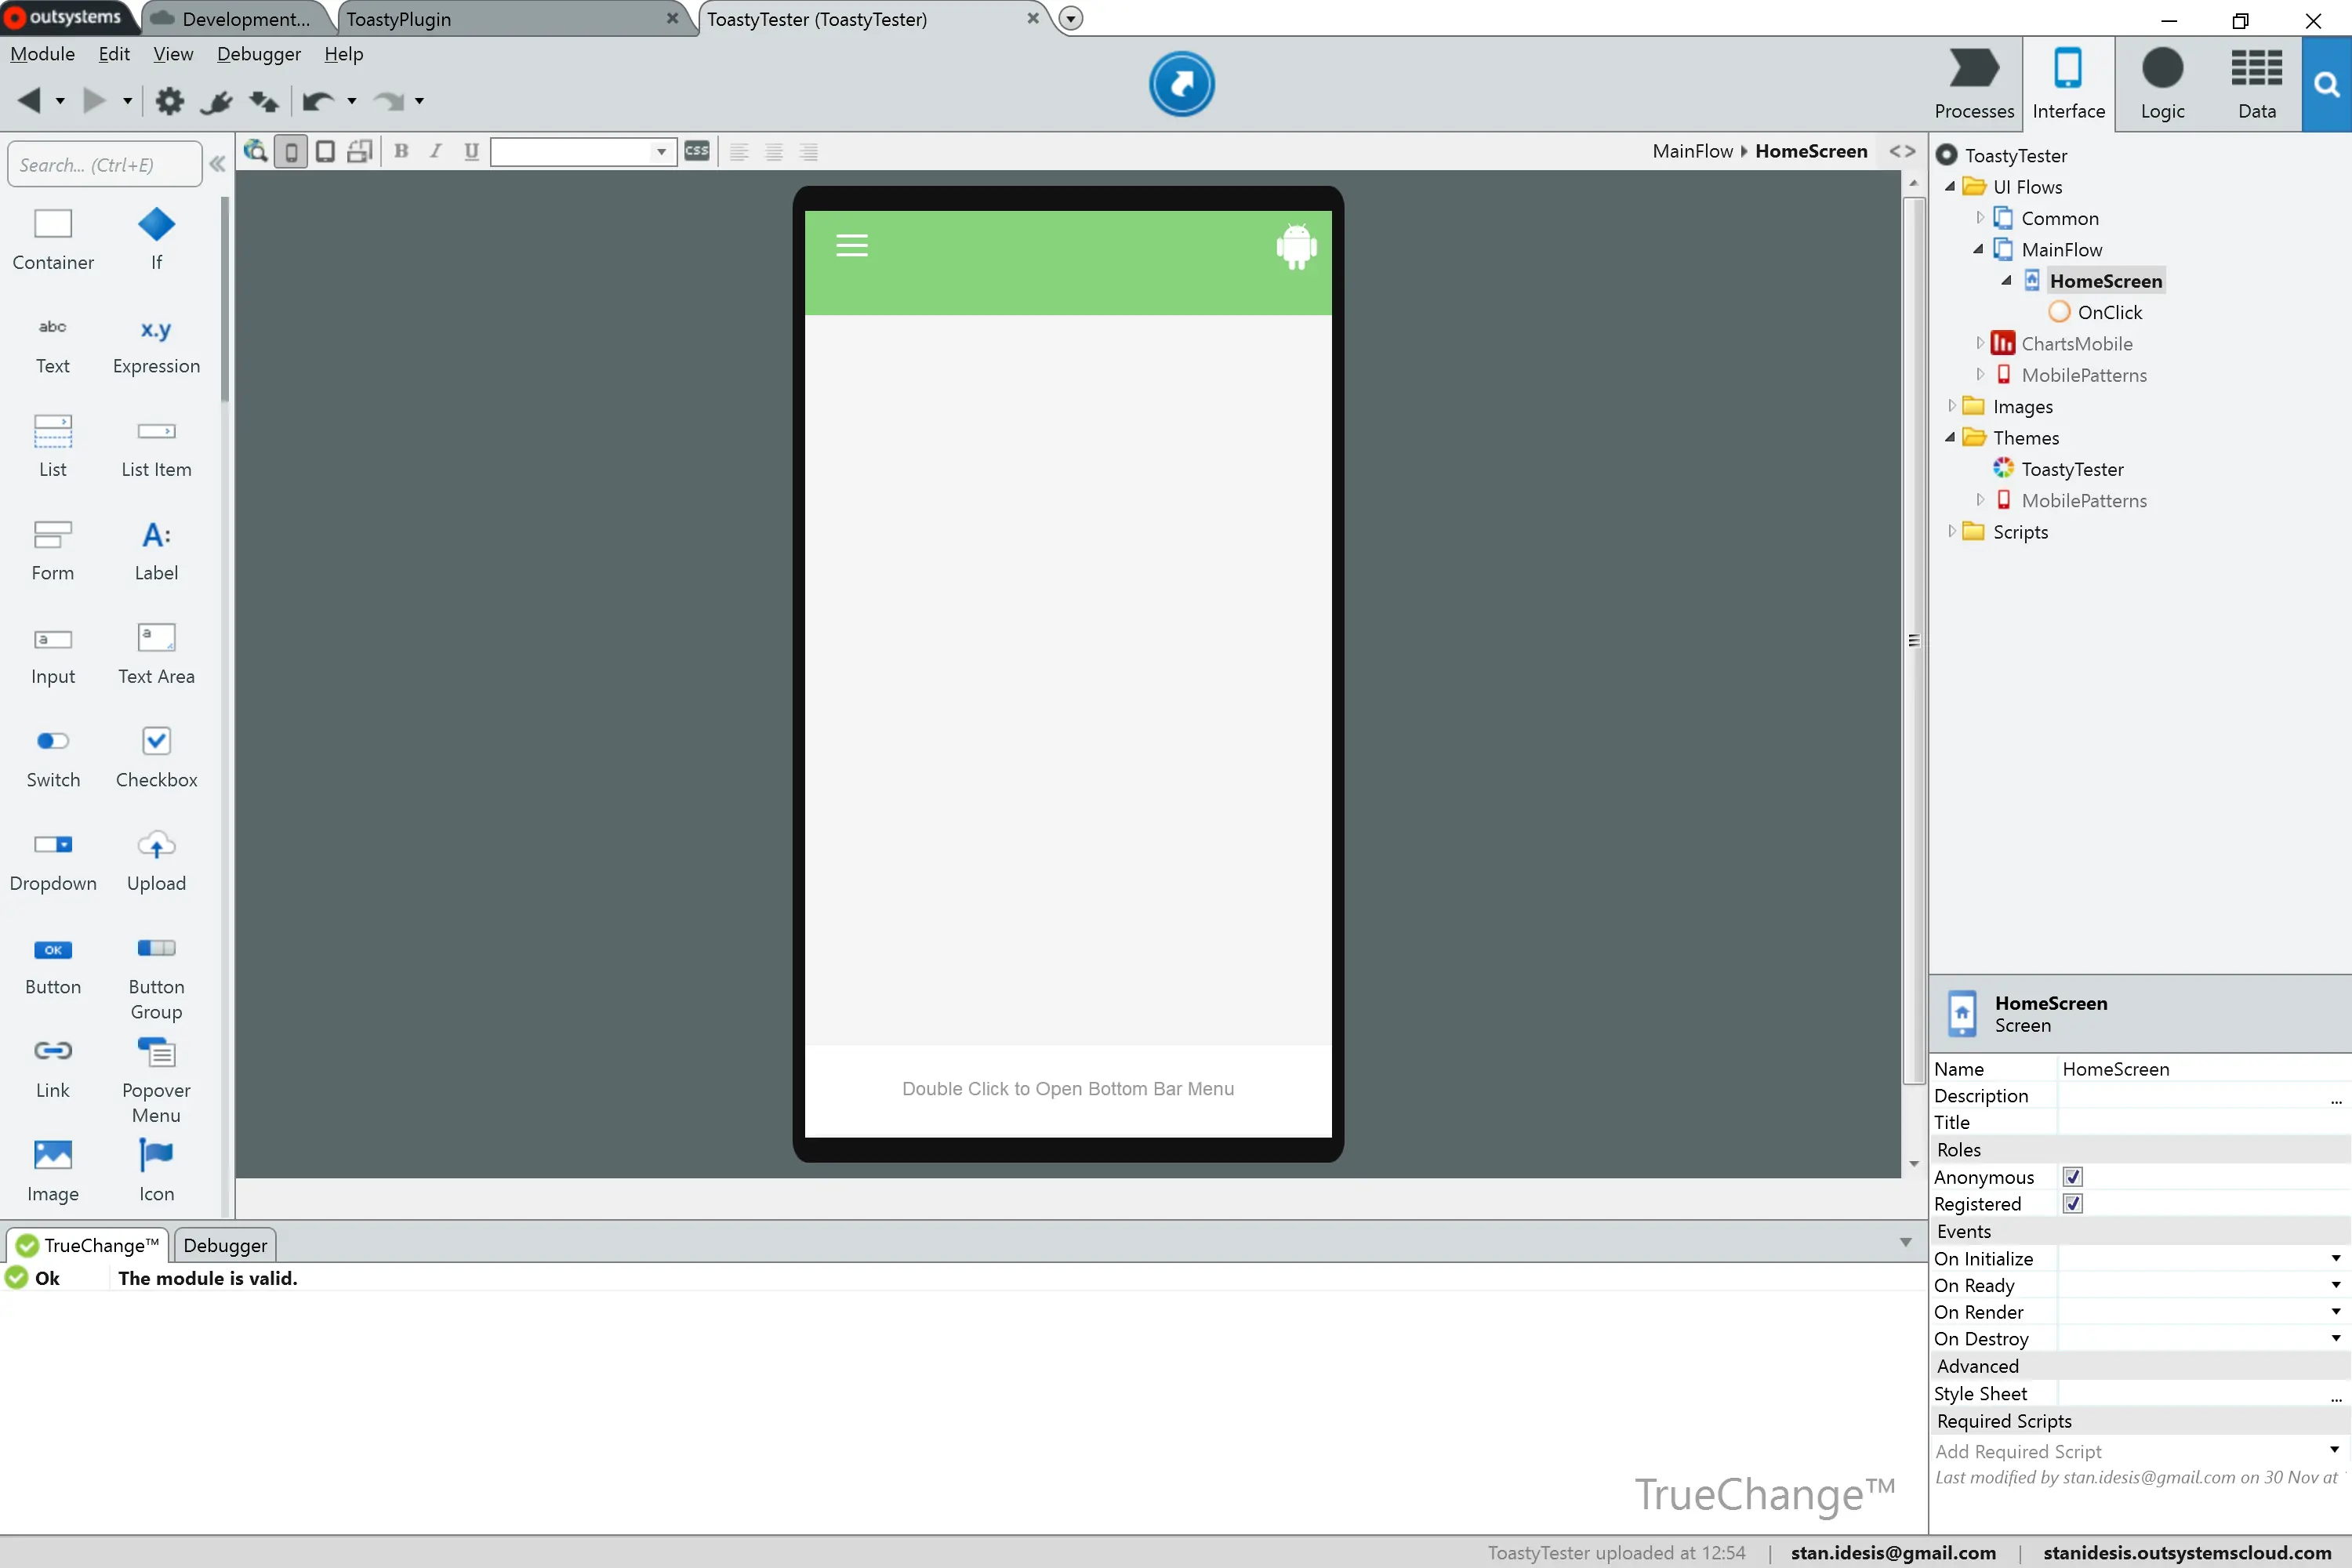
This guarantees your app has access to both actions and the ToastDuration static entities. Click OK and let the dependencies download to your project. For the purpose of this tutorial, I’ve prepared a simple public screen that uses an Android icon as a button in the menu bar:
I created an OnClick action for this button and populated it with the following:
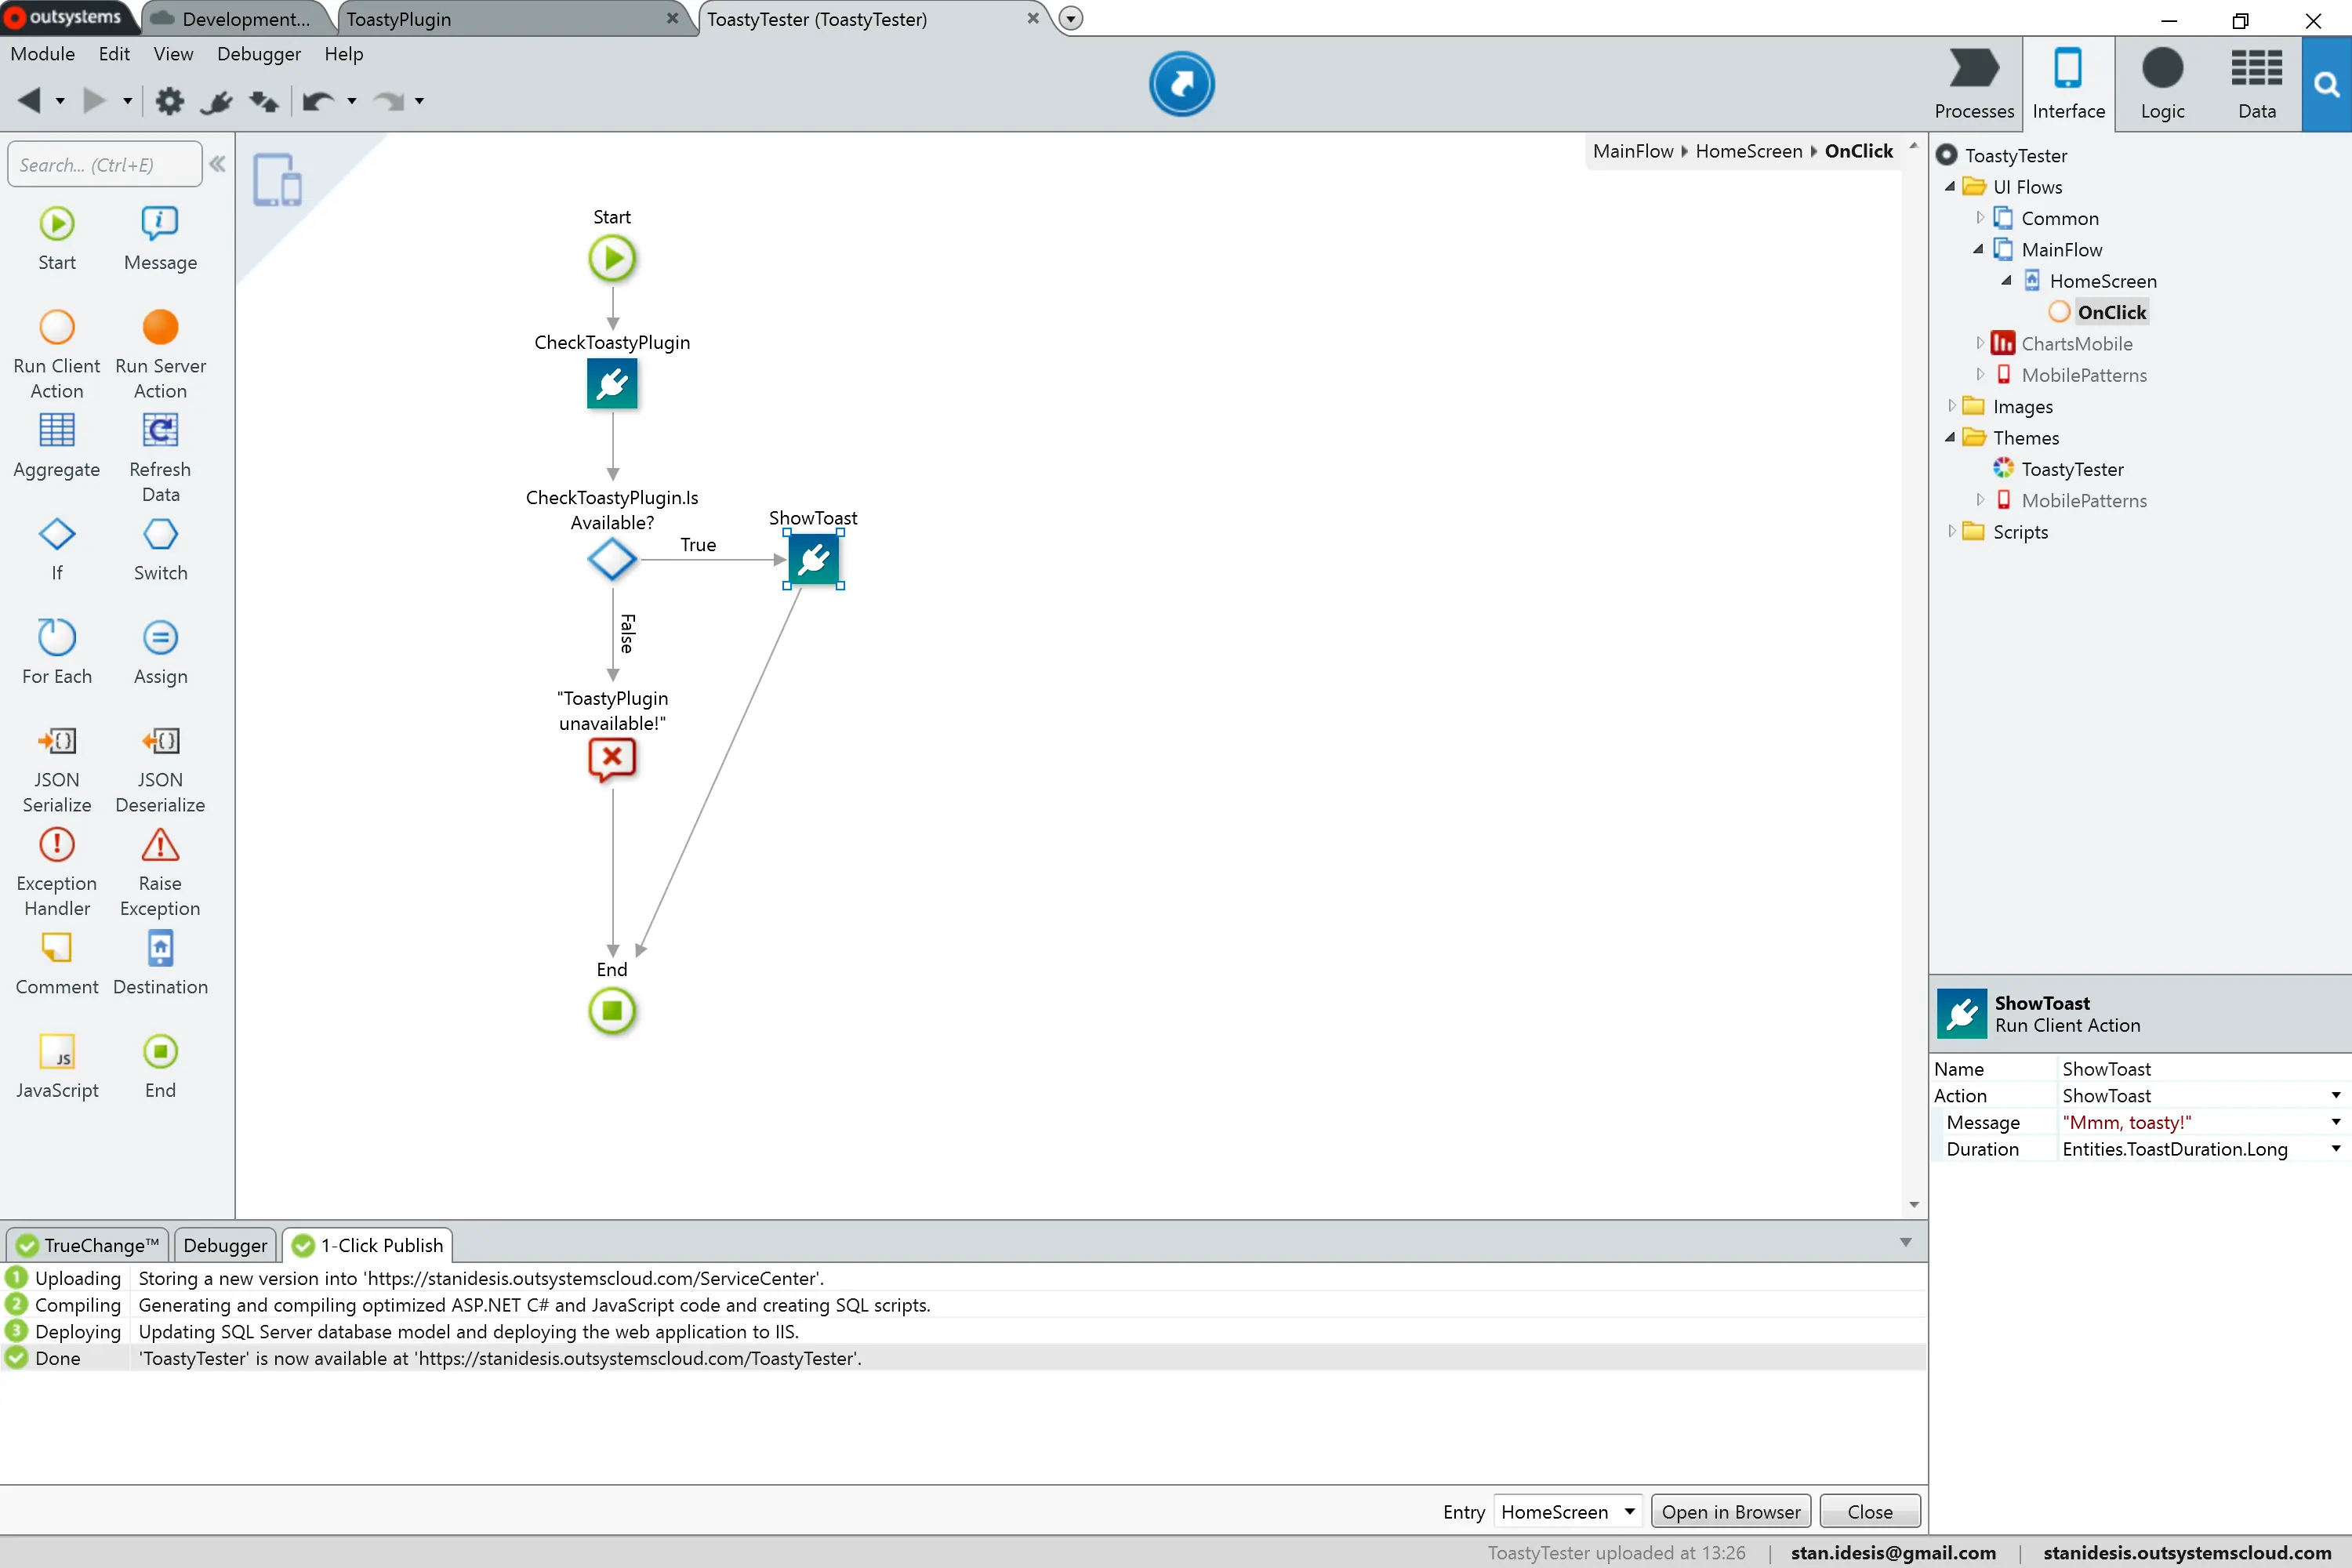
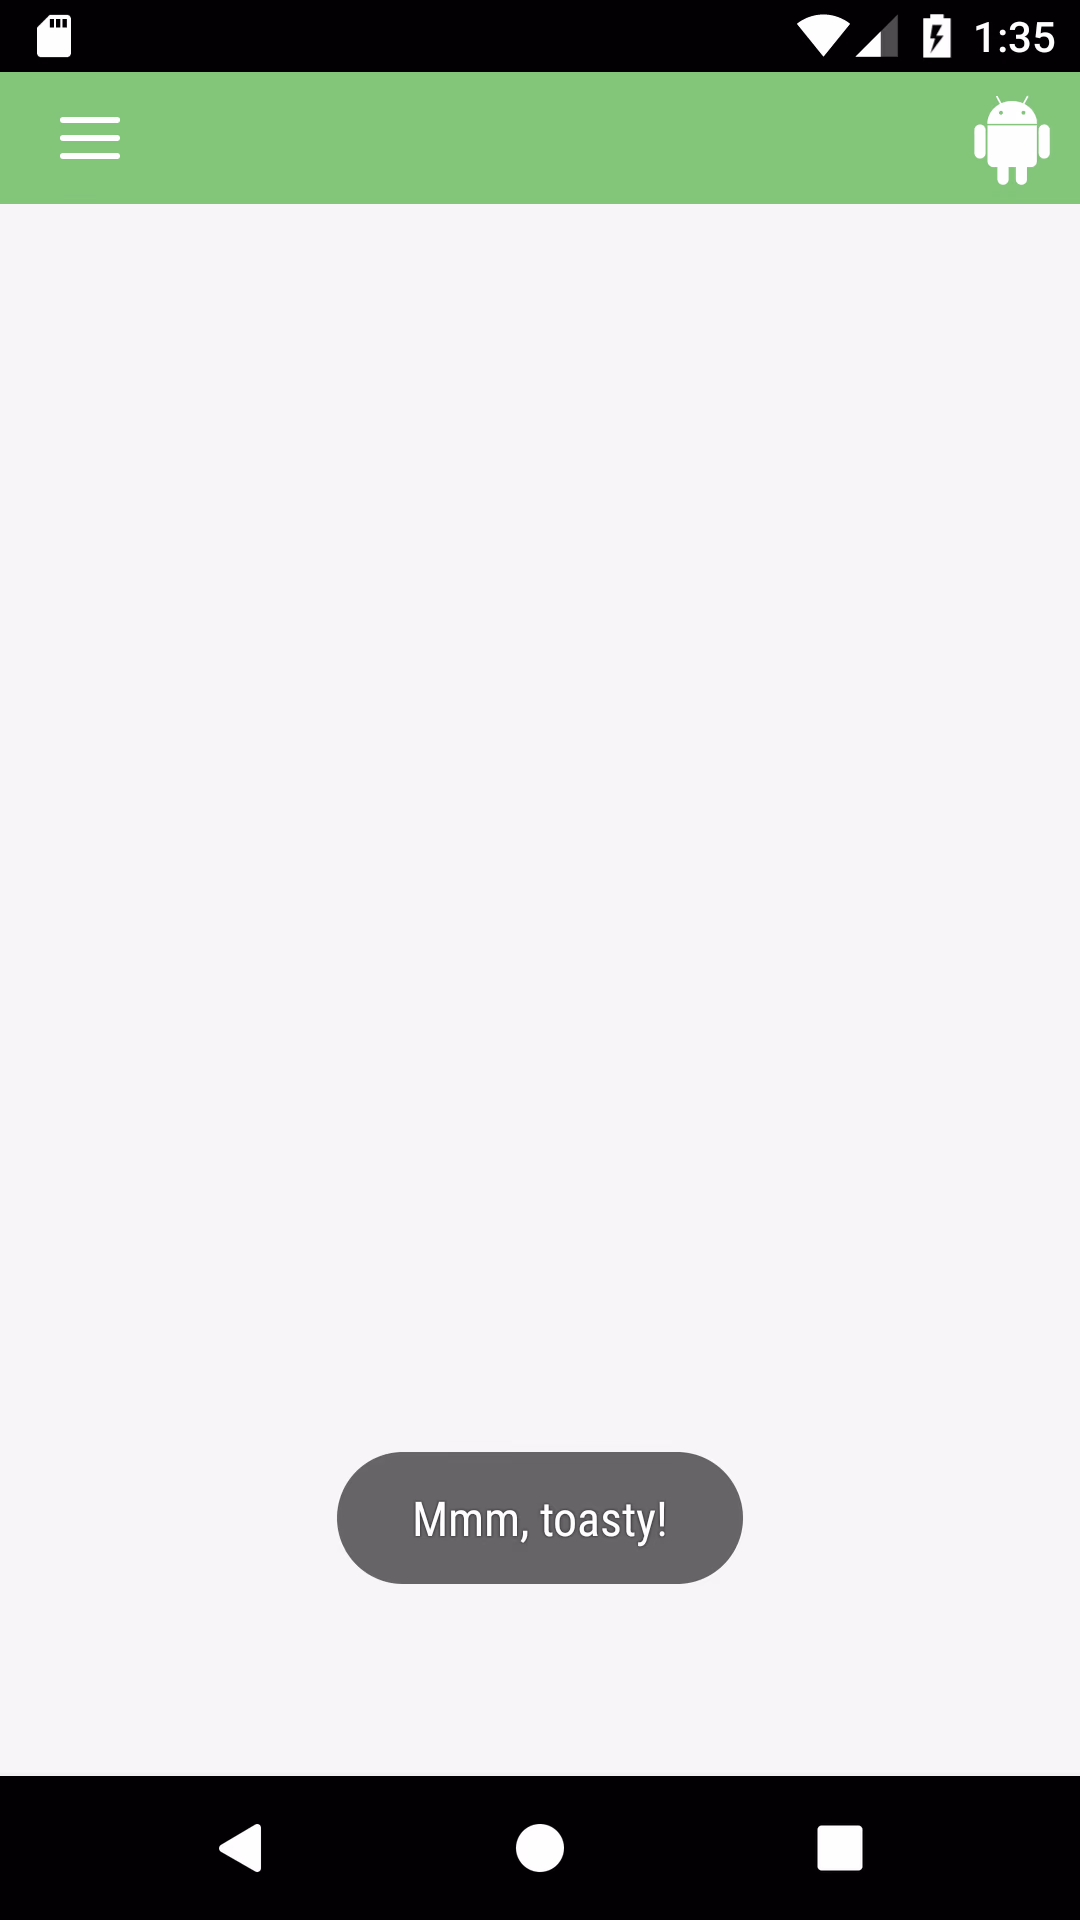
This action checks for the availability of ToastyPlugin. It presents an error message if the plugin is inaccessible, but otherwise invokes the ShowToast action with a Long duration and a message that reads, “Mmm, toasty!” How you incorporate the plugin is up to you, but you can easily follow my example by creating a new mobile module, adding a single icon to the menu bar, creating an OnClick action, and repeating the logic I’ve concocted. After you’re done, publish your changes.
To see the plugin in action, you must build the native application. Unfortunately, custom plugins cannot be tested in the browser or through the OutSystems Now mobile application. So, you must install your application on a device to use any off-platform Cordova plugins. To do so, navigate to the Development tab and switch from DEVELOPMENT to the NATIVE PLATFORMS section under your mobile project module. Then click GENERATE ANDROID APP. Accept the default parameters and allow a few moments for your application to generate.
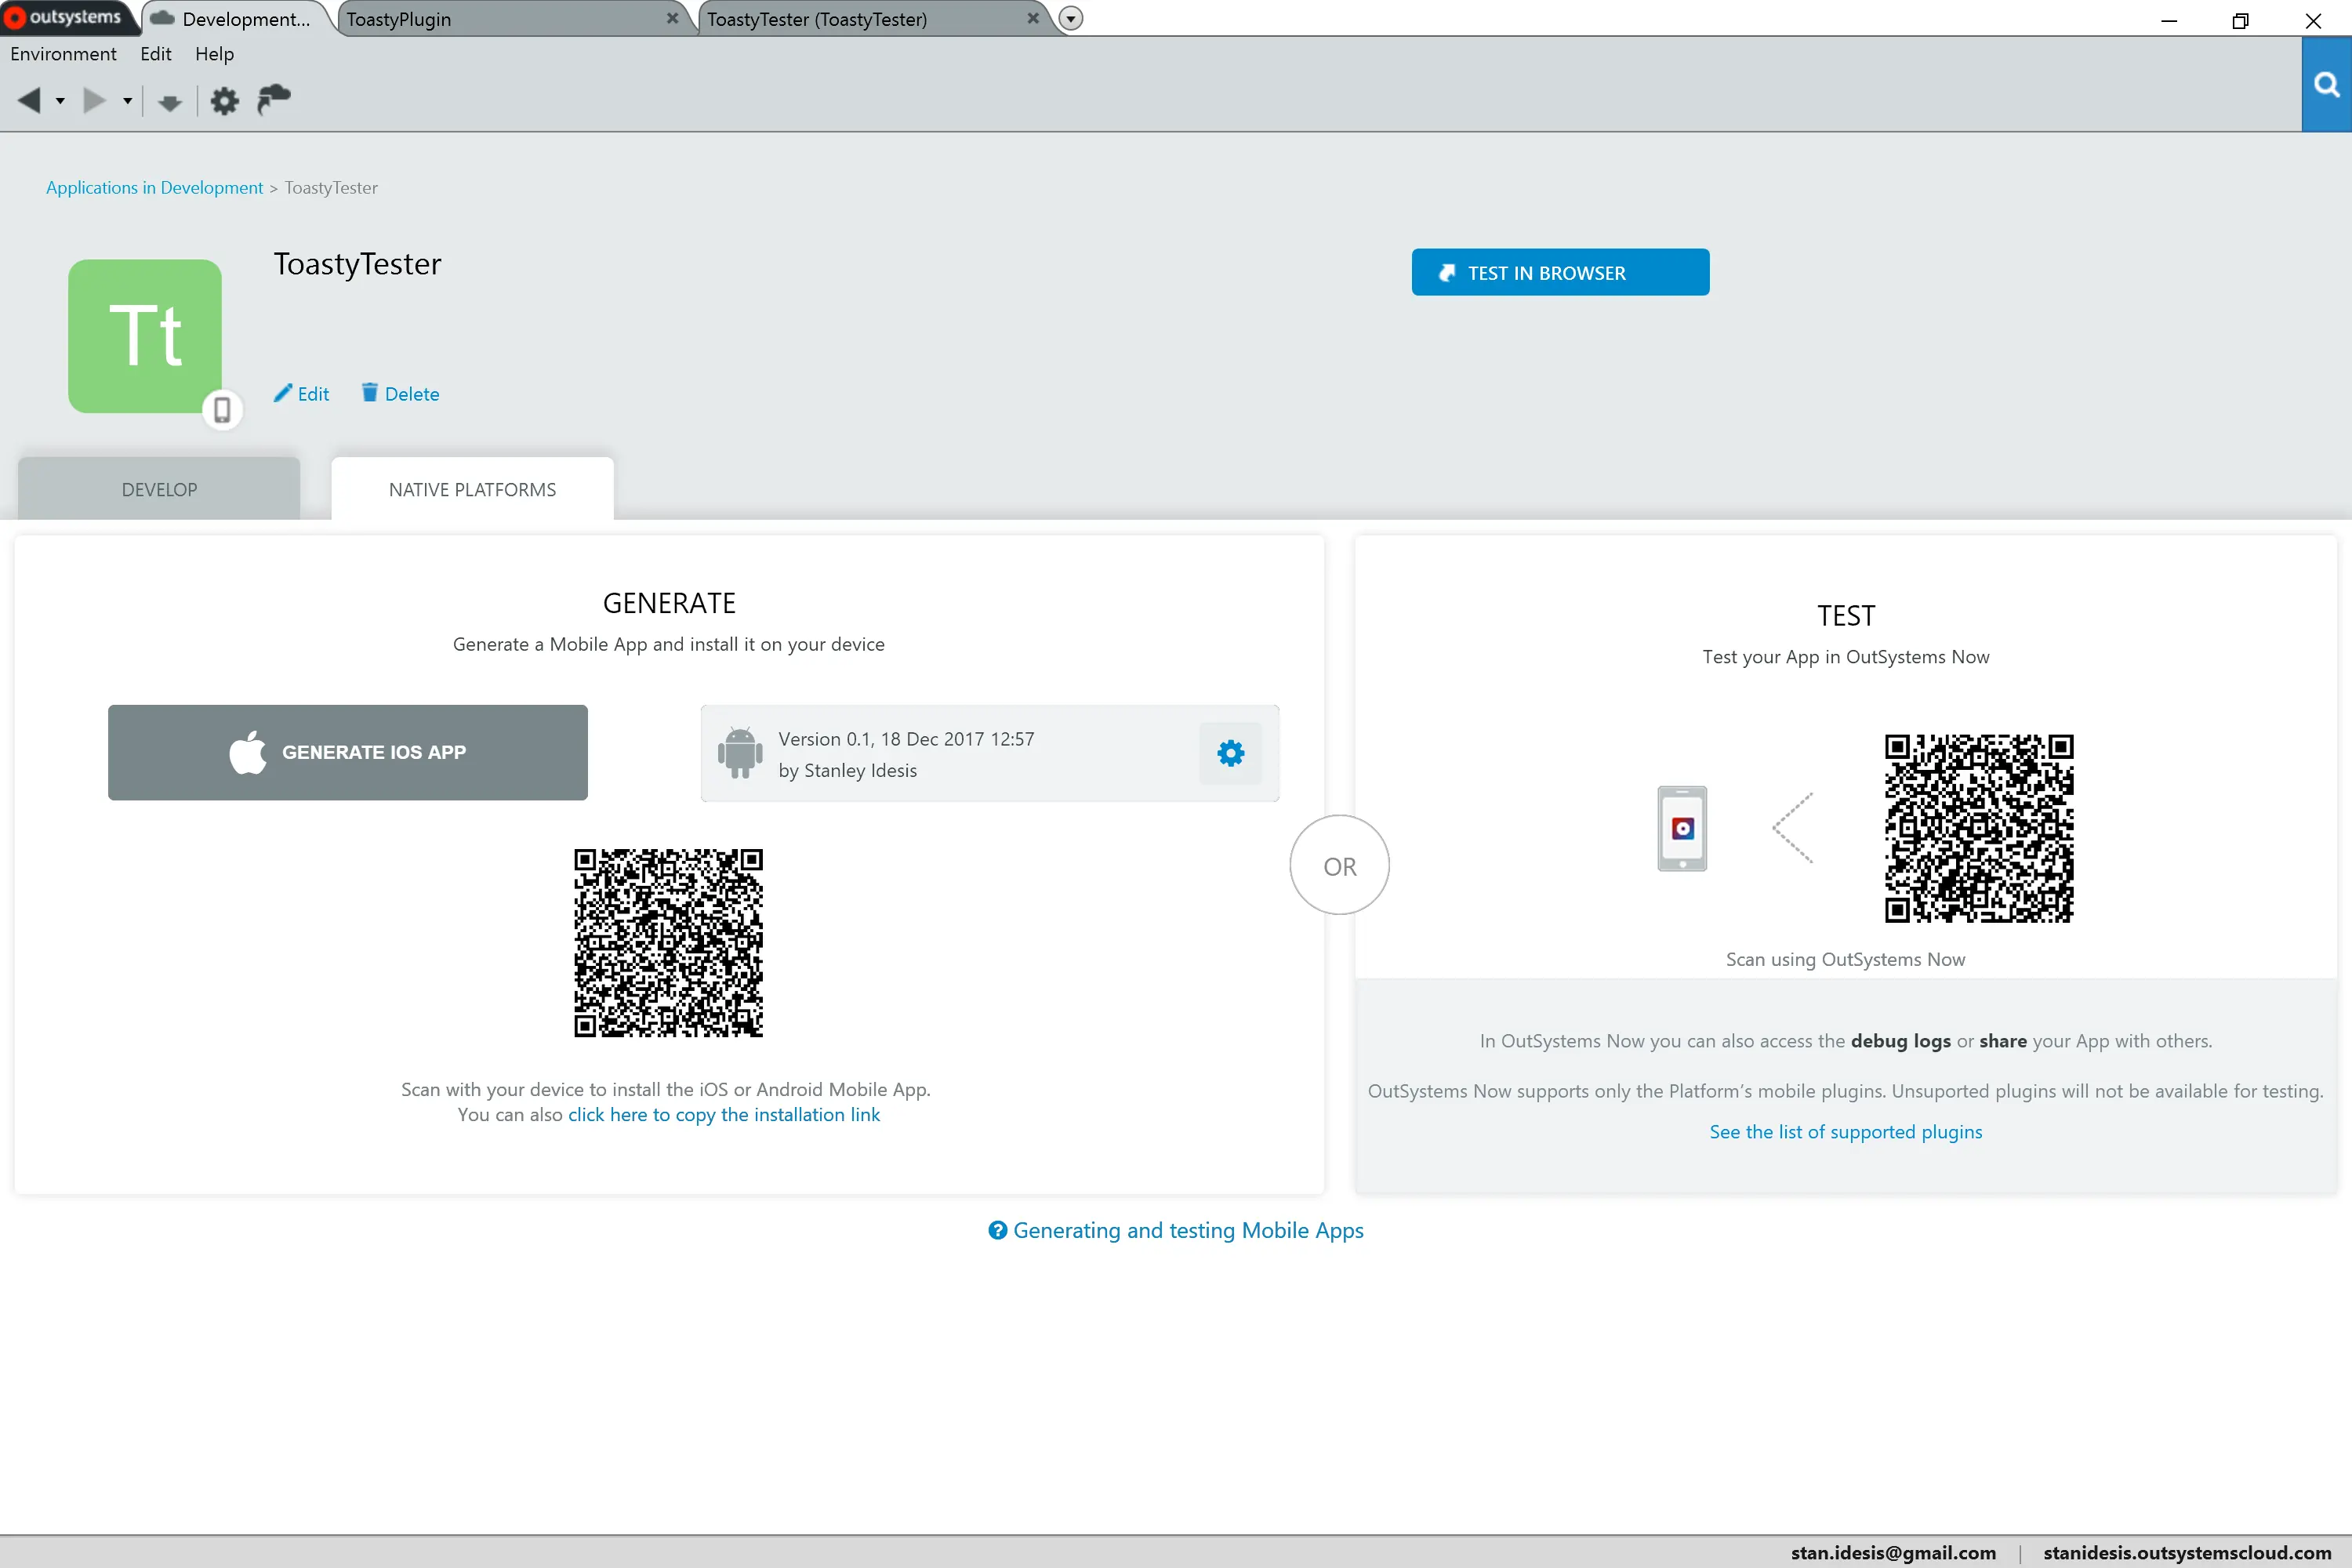
Install the application on your mobile device by using the QR code* or by directing your mobile browser to the installation link. I pasted the installation link into my emulator’s browser and followed these steps:
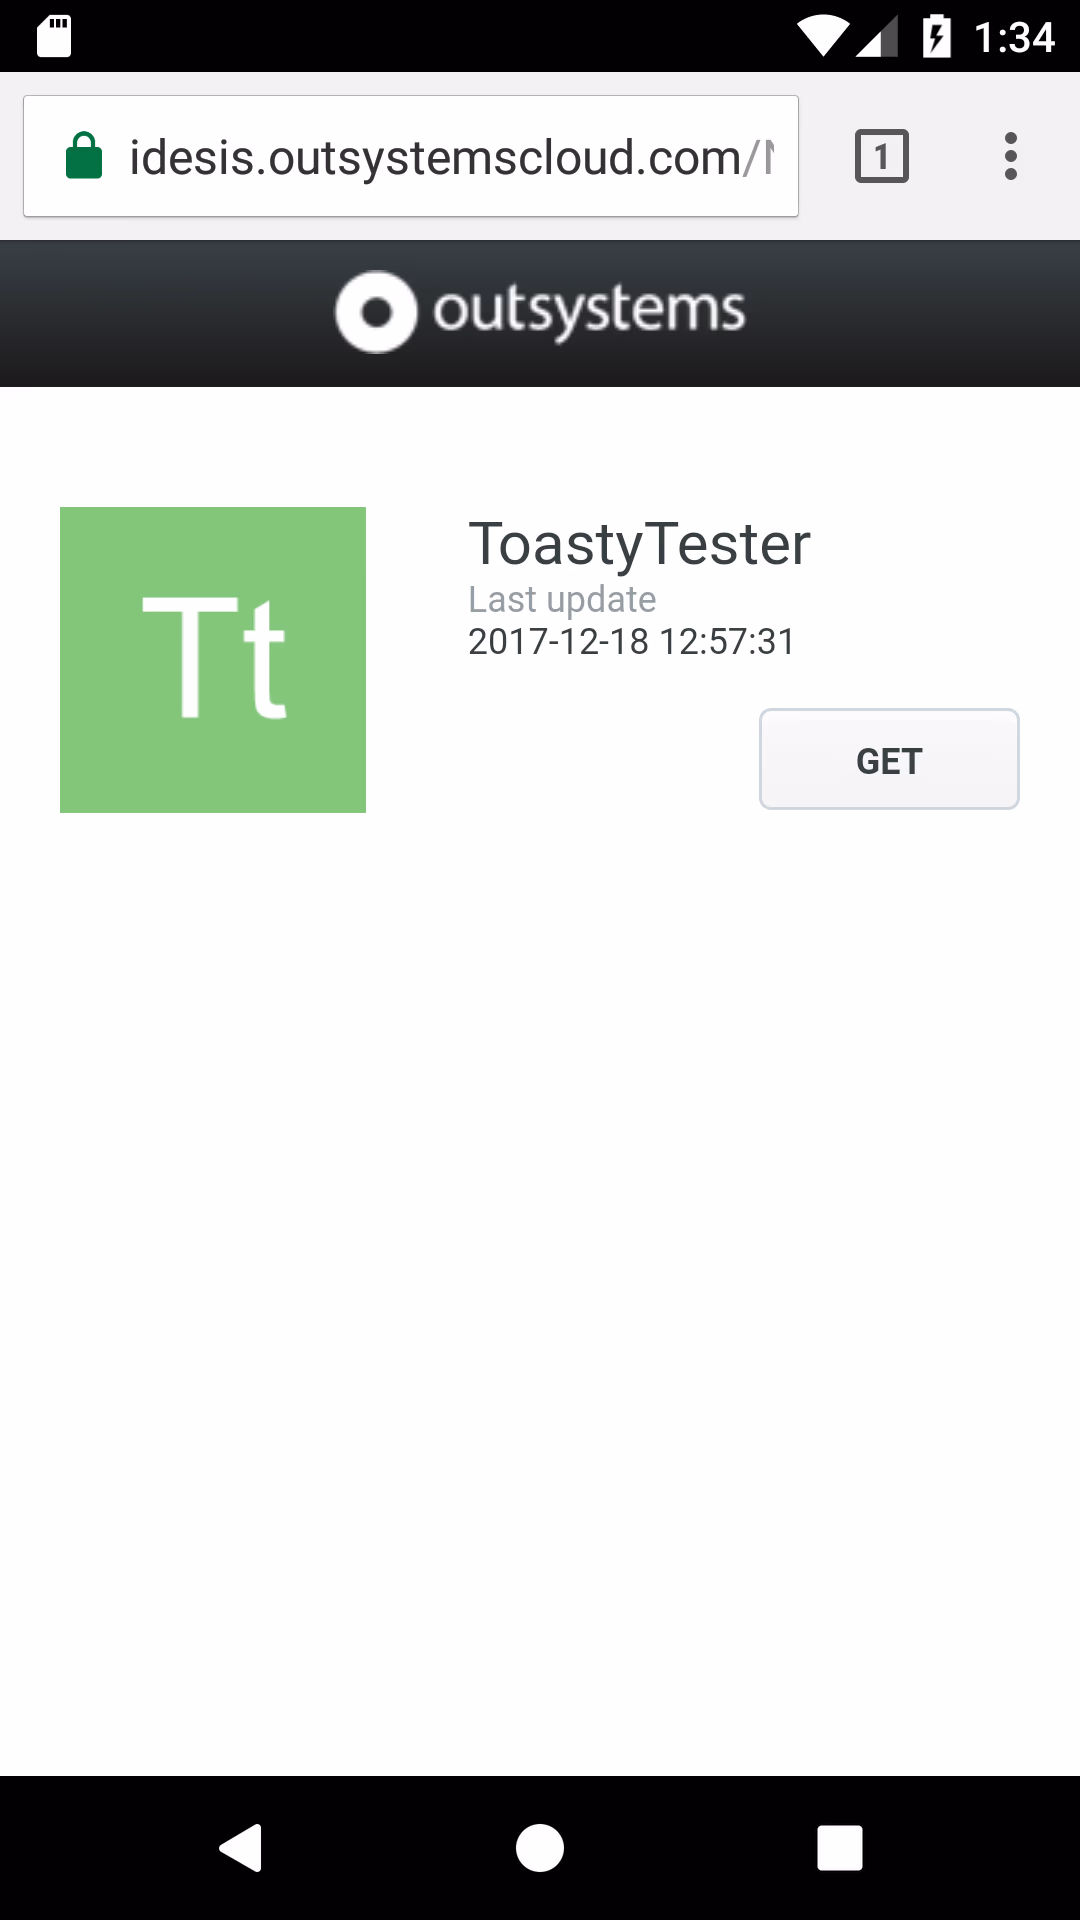 |
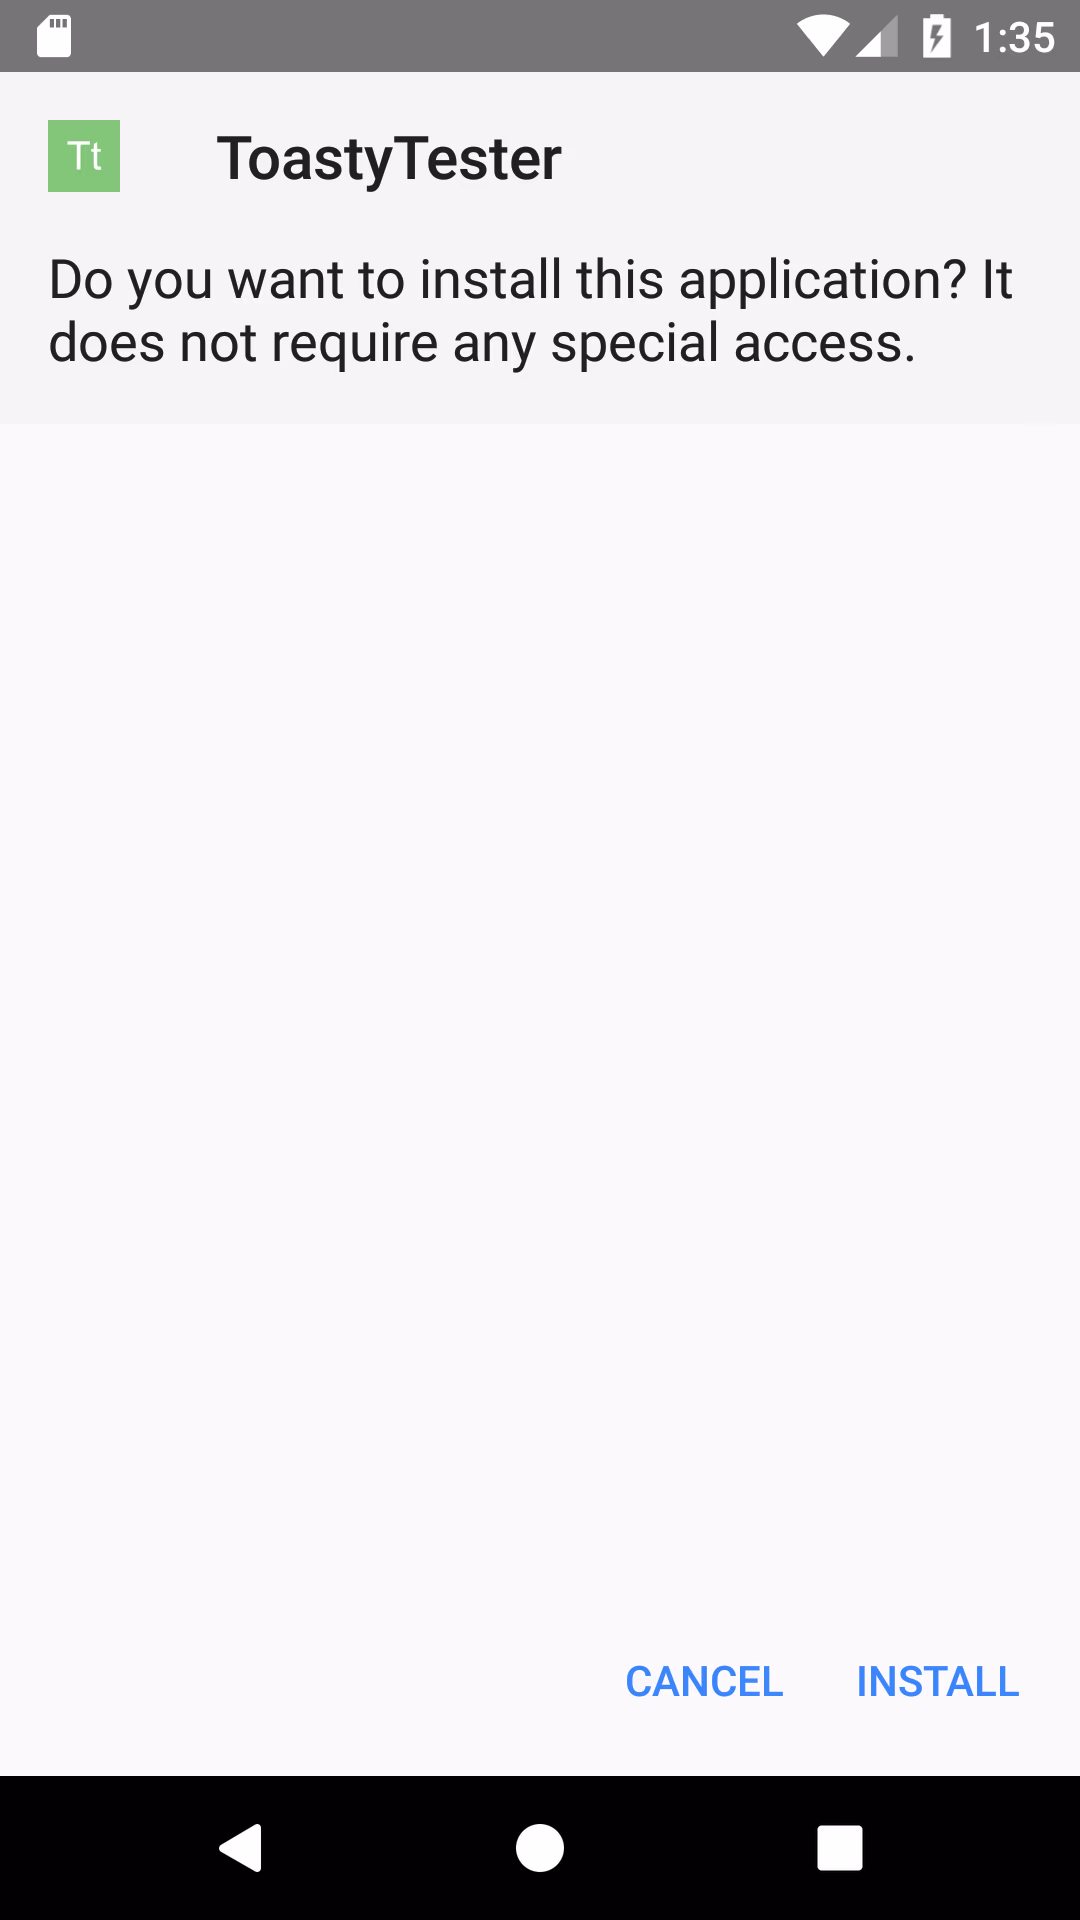 |
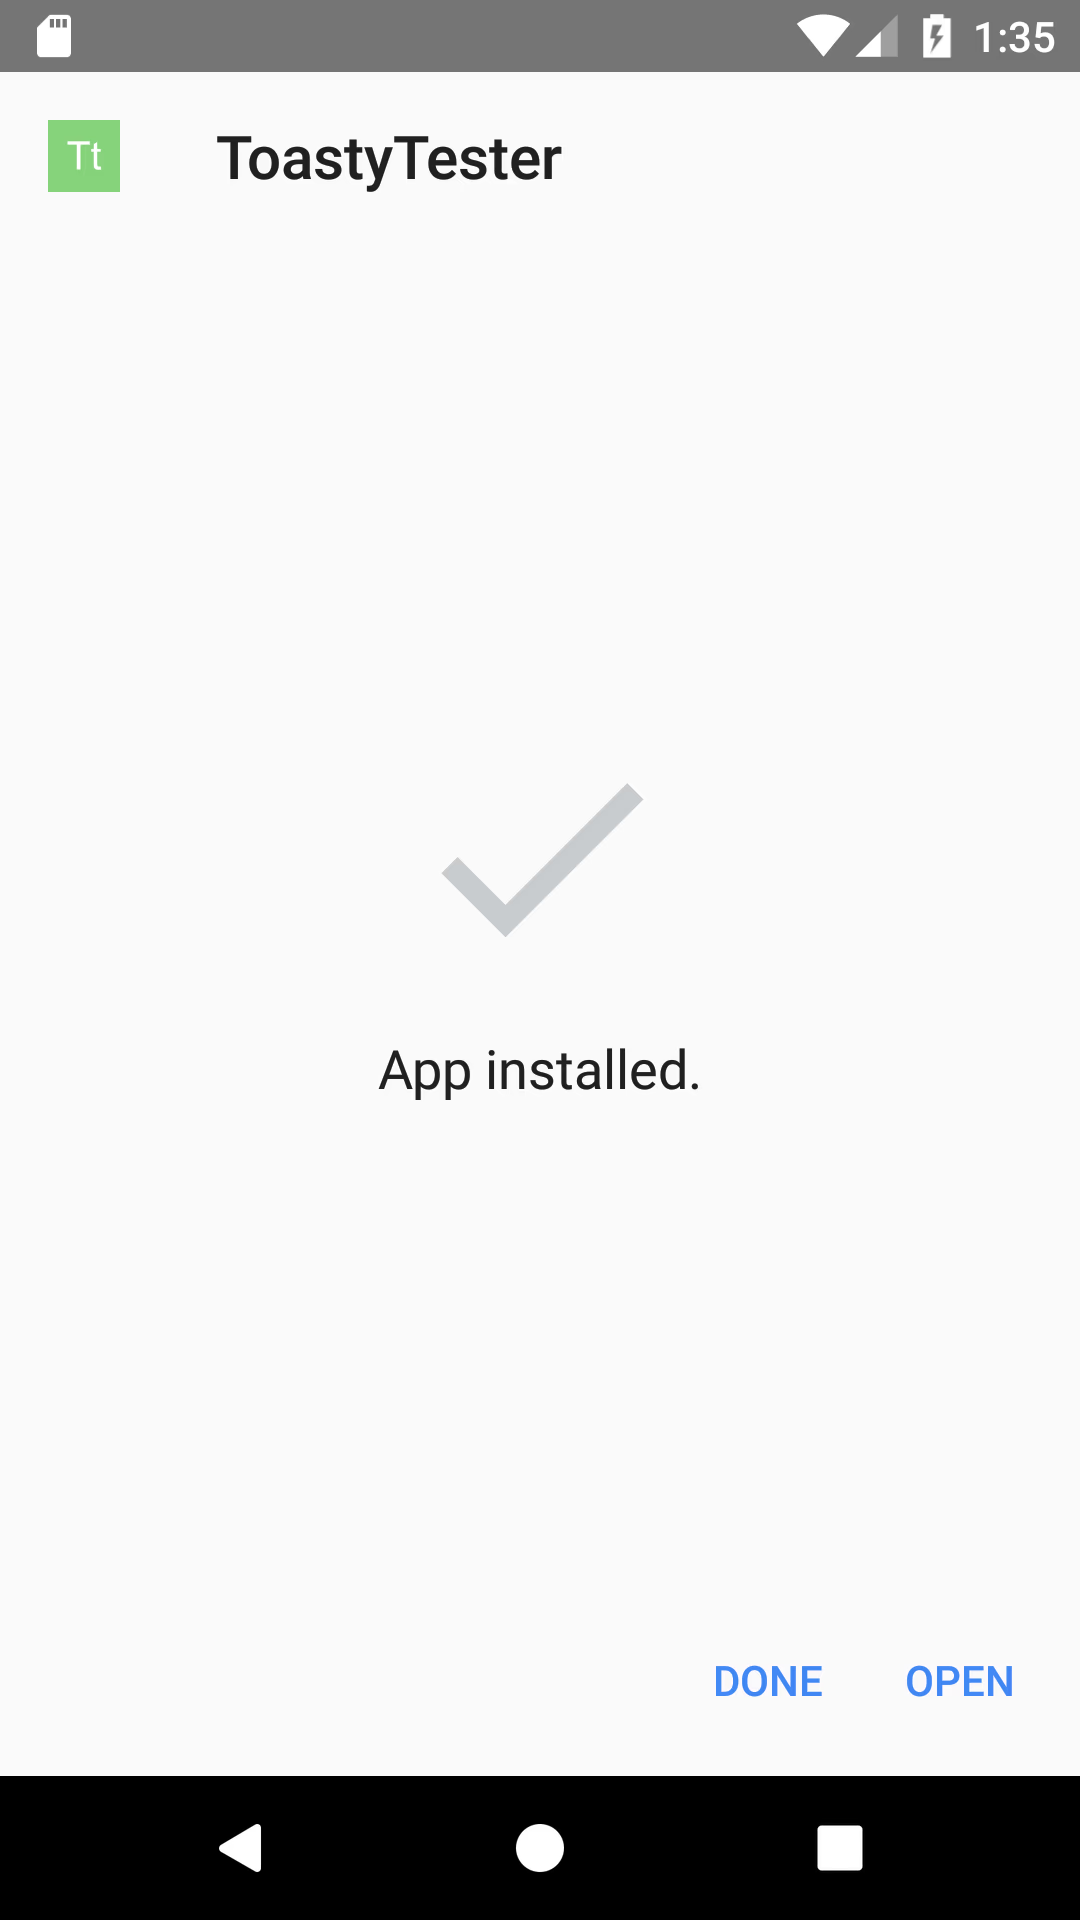 |
 |
Great success!
10. In Conclusion
Creating custom mobile functionality is not entirely straightforward, but once understood, becomes rather accessible to OutSystems developers. You can repeat this process for iOS plugins as well and even those that support multiple platforms. If you only want to gain access to an existing Cordova plugin that you can’t find in the Forge, skip to step 7. From step 7, you will build the interface that connects your OS project to the plugin’s unique requirements—and that’s all there is to it.
Thank you for following along with this tutorial and please feel free to leave feedback by dropping us a note on Twitter!
QR CODE is a registered trademark of Denso Wave Incorporated.