Build a Super Easy Chatbot with IBM Watson
Space travel is cool but what if we can chat with aliens? When we think of AI-driven bots, the mystery behind their interactive user-experience seems almost alien to us. Besides out of world experiences, chatbots are used across industries in logistics, financial services, customer service, and even disaster relief. In this blog post, I’ll show you how to build your own IBM Watson chatbot, and how to integrate it with your OutSystems reactive web build.
You will walk through how to structure intents, entities, dialog, and how to launch this feature in a web app. This app is crazy fun to build! With only a few drag and drops, copy and paste, you have yourself an awesome chatbot.
Here’s the end result:

I know that there’s no wifi in space yet, so creating an AI bot to speak with Aliens might just be the first step in our imaginations. Still, let’s have some fun.
How to Build an IBM Chatbot
First, you need to have an account at IBM. You can get it started here.
Then, follow the steps below.
Step 1. Get Services: Look for Watson Assistant in the Catalog

Select Watson Assistant and create a service, you in Dallas.
Step 2. Building the Algorithm
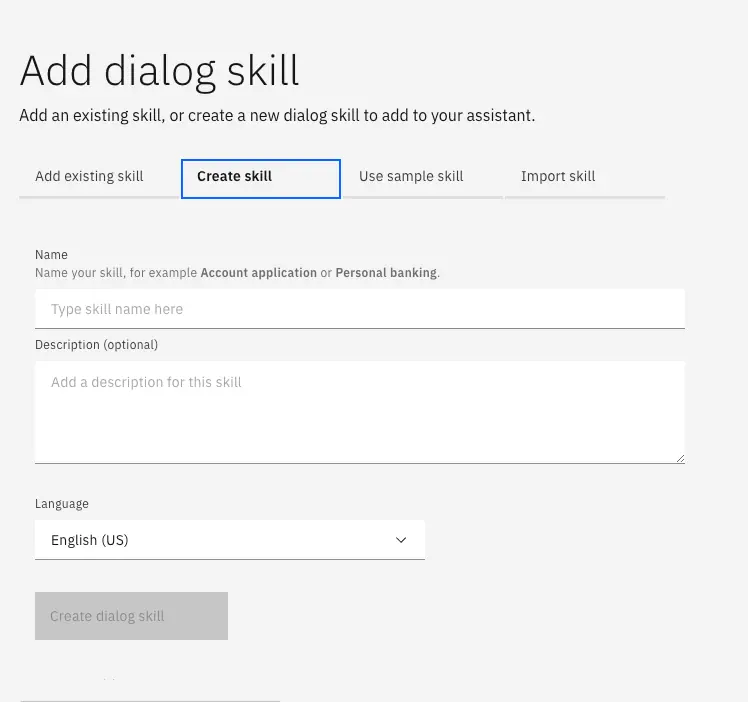
Create an Assistant named "Martian Comms", and then create a Dialog Skill:
We will create a conversation, so you need to map out on a piece of paper how you want the conversation to progress. For this Alien communication app, we can have a fun dialog such as:
> Alien Bot: Hello. I'm an alien from Mars. Are you a human on Earth?
> Human: INTENTS (Ex: #Confirmation)
> Alien Bot: Well then, how about I transport you to Mars to confirm my existence?
> Human: INTENTS (Ex: #Confirmation)
> Alien Bot: I will send my UFO to fetch you, what is your zip code?
> Human: ENTITIES (Ex: @zip_code:US Zip)
> Alien Bot: Location Confirmed. To identify you, what is your eye color?
> Human: INTENTS (Ex: #eye-color)
> Alien Bot: What a tragic color. Confirmed. I will greet you soon. Goodbye.
> END
Now that you've written out your script, let’s build the Intents, Entities and Dialog in your Watson dashboard.
Step 3. Building Intents

Click-on "Create an Intent" button and fill out an Intent Name starting with a hashtag. Then, you can start inputting responses that fit your likely responses. You can expand your word base by selecting "Show Recommendations".
The more you teach Watson your intents, language, and words, the more the system analyzes learned words for further recommendations.

Now, create an Intent for #eye_color and lists eye colors.
Step 4. Building Entities

Create your Zip code entities:

Use `(\b|\s)\d{5}(\b|\s)` to tell the Pattern type that it will be a 5 digit zip code for the US standard.
Step 5. Creating Dialog

Time to map out your dialog!
Give your Dialog Node a Title, and indicate what you want your assistant to recognize, how you want your assistant to respond, and what you want your assistant to do next.
Your Assistant could recognize #Confirmations or @zip_code.
Step 6. Connect the Chatbot Backend to a Web or Mobile App

Head over to Integrations to find your auto-generated Javascript code.
Embed the chat UI into any website pages where you want it.
Here is a sample code [Note that this code will expire after I discontinue IBM Cloud hosting]:
```
<script>
  window.watsonAssistantChatOptions = {
      integrationID: "e3cfdf78-9116-474f-8c58-6384f4064ba4", // The ID of this integration.
      region: "us-south", // The region your integration is hosted in.
      serviceInstanceID: "c2bd0850-d464-4b05-9eef-810be2df29b7", // The ID of your service instance.
      onLoad: function(instance) { instance.render(); }
    };
  setTimeout(function(){
    const t=document.createElement('script');
    t.src="https://web-chat.global.assistant.watson.appdomain.cloud/loadWatsonAssistantChat.js";
    document.head.appendChild(t);
  });
</script>
```
Build the Web App
With OutSystems you can build and launch your web app in a few clicks—and don’t worry; you can use OutSystems free edition to build this app.
Step 7. Create a Module
Once your OutSystems IDE is installed, click on "New Application" to build your app, and then click on "Add Module" and select Reactive Web from the dropdown.
Step 8. Create Front-End Screen

In your MainFlow, right-click to create a Screen, title it "Home" and check-off Role > Anonymous and Public set to Yes so that others, regardless of login or roles, can see your page.
Set your Events to OnReady, that will be triggered when you have most of the page resources ready (ie, data, UI elements).
Step 9. Insert JS Script

To Insert your Watson Chatbot Javascript, click on OnReady. Find your Javascript widget on the left-hand side and drag that component to your logic. Double-click to open the screen and copy and paste your JS script from your Watson dashboard.
OutSystems automatically compiles the script, so you can remove:
```
<script>
</script>
```
from the beginning and end of your code.
Always remember: Save and Publish.
Above, click on the green One-Click Publish button and then the blue arrow to see your chatbot integrated into your web app.
Step 10. Design
Double-click on your Home screen, and drag and drop a container onto the screen.

You can also drag an Image widget and upload images.
Save and publish once more, and now go play with your Alien chat app!
Use OutSystems Now!
Get your first app built in a few minutes.
It's free forever.
You can also watch the full tutorial in the video in Build an Easy Chatbot in 10 Minutes with IBM Watson and OutSystems.